From Niagara 4.6 version and operation system iSMA OS 4.9.88.983 (Platform Administration), the iSMA-B-MAC36NL controller has support for the built-in HDMI port, which allows connecting an external display by a standard HDMI cable (HDMI standard type A). The HDMI connection allows viewing the user’s station data directly on the display, without a need of connecting PC with a web browser. It is recommended to use the HMI panels from the iSMA CONTROLLI offer–other panels may not work or may operate incorrectly, and may have problems with resolution and touch. iSMA CONTROLLI does not take the responsibility for the proper operation of the iSMA-B-MAC36NL controller with other HMI panels.
Note: The iSMA-B-MAC36NL has a built-in USB port, which supports a display’s touchpad.

Connecting HDMI panel
Preparation for HMI
For convenient use, it is recommended to use a handheld profile for users, who support HMI views. The use of HMI views via HDMI is conditioned by the launch of the web browser on the Niagara 4 environment in the iSMA-B-MAC36NL controller. Using HDMI will cause a significant increase in CPU usage and its operation in a higher temperature range. HMI views via HDMI is dedicated to local application support in the iSMA-B-MAC36NL controller. The size and level of complexity of the PX pages is related to the responsiveness of local service. It is important to keep in mind that this is not a PC with a web browser but just the controller, and it cannot be expected that the navigation will comparable to the PC with many cores and a powerful RAM. The more complex the graphics, the longer it takes to go between the pages, and, therefore, in order to provide smooth navigation it is recommended to use 15-20 graphic widgets and 2-3 gif animations in lower resolution than the default (e.g., 1024x576px with ratio fit scaling for full screen). The default resolution of the pages is 1280x720px due to the resolution for the HDMI port.
Note: Web browser works only with HTTP, therefore, it is necessary to enable an HTTP support in Station/Config/Services/WebService; by default, the HTTP support is disabled.
Update to Support HDMI Port
Preparation for using the HMI panel:
-
Download the update from the iSMA CONTROLLI support site, which allows to support HMI views via HDMI port, and is necessary to install the required files and modules for the appropriate version of Niagara 4.6 and up.
Note: The Niagara version below 4.6 will not support the HDMI port.
-
Perform the update on the iSMA-B-MAC36NL controller using the Commissioning Wizard procedure to support HDMI port.
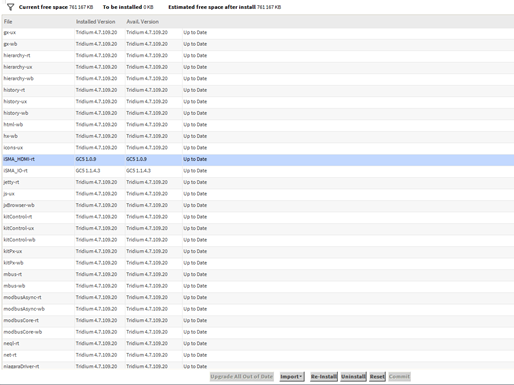
The iSMA_HDMI module is not installed by default on the iSMA-B-MAC36NL platform. It needs to be installed during the commissioning or by using the Software Manager tool under the platform component.
The iSMA_HDMI module has been created to service, configure and maintain the HDMI connection in the iSMA-B-MAC36NL.
iSMA HDMI update
-
After completing the update, go to the configuration of the HDMI support.
-
After completing the configuration, it is recommended to restart the station.
Module iSMA_HDMI
The iSMA_HDMI module has only one component, the iSMAHDMI service, which needs to be added under Station/Config/Services.
The iSMAHDMI component contains all settings, which are needed to successfully connect and configure the HDMI support.
iSMA module
The HMI panel connected to HDMI port can work in 3 independent modes:
-
Normal mode: the panel displays the station data and it is ready for interaction with the user;
-
Screensaver mode: the panel displays the image chosen by the user. Turning back from this mode to the Normal mode is executed right after the user’s activity (touch). The last open site is displayed.
-
Standby mode: the panel is in an energy-saving mode, the backlight is switched off. Turning back from this mode to the Normal mode is executed after the user’s activity (touch) and takes around 10 seconds. The last open site is displayed.
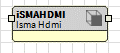
The iSMAHDMI component consists of the following slots:
iSMA HDMI Property sheet
-
Status: status of HDMI Service, available states:
-
OK: the service is working properly;
-
Fault: a fault has occurred.
-
-
Fault Cause: shows a fault cause description:
-
None: no fault;
-
Could not connect to HDMI server. Connection refused: the service cannot connect with HDMI–the iSMA-B-MAC36NL software is not up to date or there is a problem with a hardware;
-
Service is duplicated: the HDMI Service is added twice.
-
The slots assigned with the Screensaver mode:
-
Screensaver Enabled: this slot switches on or switches off the Screensaver mode (true–mode enabled, false–mode disabled). By default, the Screensaver mode is active;
-
Screensaver Time: this slot contains the time value in hh:mm:ss format. This time starts counting down, when there is no user activity on the display (no touch). If the time elapses, the display goes to the Screensaver mode. The default value is 2 minutes.
-
Screensaver Path: the slot contains the path to the custom image, which is displayed on the screen in the Screensaver Mode. The default image for the screensaver is shown below.

Screensaver
-
Standby Enabled: this slot switches on or switches off the Standby mode (true–mode enabled, false–mode disabled). By default, the Standby mode is active.
-
Standby Time: this slot contains the time value in hh:mm:ss format. This time starts counting down, when there is no user activity on the display (no touch). If the time elapses, the display goes to the Standby mode. The default value is 5 minutes.
Auto Login Function
Due to the user's requirement to login after a power outage, and to ensure a better ease of use of the HMI panel, the Auto Login function was created. Thanks to this function, after each power failure, the browser automatically logs in the user and launches the start page according to the navigation file assigned to the user.
To start the auto login function:
-
Enter the name of the existing user with Config\Services\UserServices in the Auto Login Credentials\Username slot, which will be used for Auto Login function.
-
Enter the password entered the user in the Auto Login Credentials\Password
-
Activate the Auto Login function in the Auto Login slot (switch to true).
Now the Auto Login function allows to view the station’s home page without a need of entering the user’s credentials every time after power failure.
Slots assigned to the Auto Login function
-
Auto Login: this slot enables or disables the Auto Login function (true –function enabled, false–function disabled). By default, the Auto Login is disabled. After configuring the user to log in automatically and enabling the Auto Login function, the user's default Auto Logoff Enabled function will be automatically inactivated (switched to false) in Config\Services\UserServices. The Auto Logoff Enabled function does not automatically return after disabling the Auto Login function in the iSMA HDMI Service for a given user.
-
Auto Login Credentials: username and password for the station user. If the Auto Login is enabled, the user with the credentials stored in this slot will be logged in to the station.
-
Auto Login Time: this slot contains the time value in hh:mm:ss format. This time allows to decide to log in another user than the one that has been configured for the Auto Login function. This time starts counting down when the login site appears and there is no user activity on the display (no touch). During the countdown, there is an option to log in as another user by clicking on the Change User link. Entering any character in the login field cancels the Auto Login function. If there is no reaction from the user after the elapsed time, the user from the Auto Login Credentials slot will be automatically logged in to the station. After logging out of another user, to return to the Auto Login function, simply click on the Change User link, and autostart working again. The default value is up to 15 seconds.
Note: After the power failure, the Auto Login function takes place immediately without counting down the time. After logging out of the HMI views, the user can be changed during the time count down.
Slots assigned to the resolution of the connected HMI panel
-
Resolution: shows the used resolution of the HMI panel in order to properly prepare the resolution of PX files.
Adding and Start-up of the HDMI Service
In order to run the HDMI support the following steps must be followed:
-
Install the latest iSMA_HDMI-rt module with platform Software Manager.
-
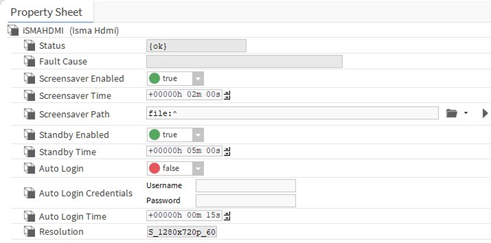
The HDMI Service uses the HTTP 80 port internally to run web server. To enable it, open Config\Services\WebService, and set the Https Only slot to false and the Http Enabled slot to true, as in the figure below.
Proper WebService configuration for HDMI support
-
Find and open the iSMA_HDMI
-
Drag and drop the iSMAHDMI component to Config\Services of the station.
-
Save the station.
-
Disconnect the power supply from the iSMA-B-MAC36NL controller.
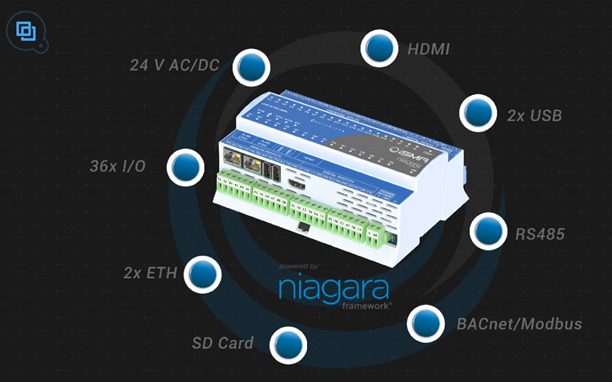
-
Connect the iSMA-B-MAC36NL controller with the panel HMI as in the above diagram.
-
Connect the power supply to the iSMA-B-MAC36NL controller and the HMI panel, which will make the panel detectable by the controller.
Note: Connecting the panel to the HDMI port, while the power supply is connected, makes it not detectable by the controller.
-
During the start-up of the controller (platform/station), and provided the HDMI service is not configured in the running station, the following image will be visible:
No HDMI service
-
After starting the station with the configured HDMI service, the Login window will appear, as shown below:
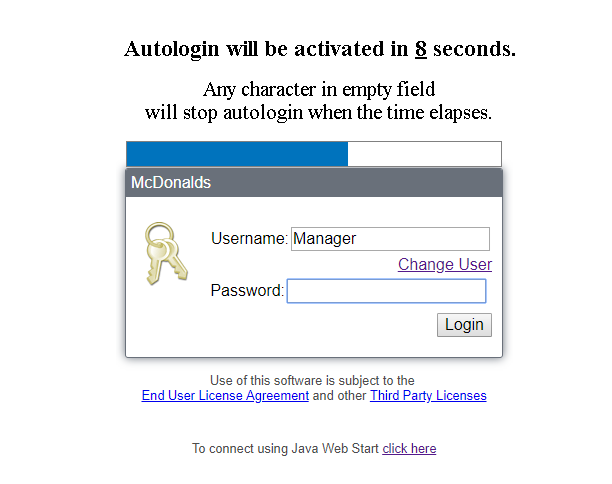
Login view
In case of the configuration of the Auto Login function, the user login fields will be completed automatically, along with the activation of the login button, and the start page of the HMI views will be opened (the following sample view).
Start page
In case of unexpected problems with establishing a connection or suspension of the view page, or, for example, the need to quickly return to the start page, there is a special service menu available. To access it, swipe from the top of the screen and the following service menu view becomes accessible on the top of the screen.

Menu
Function buttons fulfil a similar role as in the web browser:
-
BACK (left arrow): return to the previously opened page.
-
FORWARD (right arrow): move to the next page in the case of a BACK action.
-
REFRESH (circle with an arrow): refresh the current page (reload).
-
HOME (house): opens the start page defined in the navigation file (does not open the login page).
User Fonts Support
The iSMA-B-MAC36NL controller has a built-in database of most popular fonts, used to efficiently depict visualizations on the HDMI panels. The database includes the free substitutes of most common fonts, according to the list below (the bracketed names are the names of free substitutes):
-
Arial [Liberation Sans];
-
Courier New [Liberation Mono];
-
Tahoma [Wine Tahoma];
-
Times New Roman [Liberation Serif];
-
PT Sans [implemented directly];
-
Source Sans Pro [implemented directly];
-
Inconsolata [implemented directly];
-
Hunkyfonts Sans [implemented directly];
-
Ubuntu-font-family [implemented directly];
-
Niagara default font [Adobe Source Sans Pro].
Note: In case of HDMI panels, if the user adds text to graphics (i.e., PX file) using an unsupported font, the outcome will be depicted using the Déjà vu font, which may cause moving the whole text to the right.
The user has an option to add additional fonts, which requires uploading a font file to the controller.
In order to upload a font to the controller, log in to the platform and go to the “File Transfer Client”; on the left side of the view choose a file location on the PC, and on the right side of the view go to \UserHome\daemon\fonts location on the controller:
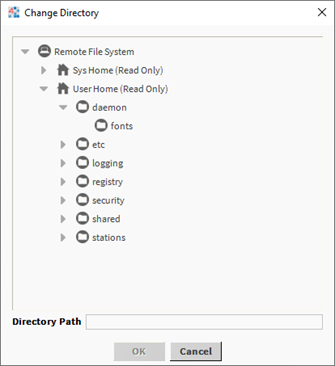
Fonts adding view
On the left side choose fonts to be uploaded, and transfer them to the controller using the right arrow.
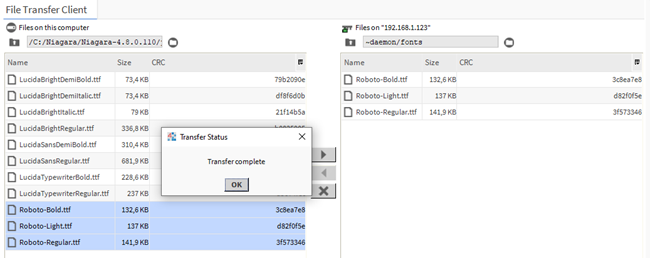
Transferring fonts
Upon a successful transfer, a „Transfer complete” window pops up.
Once all the user fonts are successfully transferred, go to the Application Director and reboot the controller (restart of the station is not enough).
After the controller is rebooted and the station loaded, the HDMI panel will properly depict text with user-uploaded fonts.