In certain circumstances, it is necessary to create a connection between devices using different versions of the Niagara Workbench, for example, a few years old controller using the Niagara AX and the Supervisor using the Niagara N4. This article outlines step by step how to build such a connection.
1. Required elements:
a) Niagara AX 3.8;
b) Niagara N4 4.4 or higher;
c) the same user on both ends.
2. Creating a user:
The user in Niagara AX and Niagara N4 has to be IDENTICAL. To create one, open the “Config/Services/UserService/User Manager” path in both environments. Add new user and set identical parameters, as depicted below:
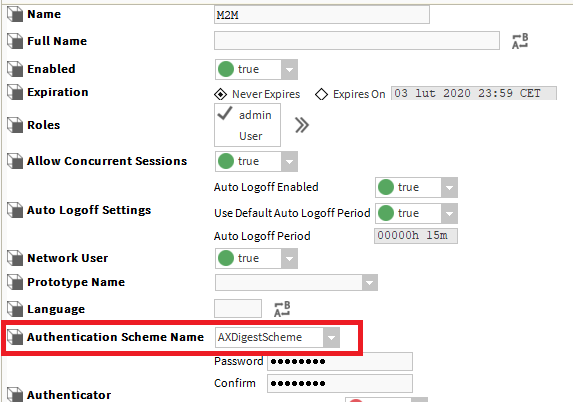
Figure 1. User parameters in the Niagara N4
WARNING: In the Niagara N4 it is required to set the “Authentication Scheme Name” user parameter to “AX Digest Scheme”. Any different value for this parameter disables the communication.
3. In the Niagara N4, go to “Platform/Platform Administration/Change TLS Settings” and set the parameters as below:
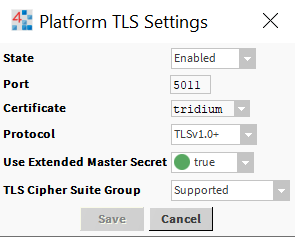
Figure 2. TLS configuration
In the Niagara AX, first four options have to be configured identically.
4. In both Niagara versions, the ‘FoxService’ has to be configured identically.
In the Niagara AX, the ‘FoxService’ is available in “Station/Config/Drivers/NiagaraNetwork/PropertySheet”.
In the Niagara N4, the ‘FoxService’ is available in “Station/Config/Services/FoxService”.

Figure 3. “Fox Service” configuration
5. In “Station/Config/Drivers/NiagaraNetwork”, add the station to communicate with using a ‘Discover’ function or manually (if the ‘Discover’ option does not work). In the station, provide the following parameters:
a) second station’s IP address;
b) “Fox” port (1911 for “Fox”, 4911 for “Foxs”), if using the “Foxs”, mark the “Use Foxs” option;
c) user data (identical for both ends);
d) the rest of parameters as follows:
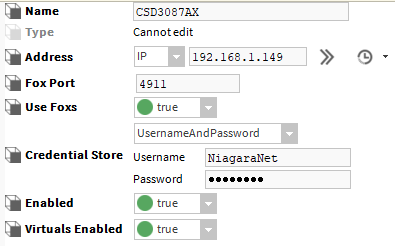
Figure 4. NiagaraNetwork configuration
6. After a first attempt to connect, a SSL certificates error occurs:
Figure 5. SSL certificates error
Then, go to “Platform/Certificate Management/Allowed Hosts” and approve the SSL certificate. Do that on both sides of the connection.
7. If the above steps have been done properly, the communication should work correctly:
Figure 6. Properly configured connection