The following article describes how, in a controller (e.g., iSMA-B-MAC36NL) based on Niagara, to configure the WeatherService using the free Internet weather service which is the OpenWeatherMap available at https://openweathermap.org/..
To use the services of this Internet service, it is necessary to register an account on their website. With a free account, it is possible to make up to sixty weather queries per 1 minute (this will allow to set up several hundred weather stations in Niagara - Niagara does not allow more frequent weather updates than once every 15 minutes, and the default is once an hour). All applicable terms of the free (as well as paid versions) account can be found at this link https://openweathermap.org/price.
To use the service, a jar module is also required, for Niagara, by Neopsis, whose source code is available at https://github.com/ (to download any files also requires an account on this Internet platform) at https://github.com/neopsis/niagara-weather/blob/master/envasWeather.iml,, where the latest source code can also be downloaded and then compiled in any version of Niagara using the WorkPlace program console.
Attached below is a zipped (zip) jar file compiled in Niagara - version 4.7.109.20.
1.Downloading API key from openweathermap.org
In order to obtain the current and forecasted weather for a specific locality, visit the https://openweathermap.org website, go to the Weather tab, and then enter the name of the city (in English) in the search field. After clicking the Search button, the website will list all the suggestions it found for the search criteria. From this list, select the city in question.
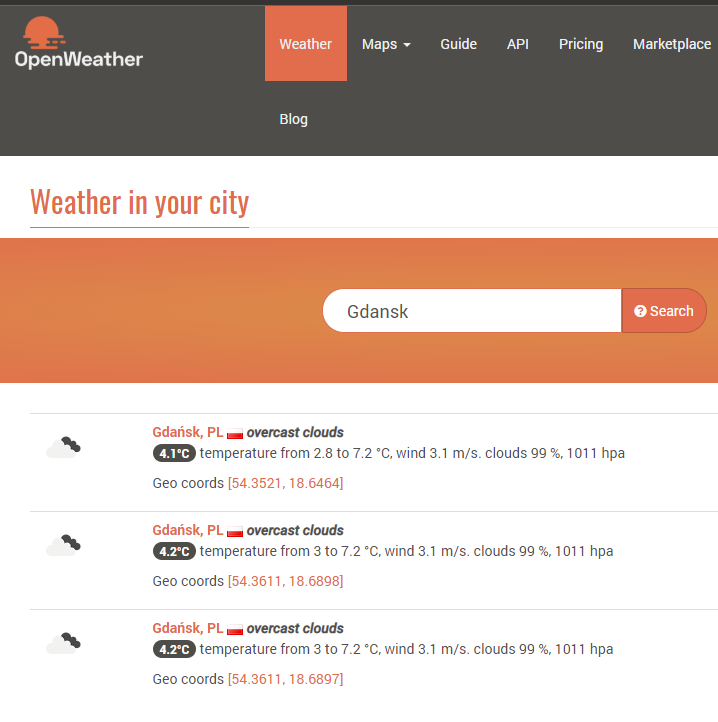
Fig. 1 List of search results for the city of Gdansk on OpenWeatherMap
In a particular weather station, it is possible to check a current and forecast weather for the selected location. On the left, next to ‘Weather in’, copy the name of the location and paste it in the provider configuration in the Niagara station. In the discussed example, it is Gdańsk, PL.
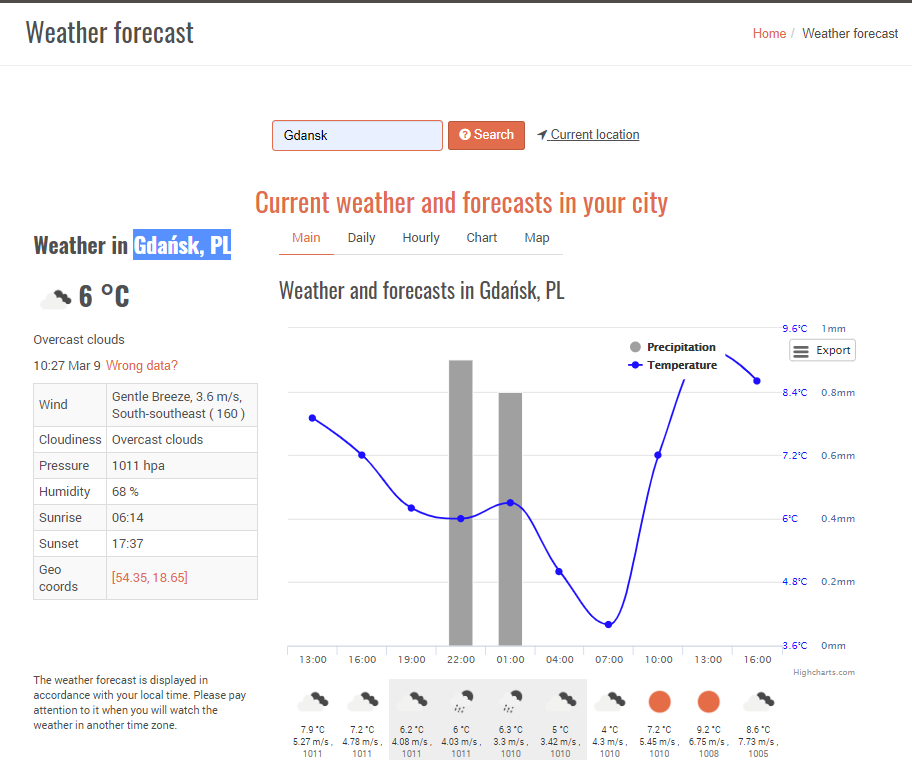
Fig. 2 View after going to the selected weather station - copying the value of the location in accordance with the OpenWeatherMap standard
The next step is to log in to a user account in OpenWeatherMap. Having logged in, there appears an additional top menu (on a white background) on the main page, with the API keys option. There, in the Generate field, enter the copied location name, and then click the Generate button. This will create a unique API key, which will be signed for the logged-in account - when used, queries will be charged to the limit of this account. The added API key should be copied, because it will be needed for the configuration of the provider in the Niagara station.
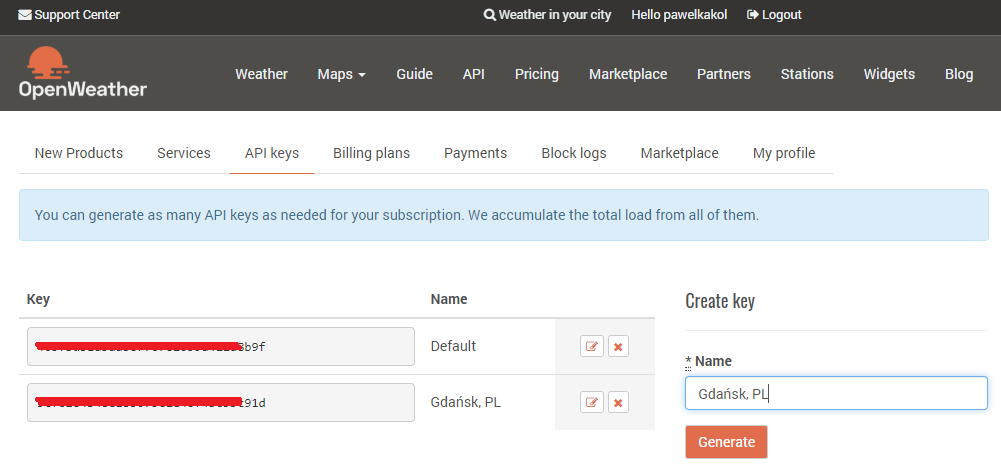
Fig. 3 Generation of a unique API key signed to a specific location and account on the Internet service OpenWeatherMap
2. Installing modules in a Niagara-based controller and testing the Internet connection
In order to run the WeatherService using the Internet platform https://openweathermap.org, it is required to install the modules envasWeather-rt.jar, weather-rt.jar, weather-wb.jar. These should be installed from the platform using SoftwareManager.
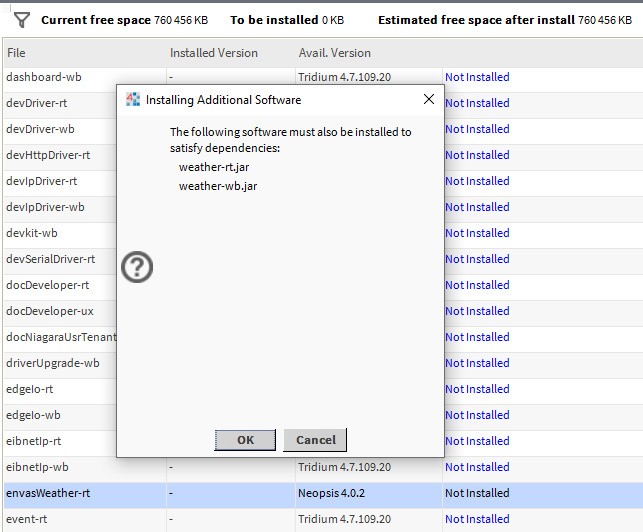
Fig. 4 Installation of jar modules necessary to use the Internet weather service OpenWeatherMap.
If you do not need to Reboot the driver after installing a module, it is nevertheless recommended to reboot the driver due to the installation of runtime modules. This can be done from the platform level in Platform Administrator or Application Director.
Due to the fact that the WeatherService service uses a service available on the Internet, it is necessary to make sure that the driver has access to the global network. For this purpose, create a simple PX view in the station for connection test. In the view editing mode (Px Editor), open the workbench palette and add (using a drag&drop method) the WebBrowser widget to the workspace, and then, in the ord slot, enter the URL path to any Internet site, such as https://ismacontrolli.com/. After entering this value, save the changes and then refresh the view or exit edit mode. It can take up to approx. 30 seconds. Below you can see the correct result of the connection test:
NOTE: Since Niagara 4.9, in order to connect to any host, it is required to enter it into the whitelist of the Workbench program. To do this, open the system.properties file from the /SysHome/defaults/ location. Then, remove the comment from the line 339 and enter a custom host at the end (after the comma).

Fig. 5 Configuration of the URL path in the ord slot of the WebBrowser widget and the web content displayed by it
If, after about 60 seconds, there is no content in the view, it most probably means that there is no Internet connection. Therefore, it is recommended to make sure that the controller is plugged into the appropriate network. In addition, it is advised to enter the appropriate (for the connected network) values of the IP(v4/v6) Gateway and DNS Domain slots in the platform in TCP/IP Configuration, and after saving the new addresses, reboot the controller. After the station reboots, it is necessary to check the Internet connection again using the test view.
3. Configuring a station in Niagara to run WeatherService
After completing the steps described in points 1 and 2, proceed to add the WeatherService service to the controller station. To do this, go to the weather palette and add the WeatherService component under Services. Then, after going to the Weather Manager view inside WeatherService, click the New button. In the pop-up window, select Nv Owm Provider from the drop-down list as below:

Fig. 6 Adding a new Provider in the WeatherService.
Then, in the second pop-up window (with editing component slots), nothing should be changed except the name (the Api key and Location slots must remain empty), as below:
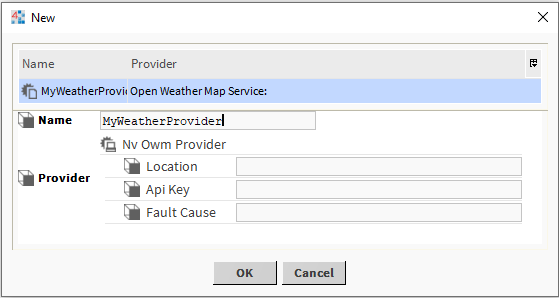
Fig. 7 Configuration of the slots in the Provider, newly added to the WeatherService
NOTE: Completing the Api Key and Location slots in the second pop-up window does not mean the values are immediately accepted, and, in special cases, may cause the component to fail, which will require its removing and adding again.
After accepting the settings with the OK button, a new Provider will be created with a fault status (the component will be highlighted in orange). At this point, open it in the AX Property Sheet view, expand Provider and enter Location and Api Key obtained from https://openweathermap.org.
After saving the entered parameters, right-click on the Weather Report (named MyWeatherProvider in the example) and invoke the Update Weather Report action as below:
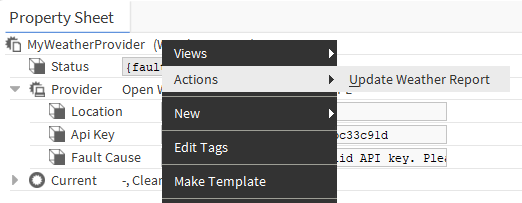
Fig. 8 Calling the Update Weather Report action when the Provider is configured correctly
Performing this action will update the Current component and add more (Today, Tommorow, etc.).
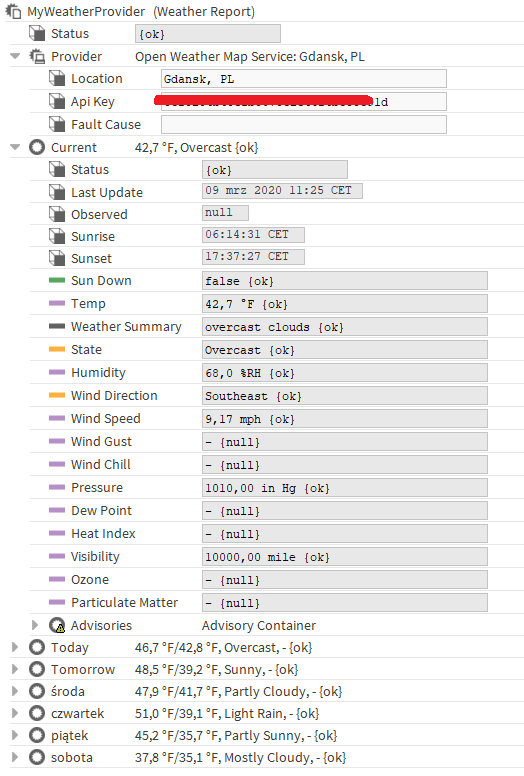
Fig. 9 The weather forecast result obtained after updating the data based on the correct configuration
From now on, the weather will be automatically updated every period entered in the Update Period slot of the WeatherService.
Note that the temperature will always be given using degrees Fahrenheit. There are two ways to change the unit to degrees Celsius, but each way has a drawback:
-
Using the context menu Tools->Options->General->UnitConversion, it is possible to force metric units the temperature value will automatically convert to st. C, but this will only work when viewing components/graphics in the WorkPlace program for which this was changed. If someone starts the station from a web browser or another (e.g., on another PC) WorkPlace program, the values will be displayed in Fahrenheit degrees.
-
The values can be converted to Celsius degrees using mathematical components - it is necessary to create logic for each converted value. The logic can be as in the following example:

Fig 10. Sample logic created based on the components of the kitControl module to convert Fahrenheit units to Celsius
NOTE: The WeatherService automatically updates component names; if today the last day of the forecast is Saturday, then tomorrow the same component will be renamed Sunday (the component ID will not change). While this does not matter when linking logic, binding values to graphical widgets can cause surprise the next day. Therefore, if there is a need to display forecast values (for the day after tomorrow or later) on the PX view, it is recommended to use BQL queries or to pass (sublink) these values through additional components such as NumericWritable. Custom components will never change the name and binding will always refer to the same (unchangeable) path ord. The component named Saturday will not be there from Friday to Sunday - it will only appear back on Monday.
4. Compiling the envasWeather-rt source code using Workplace
In order to compile a new version of the module or compile it under a different version of Niagara, it is necessary to download the source files from the following location https://github.com/neopsis/niagara-weather/blob/master/envasWeather.iml, via the ‘Clone or download’ and then ‘Download ZIP’ buttons as below (being logged in is required to download the files from GitHub):
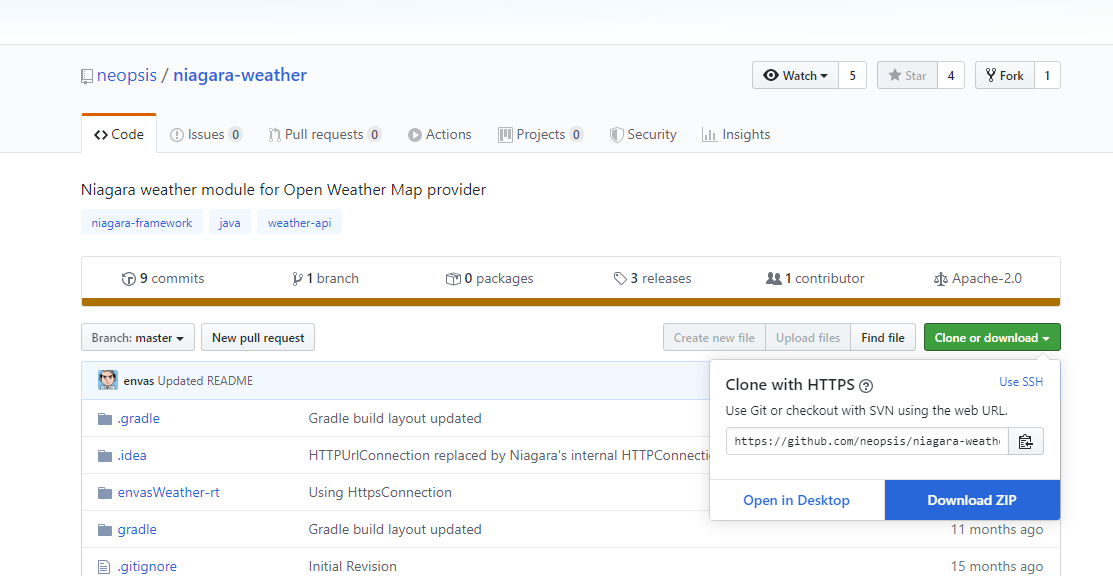
Fig. 11 Downloading source files to the envasWeather-rt.jar module from GitHub
The downloaded and extracted package is best saved in the /UserHome/niagara-weather-master folder. Then, after starting the WorkPlace program (in the appropriate version) in the lower console (if it is hidden, it can be displayed with the F3 shortcut), and perform the compilation. To do this, go (using the cd commands) to the location (inside the downloaded source code) where there is a file named gradlew and type the command gradlew build - at this point Workbench will compile to a jar file, as below:
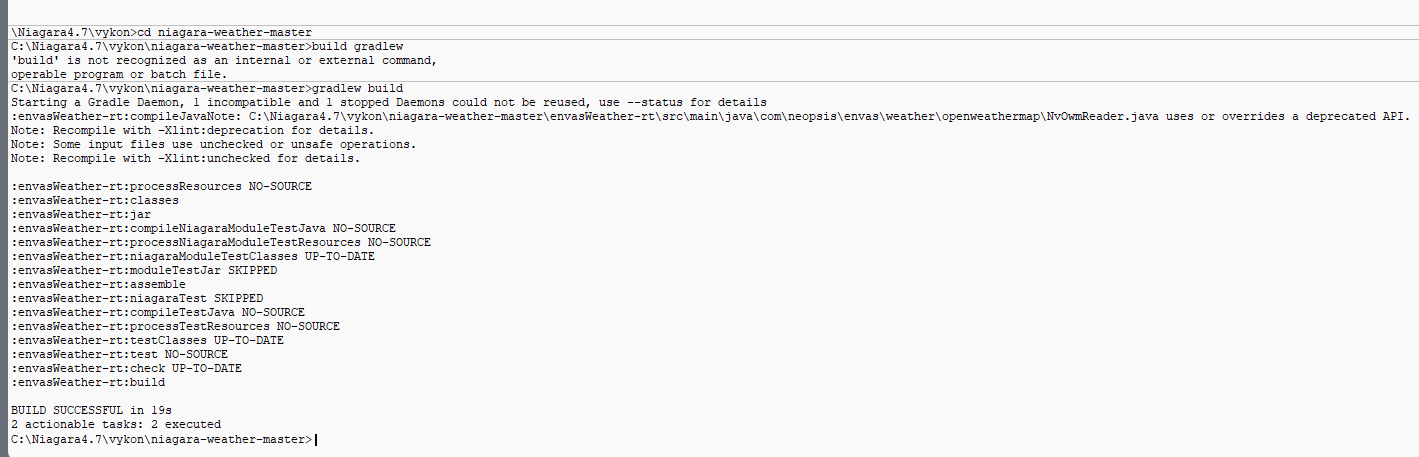
Fig. 12 Going in the console to the location of the module's source code using the cd commands and executing the compile command
After successful compilation, the jar file will be found in the /UserHome/niagara-weather-master/lib folder - it should be moved to the /SysHome/modules folder, and then restart the WorkPlace program, in order to load the new list of jar modules.