This article outlines how to set up a Mosquitto MQTT broker on a computer, as well as how to connect a Niagara station to this broker and exchange data over MQTT.
Before proceeding, it is recommended to install the MQTT Explorer program, which is a simple interface that helps to view (subscribe to) all public data on the MQTT broker, and is also able to publish data of its own. Note that Mosquitto does not have its own interface, so the MQTT Explorer is a useful tool.
http://mqtt-explorer.com/
1. What is MQTT
MQTT is a protocol based on a centralized structure, where the broker collects data from the devices of publishers (transmitting some specified values) and distributes the data to the devices of subscribers (data recipients). This principle of operation results in the fact that a change in value on any publisher is almost immediately known to all subscribers, making it possible, for example, to control lighting efficiently. Data is transmitted as strings, most often in JSON format. Cataloged data are not cataloged by device, but by topics. Although topics can be defined to specify the source I/O device, it is more optimal to create topics, e.g., according to the names/numbers of buildings, floors and rooms followed by the signal name, as in the example below:

2. Mosquitto MQTT
2.1. Installation
First of all, download the latest version of the Mosquitto broker from the official site. The link below provides access to the installer for Windows, commands for Linux systems to download the repository, and a link to the source codes on Git Hub to download and compile a non-release version.
https://mosquitto.org/download/
While starting an installation process on Windows, there might occur a notification of an unknown provider, however, if the installation file was downloaded from the above link, the notification can be safely confirmed.
In the installation process, it is important to make sure that the installation as a service option has been checked.
2.2. Commencing
In order to start the Mosquitto MQTT broker, open a command line as an administrator and enter the following command:
net start mosquitto
To stop the Mosquitto MQTT broker, open the command line as an administrator and enter the following command:
net stop mosquitto
NOTE: If the Mosquitto MQTT broker is to be available to, for example, controllers or systems logging in from outside a localhost, a 1883 TCP port has to be added to the firewall as an exception (in case of an 8883 encrypted communication).
2.3. Basic configuration
First, it needs to be pointed out that each change in configuration of the Mosquitto MQTT broker has to be saved and confirmed by stopping the service and restarting it.
The file that allows for configuration changes of the Mosquitto MQTT broker is mosquitto.conf located in the broker’s installation folder. All lines starting with a # (hashtag) contain comments. The file consists of a lot of text content preceding words characteristic for certain settings. By default, most characteristic words are commented. Enabling such option is carried out by removing a # marking and following the text instructions.
Online documentation with detailed descriptions of configuration is available at:
https://mosquitto.org/man/mosquitto-conf-5.html
This section describes a few basic configuration features.
2.3.1. Setting a list of users and passwords
For this purpose, create any file without an extension (this way of saving files is possible in Notepad++) and fill it in with users and passwords in separate lines as in the following example:
mqtt:StrongPassword123
niagara:StrongPassword234
explorer:StrongPassword345
Please note that no spaces should be included.
Having saved the file in any location under any name, open the command line as an administrator, go to the location, where the Mosquitto MQTT broker has been installed, and execute the following command:
mosquitto_passwd -U passwords
- where ‘passwords’ is a name of the previously saved file. If the file with passwords is located in a different location than the broker installation folder, precede the name of the file with its exact location. After executing the command, passwords are coded, and the above passwords example would look like:
mqtt:$7$101$K0z4S2mfw4tkTTCv$62k6Nv3Wl4mTHLcCpOPYy8/3apepSeBVZALxdFC9elfbKwrqd1mXJl+oc//B5LMMgjQg5q+IlQBDC/6ebzEnug==
niagara:$7$101$KQSdC5y3ux4q6Vmt$P2ky4yUBkbbiVXC+z701UAOcuOetgAJYMJab9RbVUZmRZkGPDR/Lra9pJG4e7a/DeO6BB60ibsnpQg3qqwMdug==
explorer:$7$101$3qlfFYxZROAhttpf$ppzi4KwDmVDDaUn/XD1zTFpEk/0R25rvsFRr95E/Dt9PizPBgn4nq5FVLuxlJXnpP3SqTVJfUqTEEugHu3bVdA==
NOTE: If the file already contains coded passwords, it is not possible to add new users at the end of the file and re-execute the command, because the program would read the coded passwords as raw text and re-code them, in fact changing them once again. Therefore, to add new users in such situation, it is required to add a temporary file to execute the coding command on, paste new coded password to the original file, and delete the temporary file.
In the next step, go to the configuration file, and enter the following line:
password_file D:\Tools\Mosquitto MQTT broker\passwd
- where the second section is an exact location of the file with coded passwords.
It is also possible to find the ‘password_file’ line in the configuration file, remove the comment, and enter a path to the file.
Additionally, to block anonymous logging, enter the following line:
allow_anonymous false
2.3.2. Activating listening ports
As a standard, the Mosquitto MQTT broker is set to listen on an unencrypted default port 1883, which is defined in the configuration file in the following line:
listener 1883
To set a different listening port, change the port’s number in this line. To add another listening port, simply add another line with another port’s number.
Please remember to create an exception in the firewall for a specific TCP port if other devices are to connect to the broker.
3. MQTT configuration in Niagara
Having set up the Mosquitto MQTT broker, proceed to the configuration of the Supervisor or Niagara controller (MAC36NL/JACE8000).
-
For controllers, first, log in to the platform and install the abstractMqttDriver in the SoftwareManager.
-
Once logged in to the station, add the AbstractMqttDriverNetwork component from the abstractMqttDriver palette to /Config/Drivers.
-
Then, under the MQTT driver, add the DefaultMqttDevice component from the Devices folder in the abstractMqttDriver palette.
-
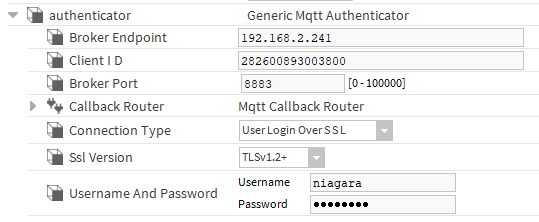
Open the added device in the AX Property Sheet view and expand the authenticator subcomponent:
-
in the Broker Endpoint slot, enter the IP address of the device hosting the Mosquitto MQTT broker (if the Supervisor is to connect with a broker hosted on the same device, enter ‘localhost’);
-
in the Connection Type slot, select one of the three available connections:
-
Anonymous - anonymous unencrypted;
-
Anonymous Over SSL - anonymous encrypted;
-
User Login Over SSL - encrypted with user authentication.
-
-
-
Make sure that the BrokerPort and SSL Version slots are configured in compliance with the broker.
-
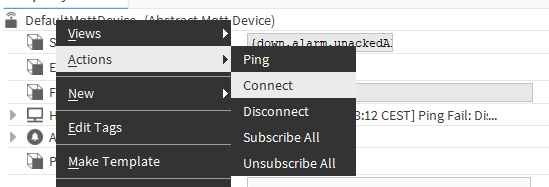
Finally, having saved the configuration, right-click the device and select the Connect action.
-
A correct connection is signalized with the component’s status and

4. Sample configurations
To install the following encrypted samples, it is required to install openssl in the operating system; it is available to download at:
https://kb.firedaemon.com/support/solutions/articles/4000121705
http://wiki.overbyte.eu/wiki/index.php/ICS_Download
Executing openssl commands is carried out in the command line opened as an administrator.
4.1. Anonymous unencrypted connection
No specific configuration required.
4.1.1. Mosquitto MQTT configuration
Configuration involves switching off the service and saving below values to the mosquitto.conf file as its full contents:
listener 1883
allow_anonymous true
After saving, restart the Mosquitto service.
4.1.2. Niagara configuration
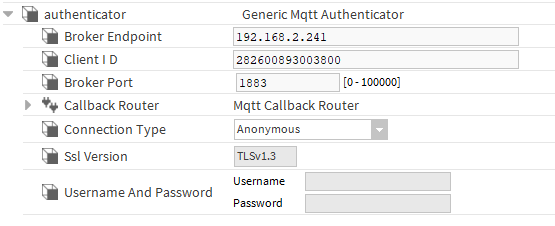
In the DefaultMqttDevice component, set a proper IP address, port, and select Anonymous in the Connection Type slot.
4.2. Anonymous encrypted connection
For the encrypted connection, besides basic configuration, the broker and connecting devices require the following settings:
-
TLS encrypted connection;
-
encrypted port;
-
server’s certificate public and private keys.
4.2.1. Mosquitto MQTT configuration
Firstly, configure a server’s certificate in one of two ways: using the Certificate Management in the Niagara Workbench or using openssl.
Further configuration steps involve switching off the service and saving the following commands to the mosquitto.conf file as its full contents:
listener 8883
allow_anonymous true
certfile D:\Tools\Mosquitto MQTT broker\certs\mqttmosqbroker.crt
keyfile D:\Tools\Mosquitto MQTT broker\certs\mqttmosqbroker.key
- where certificates can be located in any folder, however, it is recommended to keep certificates in the Mosquitto MQTT installation folder. In the following sections, two methods of acquiring necessary certificates, mqttmosqbroker.crt and mqttmosqbroker.key. Having received the certificates and saved the configuration file, restart the Mosquitto service.
4.2.1.1. Creating a certificate in the Niagara Workbench
In Workbench, go to Tools->CertificateManagement, and click New. A popup window appears to fill in certificate’s data.
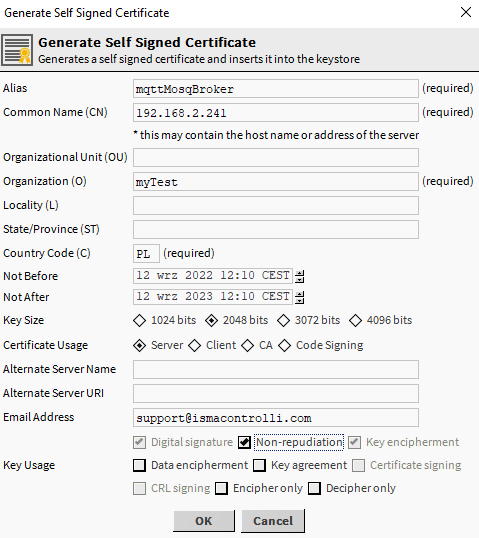
After confirming the data, a new certificate should appear in the User Key Store list within 10-15 seconds. Click the certificate, click Export, and save it on the local drive, bearing in mind that a separate file should be saved only for a public key and a separate only for a private key.
NOTE: Niagara requires for a private key to be coded, however, while exporting the key for Mosquitto MQTT or MQTT Explorer check off the Encrypt exported private key option, because these programs do not read coded private keys.
4.2.1.2. Creating a certificate with the openssl
First, define a private key:
openssl genrsa -out mqttmosqbroker.key 2048
Then, generate a certificate signing request (CSR):
openssl req -new -key mqttmosqbroker.key -out mqttmosqbroker.csr -sha256
Sign the CSR with the private key mqttmosqbroker.key and generate a public key mqttmosqbroker.crt.
openssl x509 -req -in mqttmosqbroker.csr -signkey mqttmosqbroker.key -out mqttmosqbroker.crt -days 365 -sha256
4.2.2. Niagara configuration
Niagara has a server certificate named "tridium" by default, and it is completely sufficient even if the issuer is not in the trusted certificate set. The only thing to do in terms of certificates is to add the public key of the Mosquitto MQTT broker certificate to the trusted key set, that is, import it in "platform->CertificateManagement" tab "User Trust Store". The necessary steps to go through depend on the selected certificate generation method in the previous post (4.2.1):
4.2.2.1. Importing a certificate created in the Niagara Workbench
If the key for the Mosquitto MQTT broker was created in the Niagara Workbench then one of the steps was to export the public and private keys in separate PEM files, so in this step, go to "platform->CertificateManagement" tab "User Trust Store" in Supervisor and import the broker's public key.
4.2.2.2. Importing a certificate created with the openssl
The CRT and KEY files generated with openssl are not supported by Niagara, which requires PEM files, so it is necessary to convert the broker's public key with the following command:
openssl x509 -outform PEM -in mqttmosqbroker.crt -out mqttmosqbroker.pem
Then, import the mqttmosqbroker.pem file as described in the 4.2.2.1 section.
4.2.2.3. Configuration of the device in the station
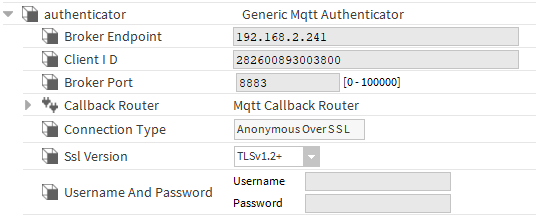
In the "DefaultMqttDevice" component, set the appropriate IP address and port of the broker, as well as the "Anonymous Over SSL" value in the "Connection Type" slot. As for "Ssl Version", the communication should start on all TLS versions, unless the broker's configuration file is set to support a specific TLS version.
4.3. Encrypted connection with user authentication
In an encrypted connection with user authentication, in addition to the basic configuration, the broker and connecting devices must be provided with support:
-
encrypted TLS connection,
-
encrypted port,
-
server certificate public and private keys,
-
a list of users and their passwords.
4.3.1. Mosquitto MQTT configuration
The first thing is to create a server certificate, which can be done in one of two ways, either using Certificate Management found in the Niagara Workbench, or using openssl. The methods are described in subsections 4.2.1.1 and 4.2.1.2, respectively.
Another thing is to create a file with users and their passwords, as described in subsection 2.3.1.
The rest of the configuration involves disabling the service and saving the following values to the mosquitto.conf file as its full contents:
listener 8883
password_file D:\Narzedzia\Mosquitto MQTT broker\passwd
certfile D:\Narzedzia\Mosquitto MQTT broker\certs\mqttmosqbroker.crt
keyfile D:\Narzedzia\Mosquitto MQTT broker\certs\mqttmosqbroker.key
- where certificates can be located in any folder, however, it is recommended to keep certificates in the Mosquitto MQTT installation folder. Having provided certificates and files with users and passwords and saved the configuration file, restart the Mosquitto service.
4.3.2. Niagara configuration
Niagara has a server certificate named "tridium" by default, and it is completely sufficient even if the issuer is not in the trusted certificate set. The only thing to do in terms of certificates is to add the public key of the Mosquitto MQTT broker certificate to the trusted key set, that is, to import it in "platform->CertificateManagement" tab "User Trust Store". The necessary steps to go through depend on the selected method of certificate generation in subsection 4.2.1:
4.3.2.1. Importing certificate created in the Niagara Workbench
As described in 4.2.2.1.
4.3.2.2. Importing certificate created with openssl
As described in 4.2.2.2.
4.3.2.3. Configuration of the device in the station
In the "DefaultMqttDevice" component, set the appropriate IP address and port of the broker, as well as the "User Login Over SSL" value in the "Connection Type" slot. As for "Ssl Version", communication should start on all TLS versions, unless the broker's configuration file is set to support a specific TLS version. The "Username" and "Password" slots should contain the data of one of the users stored in the Mosquitto broker's password file.
5. Connection with the MQTT Explorer client
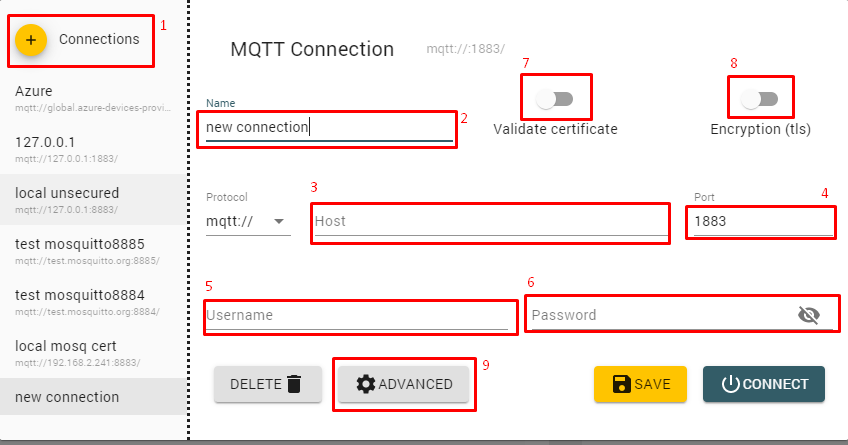
As mentioned at the beginning of the article, the MQTT Explorer is a perfect tool for testing configuration of the Mosquitto MQTT. It has a very intuitive interface described below:
-
Button for adding a new configuration
-
The name of the current configuration
-
IP address or host name to which the client should connect
-
Port number
-
User name (in case of anonymous connection leave the field blank)
-
User password (in case of anonymous connection leave the field blank)
-
Option must be enabled if the broker forces verification of the certificate whether it was signed by a trusted (for the broker) CA.
-
Option must be enabled if the connection is to be encrypted using TLS
-
Advanced options that allow to
-
build a default topic structure
-
change the MQTT client ID
-
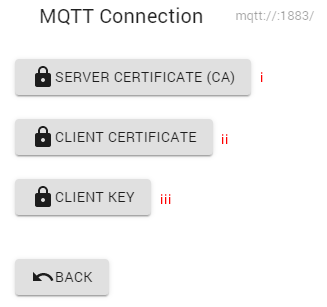
indicating certificates, below is a description of the certificate indication window
-
The public key of the server certificate (Mosquitto MQTT broker) in CRT or PEM format
-
Public key of the client's certificate (MQTT Explorer program) in CRT or PEM format
-
Private key of the client's certificate (MQTT Explorer program) in KEY or PEM format
-
-
In order to start encrypted communication, as well as certificate verification (CA), it is required to provide certificate files, as in the case of Mosquitto MQTT. The description of certificate creation (only for encrypted connection, certificate verification is not included) is given in subsections 4.2.1.1 and 4.2.1.2.
6. Troubleshooting
6.1. After installing Mosquitto MQTT broker, I can't establish communication with default broker settings
-
You should check that you have definitely set an exception in the firewall of the computer on which you put the Mosquitto MQTT broker.
-
Installing the broker alone is not enough, you still need to start its service as described in 2.2.
-
Note that in the default configuration the broker only accepts anonymous connections - check the DefaultMqttDevice component in Niagara to see if "Anonymous" is selected.
6.2. I set "Connection Type", "Broker Endpoint" or "Broker Port" to some value, now I would like to change it, but I can't because the slots are grayed out
-
When you enable the "DefaultMqttDevice" component, all connection configuration slots are blocked, so you need to disable the component again and refresh the "AX Property Sheet" view.
-
Sometimes the component crashes, so even disabling the component does not help, in this case, remove the "DefaultMqttDevice" component and add it again from the palette.
6.3. I'm trying to use openssl to generate or convert certificate files, but I'm getting an error pop up
-
It is likely that the
opensslinstallation folder has not been added to the PATH environment variable, so you need to do that, or manually (using thecdcommand) move from the default console folder to theopensslinstallation folder each time. -
The issue may be that the
opensslconfiguration file is not loaded correctly at startup, so run the following command (after each) command line run, in which the correctopensslinstallation folder should be specified:set OPENSSL_CONF=C:\OpenSSL\ssl\openssl.cnf
6.4. I have done everything according to the instructions, but encrypted communication between Niagara and Mosquitto MQTT does not want to start, for unencrypted settings the communication manages to start.
-
In this case, it is a good idea to configure the MQTT Explorer (description in Chapter 5) and see if it manages to establish communication,
-
if not, it may be that the service has not started at all, you can check this by entering the shutdown command in the command line (chapter 2.2) if the service has not started then the following (misleading, because you never know if the service has not returned an exception during startup and has not automatically shut down) message will be returned:
Mosquitto Broker service successfully launched.If, on the other hand, the service has previously started then the following message will be returned:
The requested service has already been launched. -
If the MQTT Explorer connects without a problem, then check that you are sure the Mosquitto MQTT broker's public certificate (subsections 4.2.2 or 4.3.2) has been imported as trusted.
NOTE:The Supervisor's "Certificate Management" (in the platform) and Workbench's "Certificate Management" (in the top menu "Tools") views indicate separate spaces. The Supervisor's station uses only the one located in the platform.
-
-
If the connection is from the Niagara driver then perhaps the firewall of the system on which Mosquitto MQTT is hosted has only port 1883 in the exceptions, and forgot to add port 8883.
-
If you still performed certificate signing with a trusted CA along the way then communication may not work.
-
If PEM keys were used then make sure that each file (except Niagara) has only one key either public or private.
