This article describes how to correctly add a custom trusted code-signing certificate (Code Signing) to Niagara, which will be used in the future to sign JAR modules or code written in the program component. The article also outlines how to transfer (duplicate) a trusted code signing certificate to another version of Workbench (WorkPlace) or to another computer.
NOTE: Do not confuse the Certificate Management view available in the top Tools menu in Workbench (WorkPlace) with the view available in Niagara's daemon platform (Supervisor). The definition of a trusted code-signing certificate should be done for Workbench, not for the Niagara daemon.
NOTE: To distinguish between the open Certificate Management Workbench/daemon windows, look at the bold text above the view tabs: Certificate Management for Vykon WorkPlace N4 is the Workbench view, while Certificate Management for localhost is the daemon view.
Creating a trusted code-signing certificate (Code Signing)
-
From the Workbench, open Certificate Management from the top menu Tools.
-
Then in the User Key Store tab, click the New button at the bottom of the view.
-
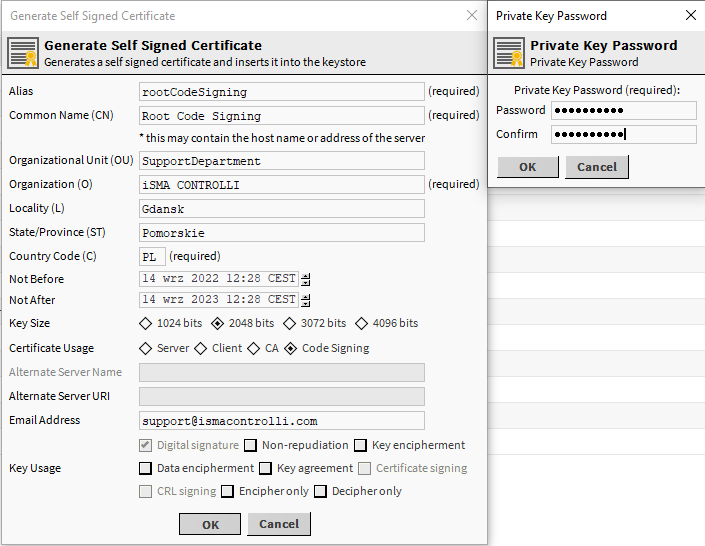
Next, the Generate Self Signed Certificate popup window will appear. In this window, select the Code Signing option in the Certificate Usage field, and then fill in the data of the certification authority and select the Digital signature option in the Key Usage.
-
After confirming the data with the OK button, it is required to enter the password for the private key.

Fig.1 Creating a trusted code-signing certificate in the Niagara Workbench
-
This way, the added certificate appears in the User Key Store tab.

Fig. 2 Custom trusted code-signing certificate added to the Niagara Workbench
-
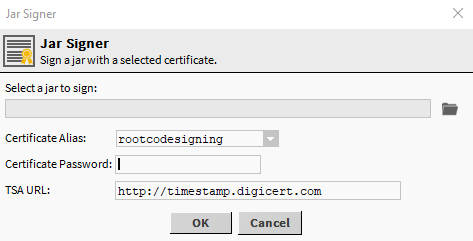
After following the above steps, open the module signing tool from the top menu bar Tools->JarSignerTool to check if the certificate has been added correctly.

Fig. 3 Verifying the addition of a custom trusted code signing certificate in the Niagara Workbench using the Jar Signer Tool
From now on, JAR modules can be signed with the Jar Signer Tool, using the custom trusted code signer.
Moving the code-signing certificate (Code Signing)
-
The first step is to export the public and private key of the selected code-signing certificate; for this purpose, from the Workbench, open Certificate Management from the top menu Tools.
-
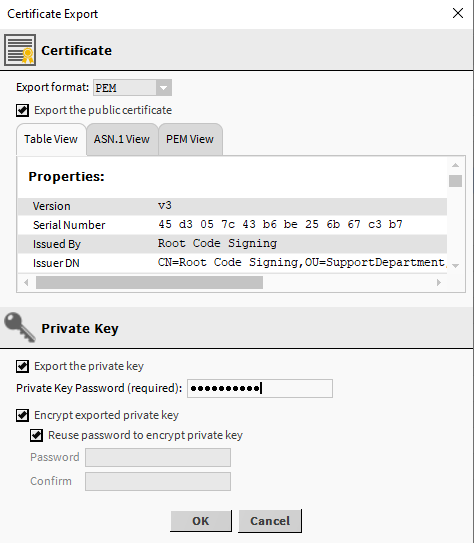
The next step is to export (Export button) the added code signing certificate as a PEM file, with the option to export the public and private key selected (will require the private key password), accepting will require the location to which it is to be saved.

Fig. 4 Exporting the public key and private key of the code-signing certificate
-
If the certificate is installed on another computer, transfer the PEM file to the other computer.
-
Then go to the Workbench, which is to import the trusted code-signing certificate, and open Tools->CertificateManagement from the top menu.
-
After opening the view, under the User Key Store tab, click the Import button, which will bring up a popup window to indicate the location of the PEM file with the public and private keys of the trusted code signing certificate.
-
Once the file is selected, enter the current private key password.
-
At the end, assign a new password for the private key.
-
From now on, it will also be possible to sign JAR codes with the same certificate on another Workbench.
