This article outlines best practices in using the iSMA-D-PD10C-B1 (and iSMA-D-PD15C-B1) panels with the iSMA-B-MAC36NL controllers. It is divided into three categories: installation, configuration, and creation of graphics. All parts referring to the iSMA-D-PD10C-B1 panel also apply to the iSMA-D-PD15C-B1.
Panel Installation:
-
For production images below the 1152 version (meaning the Niagara versions below 4.8), the iSMA-D-PD10C-B1 panel has to be connected (with USB or HDMI cable) to the iSMA-B-MAC36NL device before turning on its power supply–otherwise, it is necessary to reboot the iSMA-B-MAC36NL controller, as during a commissioning process the controller checks the technical specification of the panel and adjusts display settings accordingly. As of the 1152 production image (Niagara 4.8), the panel can be connected to the controller at any time.
-
The RJ45/USB-A cable length cannot exceed 5 m with no repeaters, or, if repeaters are used, the bus cannot exceed 30 m length.
-
For cables compliant with the HDMI Working Group, the length cannot exceed 15 m; however, for most cables on the market, this limitation is 5 m. (Both values apply to installations with no repeaters).
-
For production images below the 1152 version (meaning the Niagara versions below 4.8), the power supply system has to be designed in such a way that in case of a spontaneous power failure (and recovery) in the iSMA-B-MAC36NL controller, that same process occurs in the iSMA-D-PD10C-B1 panel. As of the 1152 production image (Niagara 4.8), the above is not applicable.
-
The panel can either be wall-mounted using brackets, or installed on a board/in a cabinet using mounting clips. In both cases, it is essential to remember to provide access to menu buttons and panel power supply, accessible at the back of the panel.
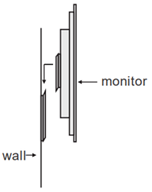
Figure 1. Wall-mounting using brackets.
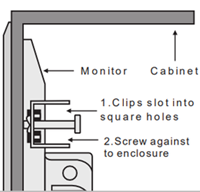
Figure 2. Snap joint installation using mounting clips.

Figure 3. Panel buttons at the back.
-
Only a dedicated power supply unit can be used for the iSMA-D-PD10C-B1 panel, and the rectifier (12 V DC or 24 V DC) has to be fixed properly in order to prevent loosening and falling out of the clip.
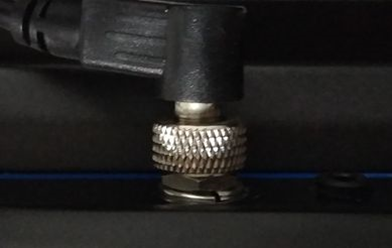
Figure 4. The power supply connector properly fixed in the panel.
-
In order to sustain the IP65 protection, the HMI panel with the HDMI interface has to be mounted using a seal, for example, on a door of cabinet, which also has the IP65 protection; in such case the whole installation–the cabinet and the panel–has the IP65 protection. The panel itself (for example, wall-mounted) has the IP20 protection.
Niagara Configuration
NOTE: A short step-by-step instruction, how to prepare the Niagara station to the installation with the HMI panel with HDMI interface, is available in a separate article, ‘MAC36NL - HMI panel with HDMI interface - Commissioning’.
-
Each time the iSMA-B-MAC36NL controller is used with the HMI panel with HDMI interface, make sure that the latest version of the ‘iSMA_HDMI’ module and the latest version of the iSMA-B-MAC36NL distribution file are installed on the workstation. The installation process of these files is outlined in the article ‘MAC36NL - Distribution Files - Downloading and installation’. Following the last step, update the distribution of the iSMA-B-MAC36NL controller, which is described in the article ‘MAC36NL - Distribution - Upgrade/downgrade’.
-
In case the ‘iSMAHDMI’ service (from the ‘iSMA_HDMI’ palette) is not installed in the station, the loading iSMA logo is displayed on the panel, as in the figure below:
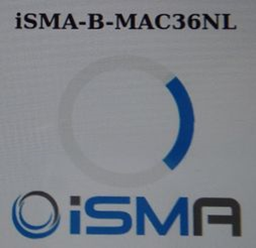
Figure 5. The iSMA loading logo screen displayed on the panel due to the missing ‘iSMAHDMI’ service in the Niagara station.
-
As the panel works only with the HTTP protocol, default port 80, it is necessary to adjust the ‘Web Service’ settings: the ‘HttpEnabled’ slot has to set to true, and the ‘HttpsOnly' slot has to be set to false.
-
Applying a different ‘Default Web Profile’, other than the ‘Handheld Hx Profile’, may hinder the visualizations (in case of the ‘Wb’ profile), or may display a persistent spinning circle icon, as in the figure below:

Figure 6. The spinning circle icon.
-
Please note that, for security reasons, each time the station is copied to the workstation, the ‘Username’ and ‘Password’ slots values in the ‘iSMAHDMI’ service are reset. Therefore, if the ‘Autologin’ function is enabled, these credentials have to be reentered each time the station is copied to a new controller.
Niagara Graphics Creation
-
Creating graphics for servicing the HMI panel with HDMI interface should be carried out in ‘CanvasPane’ with fixed dimensions matching the panel’s resolution (1280x720). The ‘scale’ slot has to be set to ‘None’, as the resolution of the workstation may differ (and what is more, the WorkPlace navigation windows change the dimensions of the workspace window); otherwise, the graphics created on the workstation may be wrongly displayed on the panel.
-
While creating graphics, it is recommended not to follow the standard method of switching graphics using buttons correlated to separate ‘PX’ files with hyperlinks. In case of the described set of devices, this method implies a long time of switching views. Instead, it is recommended to use one ‘PX’ file in 'TabbedPane'.
-
Before adjusting the size of the workspace, it is recommended to indicate the location of tabs (top/bottom, left/right) and to add all tabs and their texts. Once the location of tabs is indicated, the workspace of previously created tabs ('CanvasPane') is not reduced, which allows to avoid unnecessary corrections.
-
In case the graphic is smaller than 1280x720, it is recommended to include the expected background in the main ‘CanvasPane’, instead of the ‘PX’ file (occasionally used) loaded with the ‘PxInclude’ function (here, it is recommended to use a transparent background). It allows to avoid the white background appearing on the left/right side or top/bottom of the graphic’s window.
-
Summing up the above points, in the new ‘PX’ file, remove the ‘ScrollPane(Root)' in the ‘Widget Tree’, then add the ‘CanvasPane’ component from the bajaui palette, and set its dimensions to 1280x720 as well as its background. Next, place the ‘TabbedPane’ component underneath, and add other ‘CanvasPane’ components corresponding to each tab–once these components are added, adjust the ‘TabbedPane’ size to the main window, and adjust sizes of the tabs’ workspaces.
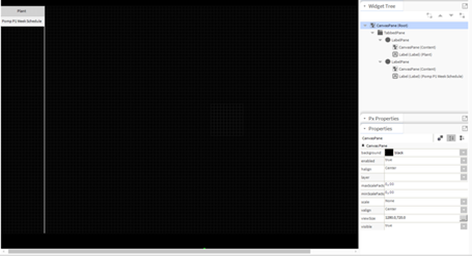
Figure 7. The view of the graphics tree, optimized for the HMI panel with HDMI interface
-
It is not recommended to use more than one ‘WebWidget’ per view, due to its size.
-
While designing ‘PX’ files, it is worth heaving in mind that the graphics are created not only for clicking with mouse pointers but also for finger-tapping, so their sizes have to be adjusted accordingly.
-
It is not recommended to use action windows (for example, ‘Set’) in graphics for the HMI panel with HDMI interface, due to their very small size. A good alternative is to use the ‘IncrementSetPointButton’ and ‘DecrementSetPointButton’ components (with a fixed value change after a click/tap), the ‘SetPointFieldEditor’ component (allowing to introduce a value from a keyboard expanding from the bottom of the screen–here, please remember to put at least one ‘SaveButton’ from the ‘kitPx’ module on the graphic), the ‘SetPointToggleButton’ and ‘SetPointCheckBox’ components (allowing to change a state with a click/tap), and the ‘SetPointSlider’ component (allowing to set a value with a slider).
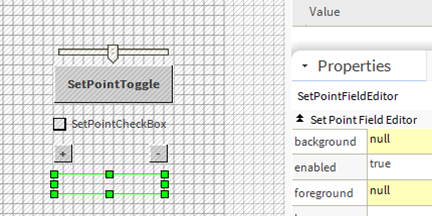
Figure 8. Widgets recommended to use in graphics for the HMI panel with HDMI interface
-
For the production image 1152 (Niagara 4.8) and up, the pop-up windows defined by the user are fully functioning. For earlier versions, it is not recommended to use this function.
-
In the ‘Default Web Profile’ of the ‘Handheld Hx Profile’ user, the log off button disappears; therefore, it is recommended to use the ‘LogOffButton’ from the ‘kitPx’ module in applications with more than one user.
