The article outlines configuration of the 'CategoryService', 'RoleService', and 'UserService' in order to set proper user permissions. Additionally, the article tells how to configure the 'HierarchyService' to grant or revoke user permissions to navigate the menu created with the 'HierarchyService'. The article covers also Niagara permission levels and setting the 'Operator' flag for components.
First, it is required to add categories, and then assign application's components accordingly. Optionally, it is possible to create own hierarchy. Next, it is required to create users' roles, and configure their permissions. Finally, assign relevant roles to the users.
1. Creating Categories
The 'CategoryService' is designed to categorize components or whole folders within an application. New categories (with individual names) are added to the station in the 'CategoryService' in the 'CategoryManager' view.
In the described example, the following categories have been added:
-
'Operator';
-
'Manager';
-
'Engineer'.

Figure 1. The list of categories added in the 'CategoryService' - the 'Category Manager' view
2. Assigning Application Components
After adding new categories, go to the 'Category Browser' view, where all station's components are listed in a table (rows) along with available categories (columns). In the table, it is possible to assign particular categories to components clicking a dot in a specific field (a dot means assigned category for a component, empty field means no category is assigned to a component). If the field in the 'Inherit' column is checked, the components included in the folder inherit its settings.
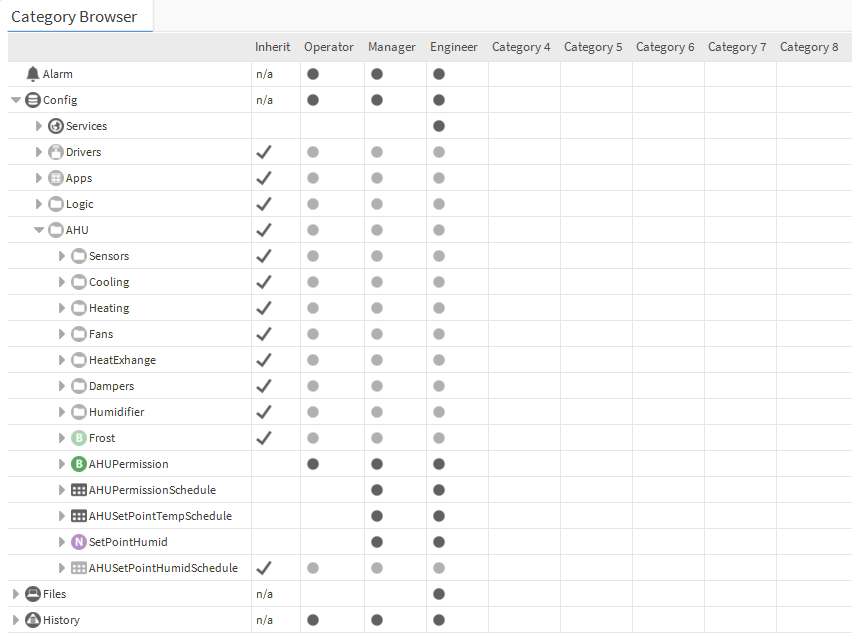
Figure 2. Assigning station's components to particular categories in the 'CategoryService' - the 'Category Browser' view
By default, Niagara displays eight categories, and there is no need to create individual categories - the eight default ones are ready to use. For transparency, it is advised not to use default categories' names if the integrator creates individual categories. The number of categories is not limited to eight, it is possible to create any number of categories, remembering to give each category a different 'Index' number.
3. Creating Hierarchy
Hierarchies are a way to create an individual menu different from a classic folders tree, which sometimes is unnecessarily complicated.
In order to create an individual hierarchy, go to the 'hierarchy' palette, add the 'Hierarchy' component (for example, drag&drop it) to the 'HierarchyService', and name it as the new menu required position. Next, add one 'LevelDef' component (depending on how the new menu is supposed to be automatically build). In the described example, the 'QueryLevelDef' component has been used. Two new menu positions have been created and named 'Schedules' and 'Points'. Eventually, requests have been defined using automatic tags of the Niagara system. The request are defined in the 'Query' slot of the 'QueryLevelDef' component.
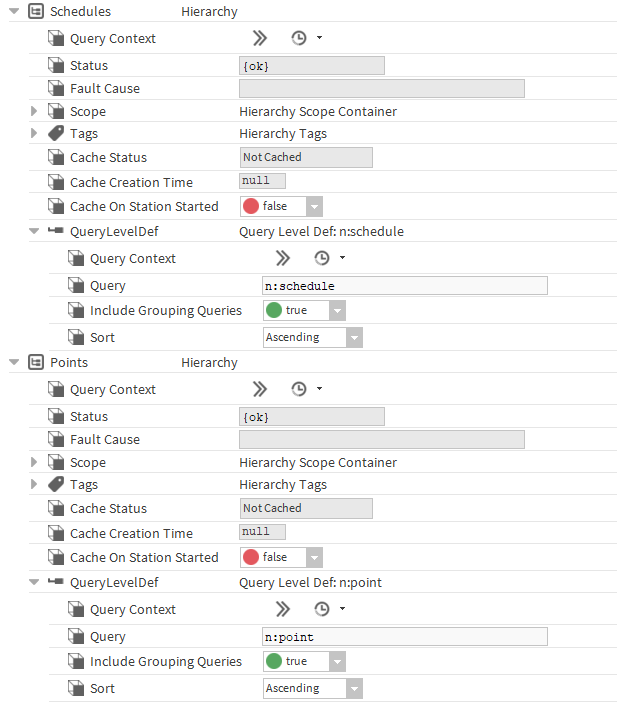
Figure 3. Example of the menu configuration in the 'HierarchyService'
4. Creating User Roles
The following step is to create user roles in the 'RoleService'. In the 'AX Role Manager' view, clicking the 'New' button opens a pop-up window, which allows to define how many new roles are to be added. Confirming with 'OK' opens another pop-up window, which allows to name each new role, grant permissions, and assign hierarchies. In the described example, three different roles have been created, named as follows:
-
'General';
-
'Management';
-
'Service'.
Each created role has been granted relevant permissions to previously created categories and hierarchies, as below:
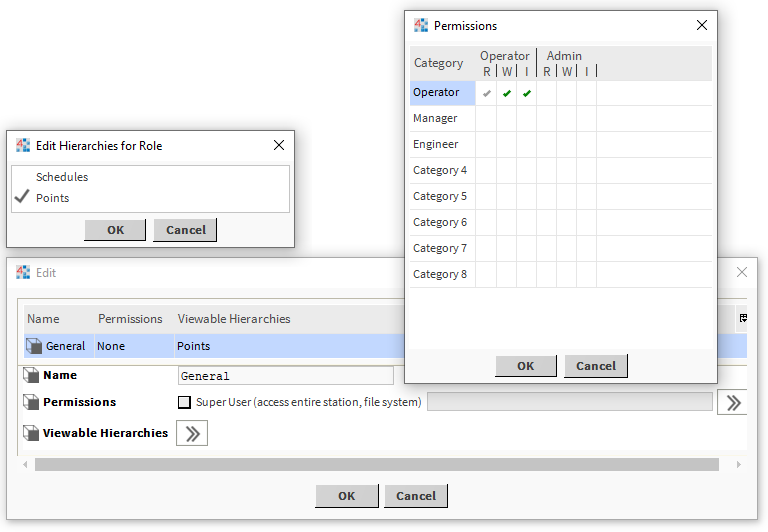
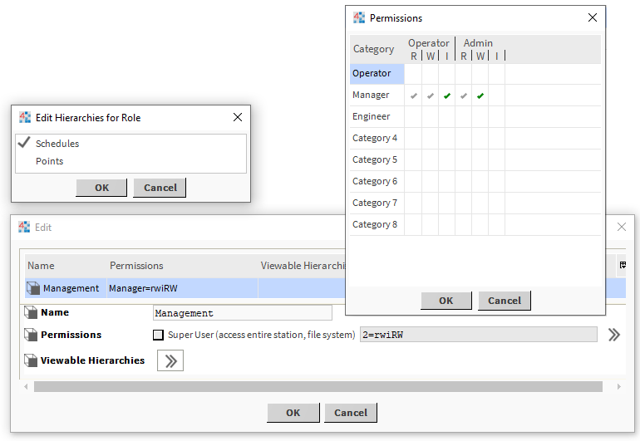
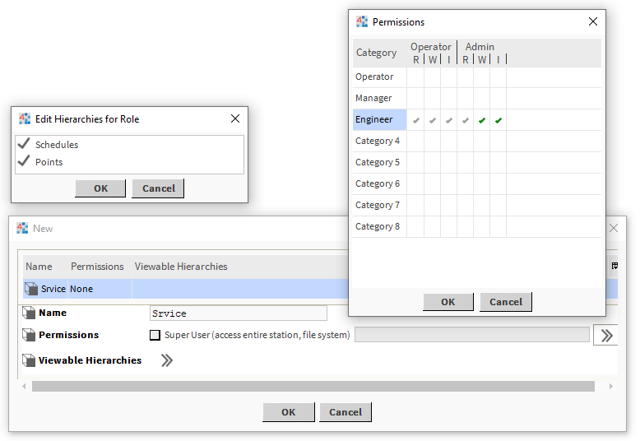
There are six access levels in the Niagara system:
-
'Operator read' - allows to read component's values with the 'Operator' flag;
-
'Operator write' - allows to write component's values with the 'Operator' flag;
-
'Operator invoke' - allows to invoke component actions with the 'Operator' flag;
-
'Admin read' - allows to read component's values;
-
'Admin write' - allows to write component's values;
-
'Admin invoke' - allows to invoke actions in components.
Three last options are available by default for all slots for all components (within one category). First three options are only available for components with the 'operator' flag.
During the station's configuration, apart from added roles, there is always a default role named 'admin', which grants 'Super User' permissions (access to everything).
5. Setting the 'Operator' Flag in the Component's Slot
To enable the user with the 'Operator' access level to act on particular component's slots, it is required to set the 'Operator' flag there. To this end, open the component in the 'AX Property Sheet' or 'AX Slot Sheet' (the 'AX Slot Sheet' being a better option as it also allows to set the flag to actions), then right-click a chosen slot, and select the 'Config Flag' option from the context menu. The 'Config Flags' pop-up window appears; check the 'Operator' flag and confirm with OK.
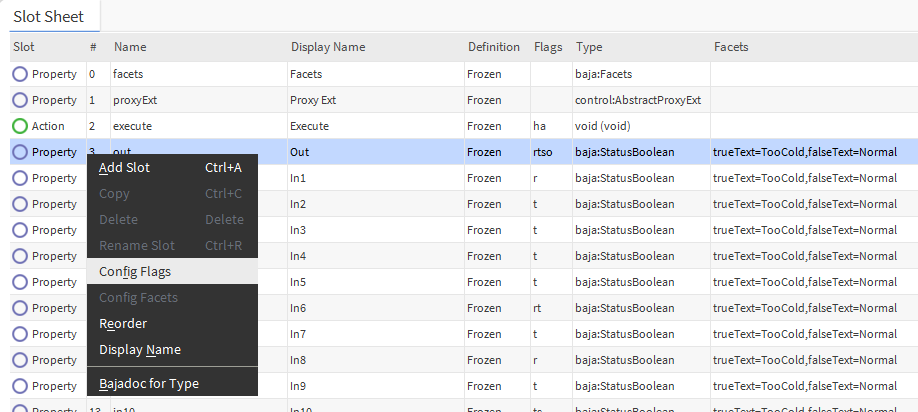
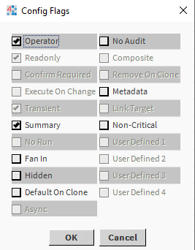
The component configured this way is accessible from the 'Operator' role level; in order to enable the user to invoke actions ('Invoke'), the 'Operator' flag also has to be configured in the component.
6. Assigning Roles to Individual Users
The last step is to assign user roles (one user can be assigned multiple roles). In order to do this, go to the 'UserService', and edit the selected user. In the 'Roles' slot, assign the user to relevant roles (selecting from a list of available/configured roles), and all selected roles are checked.

Figure 9. Assigning roles to the user
Having assigned roles to all users, and logging them to properly configured components, the slots are (or not) visible and/or editable, and/or their actions are available to invoke.
