In the iSMA Tool there are two components that allow to set schedules for specific events–the BooleanScheduleWeekly and NumericScheduleWeekly. Both offer a Schedule Weekly view, which facilitates setting a schedule, and a Special Events view, which allows to add special events to the schedule.

The Schedule Weekly view
In order to open the Schedule Weekly view, double-click either one of the scheduling components. The Schedule Weekly view displays a one week view, each day divided by hours.
To set a schedule, first, set the required time interval. If the required time interval lasts for an hour or less, double-click on the required day and time, open the context menu, choose Add Event option, and enter the required value and time limit in the displayed dialog window. If the required time is longer than an hour, click and hold the click on the beginning of the required time interval and drag until the end of it. Open the context menu, choose Add Event option, and set the required value in the displayed dialog window.
In case no specific value is set for a given time interval, the default value is applied.
The example from the figure 141 shows the schedule, which may be read as a room temperature profile. From Monday to Friday, from 00:00 AM to 06:00 AM the set value is 18, and then it changes from 06:00 AM to 09:00 AM to 22. From 09:00 AM to 04:00 PM the set value is 20. After 04:00 PM the default value is applied.
Editing of the schedule involves selecting the required time interval and using the context menu. The context menu offers the following options:
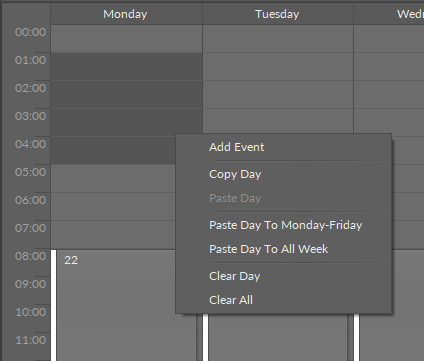
A context menu in the Schedule Weekly view
-
Add Event: allows to create a new event, which means setting a required value to be applied in the define time. The Add Event option opens a dialog window:
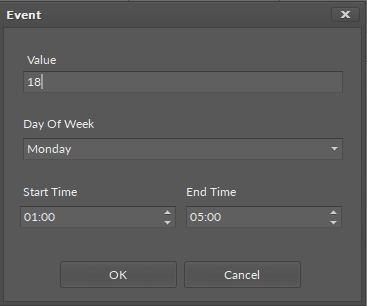
The Add Event dialog window
The Value field allows to set a required value, depending on the scheduling component type, it is a numeric or Boolean value.
The Day Of Week field allows to adjust the starting day of the selected time interval.
The Start Time and End Time fields allow to adjust the selected time interval.
The event is created after confirming with the OK button in the dialog window. Now, on Monday, from 01:00 AM to 05:00 AM the setting will be 18.
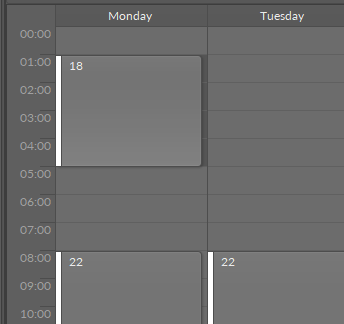
New setting in a schedule
-
Copy Day: allows to copy all events of a day;
-
Paste Day: allows to overwrite the selected day with the events copied from another day (Copy Day);
-
Paste Day To Monday-Friday: allows to copy and overwrite all the events of selected day to all days from Monday to Friday;
-
Paste Day To All Week: similar to the Paste Day To Monday-Friday option, but in this instance all days of the week will be overwritten;
-
Clear Day: allows to remove all events of a day;
-
Clear All: allows to remove all events from the schedule, regardless of which day the option was initiated on.
To edit of an already existing event:
-
drag the event to a new time in a calendar;
-
pull the upper or bottom border of the event, changing its beginning or ending hours
Note: The events cannot overlap during one day.
-
double-click the event;
-
open the event’s context menu and choose the Edit Event option.
The selected event may be removed using Delete button on the keyboard or choosing the Delete Event option from the context menu.
Note: All changes in the schedule are sent directly to the controller and are immediately taken into account in the application’s logic. It means that removing any event may result in a change of the application’s behavior due to the change of the schedule output parameter value.
While using the Schedule Weekly view, additional data are displayed in the Object Properties window:
-
Current Time: shows the current time;
-
Current Output: shows the current output value;
-
Default Value: allows to set a default value, which is used in case no event is planned;
-
Next Event Value: shows the output value of the next scheduled event;
-
Next Event Time: shows the time when the next output value will be applied.
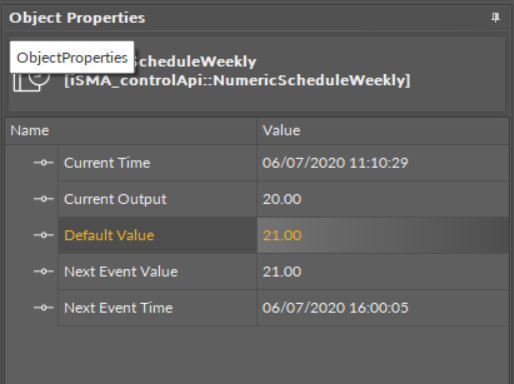
The Object Properties view for scheduling components
Note: All settings, which are available in the Schedule Weekly view and the Object Properties window, can also be edited in the Property Sheet view.
Special Events
Apart from the Schedule Weekly view, the scheduling components have also the Special Events view available.

The Special Events view
The Special Events tab allows to set individual events, which are not part of a weekly schedule. These events are not displayed in the Schedule Weekly view. They are added or deleted using the Add or Delete buttons at the bottom of the tab. The settings available for a special event are the following:
-
Type: the setting edited in the Object Properties window; the special event can be set either for a specific date, the date range, or a specific week and day (this option allows also to select month which the special event will take place in);
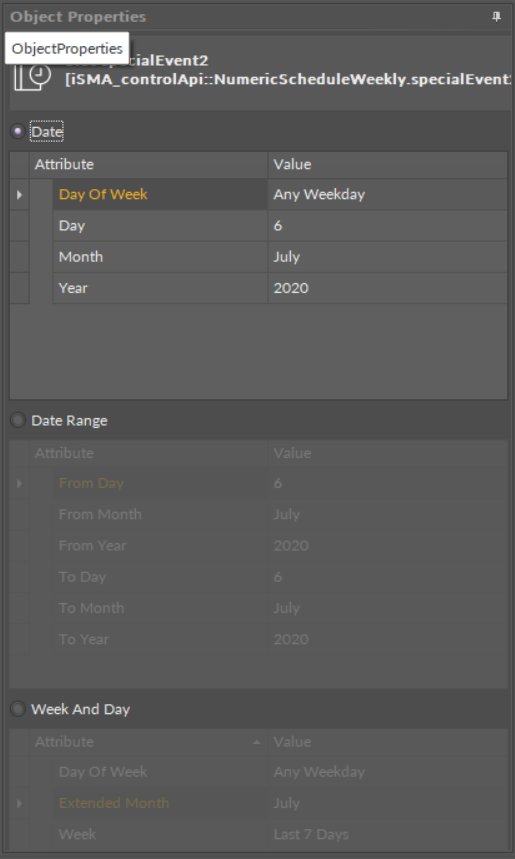
Special Event in the Object Properties window
-
Start Time: the starting time for the special event;
-
Stop Time: the ending time of the special event;
-
Start Value: the starting value of the special event;
-
Stop Value: the ending value of the special event.