This document describes in a few steps how to go through the 'commissioning' process in iSMA-B-MAC36NL family controller platform. The initiation of this process requires the prior execution of the instructions contained in MAC36NL - Distribution Files - Downloading and installation and MAC36NL - First Commissioning.
-
After logging into the controller platform in the 'WorkPlace' program, right-click on 'Platform' in the 'Nav Tree' window and select 'Commissioning Wizard' from the context menu.
-
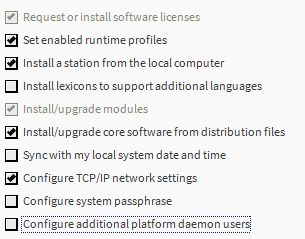
In the first window, select what steps of the commissioning process will be performed. In order to quickly complete the commissioning stages, the last option responsible for adding additional users to the platform should be deselected.

Picture 1. Available steps of the 'commissioning' process.
3. In the next step, install the license on the driver - it is the best to choose the method of downloading it from the license server.
4. The runtime profiles can be activated in the next step. It is recommended to enable the 'UX' and 'WB' profiles.
5. The next window is used to upload stations to the controller. You can skip this or load a station on the PC by selecting it from the drop-down list. The station being loaded can be changed to the target name and the settings for starting up after installation, as well as for each auto-start.

Picture 2. Installation of the station.
6. If it was decided to upload stations, in the next step the wizard will ask which station files should be loaded. It is recommended to use the option 'Copy every file in the station directory and its subdirectories'.
7. In the next window you will see a list of 'jar' modules to be loaded to the driver. After selecting the modules, click the 'Update All Out of Date' button to update all previously installed modules (on the device) to the latest version.
8. In the next two windows, the wizard will display a list of changes in modules and a list of the updated distribution files, respectively.
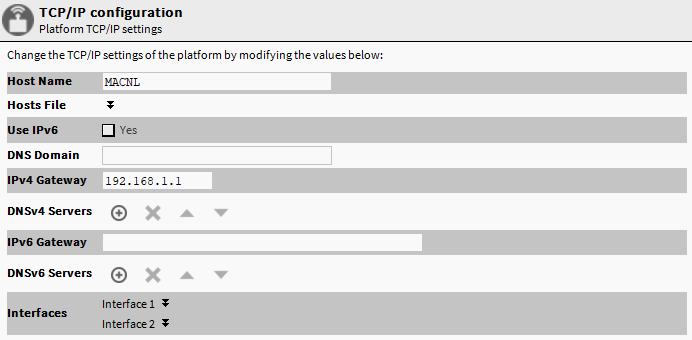
9. In the 'TCP/IP configuration' step, configure the IP network parameters. To configure individual Ethernet interfaces, expand 'Interface 1' (enabled by default) or 'Interface 2' (disabled by default).

Picture 3. Configuration of Ethernet interfaces.
10. The last window summarizes everything that has been planned to be performed. After clicking the 'Finish' button, the file transfer to iSMA-B-MAC36NL controller will start.
11. When the file transfer is complete, click the 'Close' button and the controller will reboot and start installing the new distribution. During this time the 'RUN' LED will be off and the 'ON' LED will flash alternately with the 'COM1' LED.
NOTE: Since Niagara 4.8.0.110 version, the 'passphrase' is stored on the SD card, so despite the earlier input of this value during the 'commissioning' process, after installing the new distribution and logging into the platform, the integrator will have to re-enter the 'passphrase' and manually start the station with the "Application Director" (as long as it had a 'passphrase' assigned to it). Thanks to this, SD cards are easily transferred between devices.
12. When the 'RUN' LED starts flashing quickly (about twice per second) it will be possible to log into the platform. From the moment of the slowdown, the blinking of the 'RUN' diode (approx. Once per second) will allow you to log into the station.
