This document describes the process of adding and configuring the DALI protocol in iSMA-B-AAC20-D device. To configure such a connection:
NOTE: The DALI protocol will only work in the case of the controller extended with the DALI interface. It is labelled iSMA-B-AAC20-D and iSMA-B-AAC20-LCD-D.
-
Go to "Kit Manager" and upload "iSMA_DALI" to iSMA-B-AAC20-D.
-
After reconnecting with the controller, open "App/Drivers". From the "iSMA_DALI" in the "Device Kits" window add "DALINetwork" to "Drivers".
-
In the "Object Properties" window of the newly added component set the "Enable" slot to "true" and the "Power Supply" slot to "On".
-
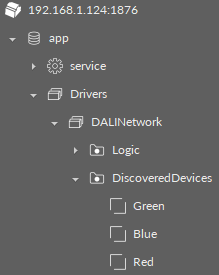
To add ballasts, click the “discover” button. The available devices will then be searched for.

Picture 1. "Workspace Tree" view containing the located devices.
5. Move the found devices from the "DiscoveredDevices" folder to "DALINetwork", if not done, the next time the "discover" process is run, the previously added DALI devices will be read again and their names will be reset to the default ones.
NOTE: Remember to set a unique "Short Address" for each device.
More on how to configure the DALI protocol and an exemplary operation is presented in the article AAC20 - DALI - cooperation with RGB LED tape.
