The article outline how to move the ‘Custom Table’ ('iSMA_IO’) configuration to a next ‘UniversalInput’ component, to a next iSMA-B-MAC36NL controller, and how to keep prepared characteristics for the future.
The procedure of creating characteristics for any sensor is described in the iSMA_IO - Custom Table - Sensor table configuration article.
1. Moving the ‘Custom Table’ to Another Component or Station
In order to move a prepared characteristic to another universal input, simply duplicate the component with prepared ‘Custom Table’, and give the new copy a new name and channel number.
If the ‘Custom Table’ has to be moved to the component linked to the logic, follow the below steps:
1.1 Open the component with configured characteristics in the ‘AX Property Sheet’ view.
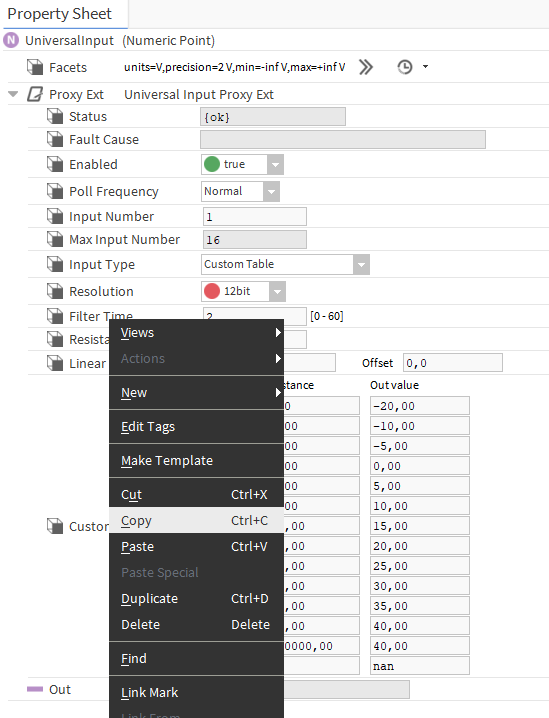
1.2 Open the ‘Proxy Ext’ component and copy the ‘Custom Table’ slot.

Figure 1. Copying ready ‘Custom Table’
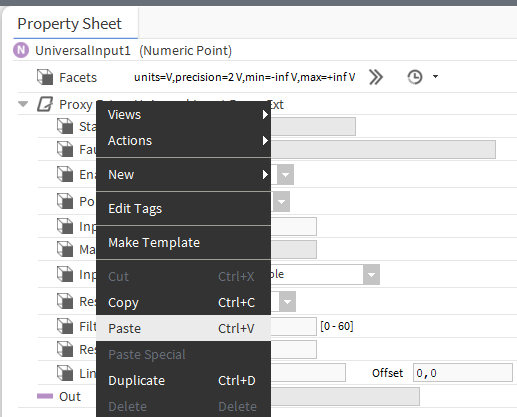
1.3 Next, open the ‘UniversalInput’ destination component in the ‘AX Property Sheet’ view and paste the copied contents into the ‘Proxy Ext’.

Figure 2. Pasting ready ‘Custom Table’ to the next component
1.4 Finally, change the ‘Input Type’ to ‘Custom Table’.
WARNING: Before copying the ‘Custom Table’, please make sure that such slot has not already been configured in the destination component; if so, it has to be removed manually.
In order to move the characteristics to the station in another controller, copy the ‘UniversalInput’ with prepared characteristics to another station, or follow 1.1-1.4 points.
2. Archiving the ‘Custom Table’ for the Future
In order to archive once prepared ‘Custom Table’ configuration to use it in future realizations, follow the below steps:
2.1 Add a new palette file on the local PC and name it as appropriate - adding palettes is covered in the Niagara - Palette - Description and creation article.
2.2 Copy the whole ‘UniversalInput’ component containing desired characteristics and paste it to the new palette.
2.3 Change the name of the ‘UniversalInput’ pasted to the new palette in reference to the characteristics it contains.
2.4 Save changes in the palette.

Figure 3. Contents of the new palette with the ‘UniversalInput’ with prepared ‘Custom Table’ added
In order to use the new palette, open it in the ‘Palette’ window, and, using ‘Browse’, indicate its path on the local PC. Then, drag the ‘UniversalInput’ component to the station’s configuration, or follow 1.1-1.4 steps - only the source components are the components in the new palette.
