The MAC36PRO features a built-in Device Management Web Server, a web-based interface designed for pre-commissioning the controller, monitoring the system parameters and health status, managing the controller network parameters, and configuring the iSMA OS-level settings.The web server can be used to pre-commission the controller even if the host ID has not been licensed yet. By default, the web server is enabled and accessible via HTTPS connection on port 5580. It can be accessed using ETH1, ETH2, and USB network connection.
HTTPS
For security reasons, a standard HTTP connection is disabled by default. Connection to the MAC36PRO web server is possible only via a secure HTTPS protocol. Please make sure that the https://<MAC36PRO_IP_ADDRESS>>:5580 address is used while connecting with the controller’s web server.
HTTPS - first connection
When connecting to the MAC36PRO web server for the first time, a browser warning may appear because of the self-signed certificate. This is expected behavior for embedded systems using HTTPS. It is required to accept the certificate to access the web server.
The first connection can be established using the default IP address of the controller (192.168.1.123) or through the USB connection on static IP address (169.254.1.123).
Login
To access the web server functions, the user must be logged in. The web server is secured with Niagara Platform credentials.
First Login
If the controller has not been commissioned yet, please use the default Niagara Platform credentials (tridium:niagara).
If the default credentials are used, the system will prompt the user to change them. A dialog window appears requiring:
-
new username,
-
new password,
-
system passphrase,
The default tridium user will be removed and the new user will be created. The same user will be used to log in to the controller platform in Niagara Workbench.
Home Page
Home page of the MAC36PRO device management web server contains basic data about the device. It is displayed after a successful logging in to the device. It is useful for troubleshooting, and monitoring controller health status.
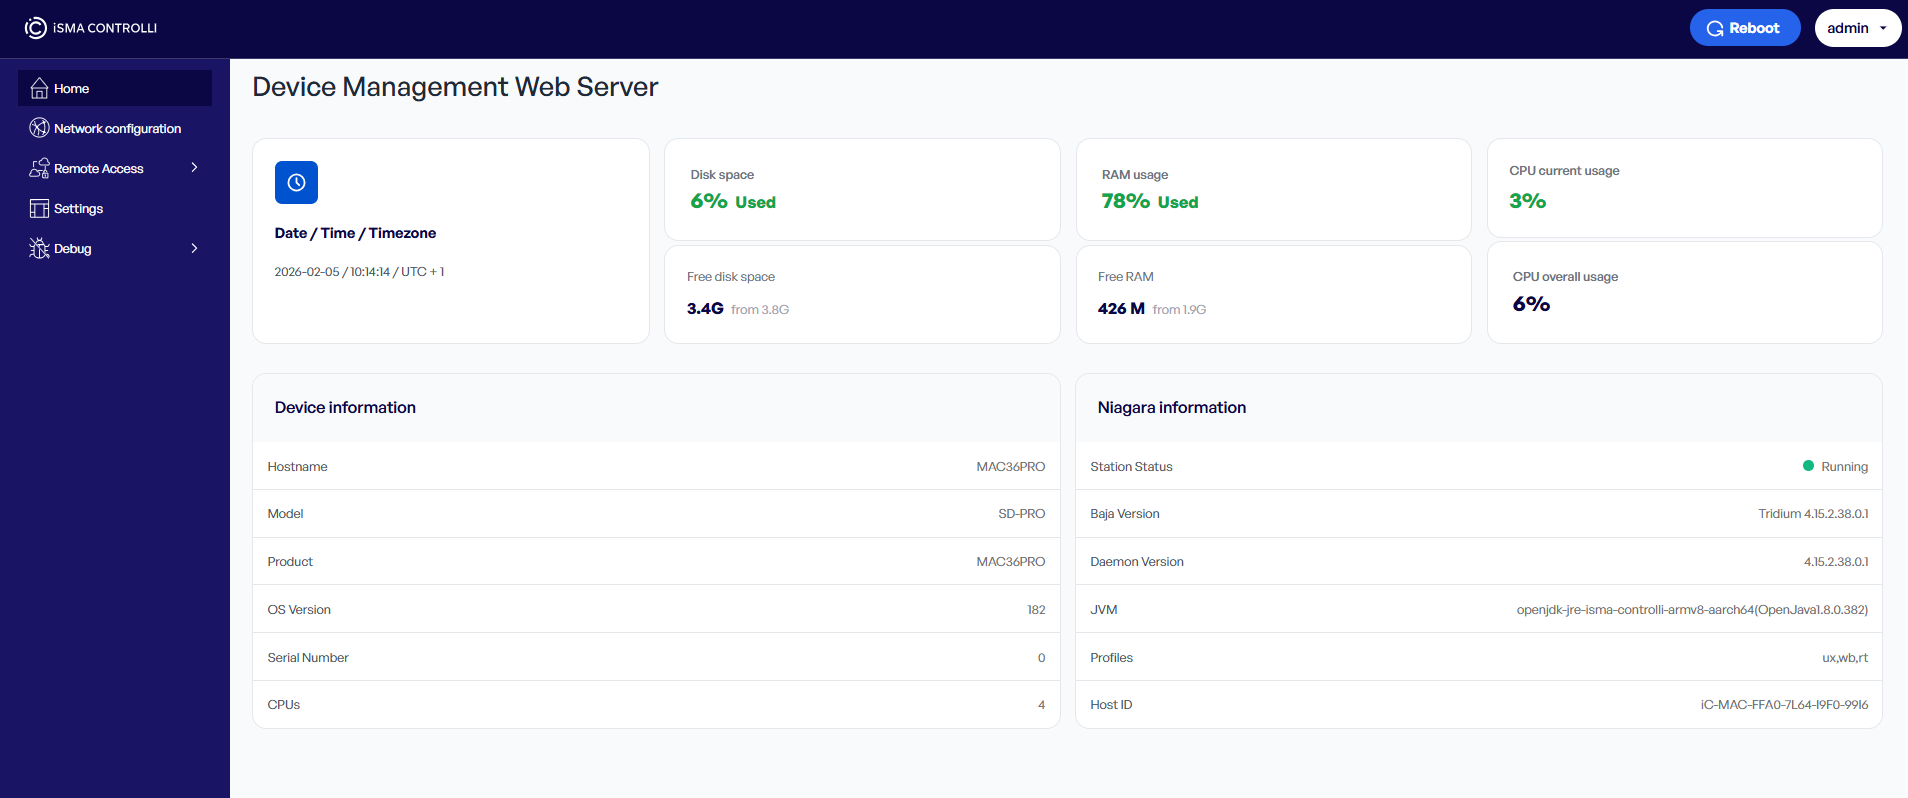
Home page contains the following data:
-
Date/Time/Time Zone: shows a current date, time, and time zone set on the controller,
-
Disk Space: shows a current usage of the disk space on the controller (presented in %),
-
Free Disk Space: shows an amount of free disk space out of the total disk space available on the controller (presented in GB),
-
RAM Usage: shows a current RAM usage by the controller (presented in %),
-
Free RAM: shows an amount of free RAM out of total RAM available on the controller (presented in MB/GB),
-
CPU Current Usage: shows a current CPU usage by the controller (presented in %),
-
CPU Overall Usage: shows a summary CPU usage by the controller from the device start (presented in %),
-
Hostname: shows a hostname of the controller; the hostname can be configured in the Network Configuration section,
-
Model: shows a Niagara model of the controller,
-
Product: shows a product code of the controller,
-
OS version: shows an OS version installed on the controller,
-
Serial Number: shows a serial number of the controller,
-
CPUs: shows a number of CPUs in the controller,
-
Station status: shows a status of the station saved on the controller,
-
Baja Version: shows a Baja version,
-
Deamon Version: shows a Niagara deamon version,
-
JVM: shows a Java Virtual Machine version,
-
Profiles: shows used Niagara profiles,
-
Host ID: shows a host ID for the licensing purposes.
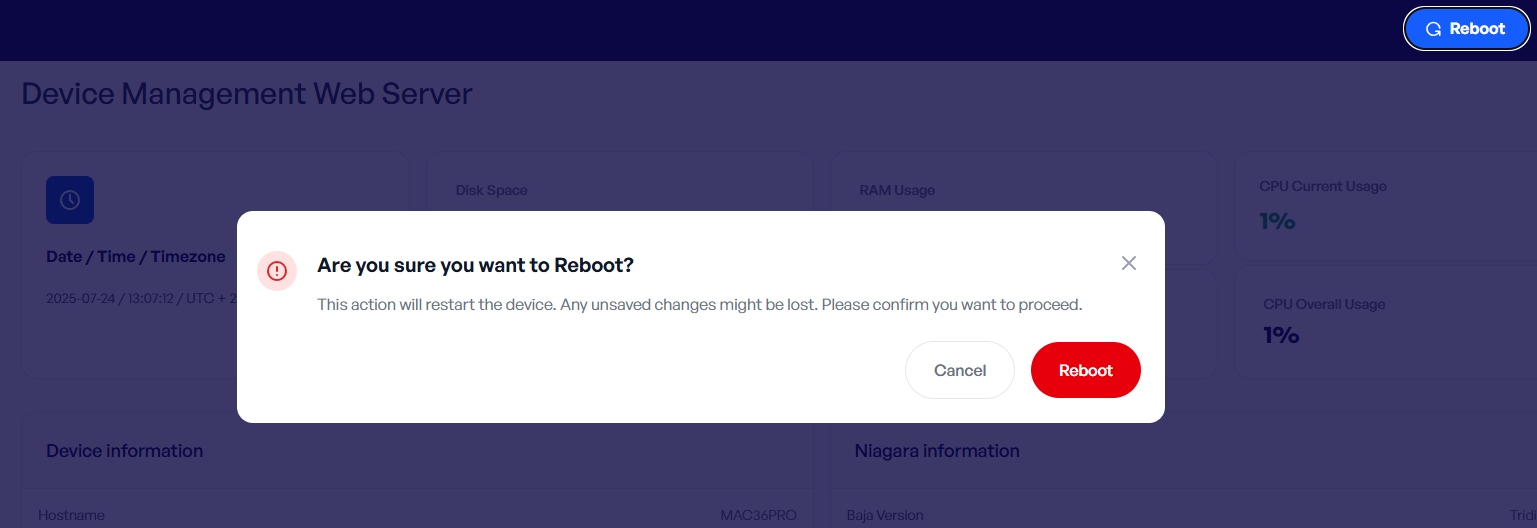
In the top right corner of the device management web server, there are 2 buttons available for the device reboot and logging off. These are available regardless of which tab of the web server is being displayed at the moment.

For a reboot, a confirmation pop-up is displayed:
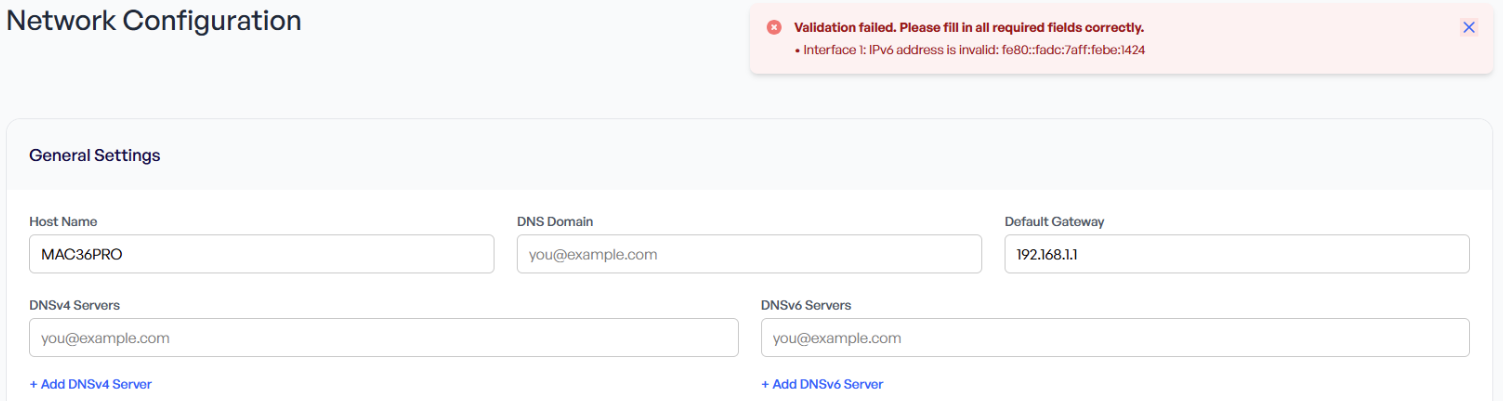
Network Configuration
The Network Configuration tab shows the settings of the controller’s network interfaces and allows to manage them. It allows to pre-configure network parameters for each Ethernet interface available on the controller, before accessing the platform in the Niagara Workbench or in case of any changes to the network parameters during the controller operation.
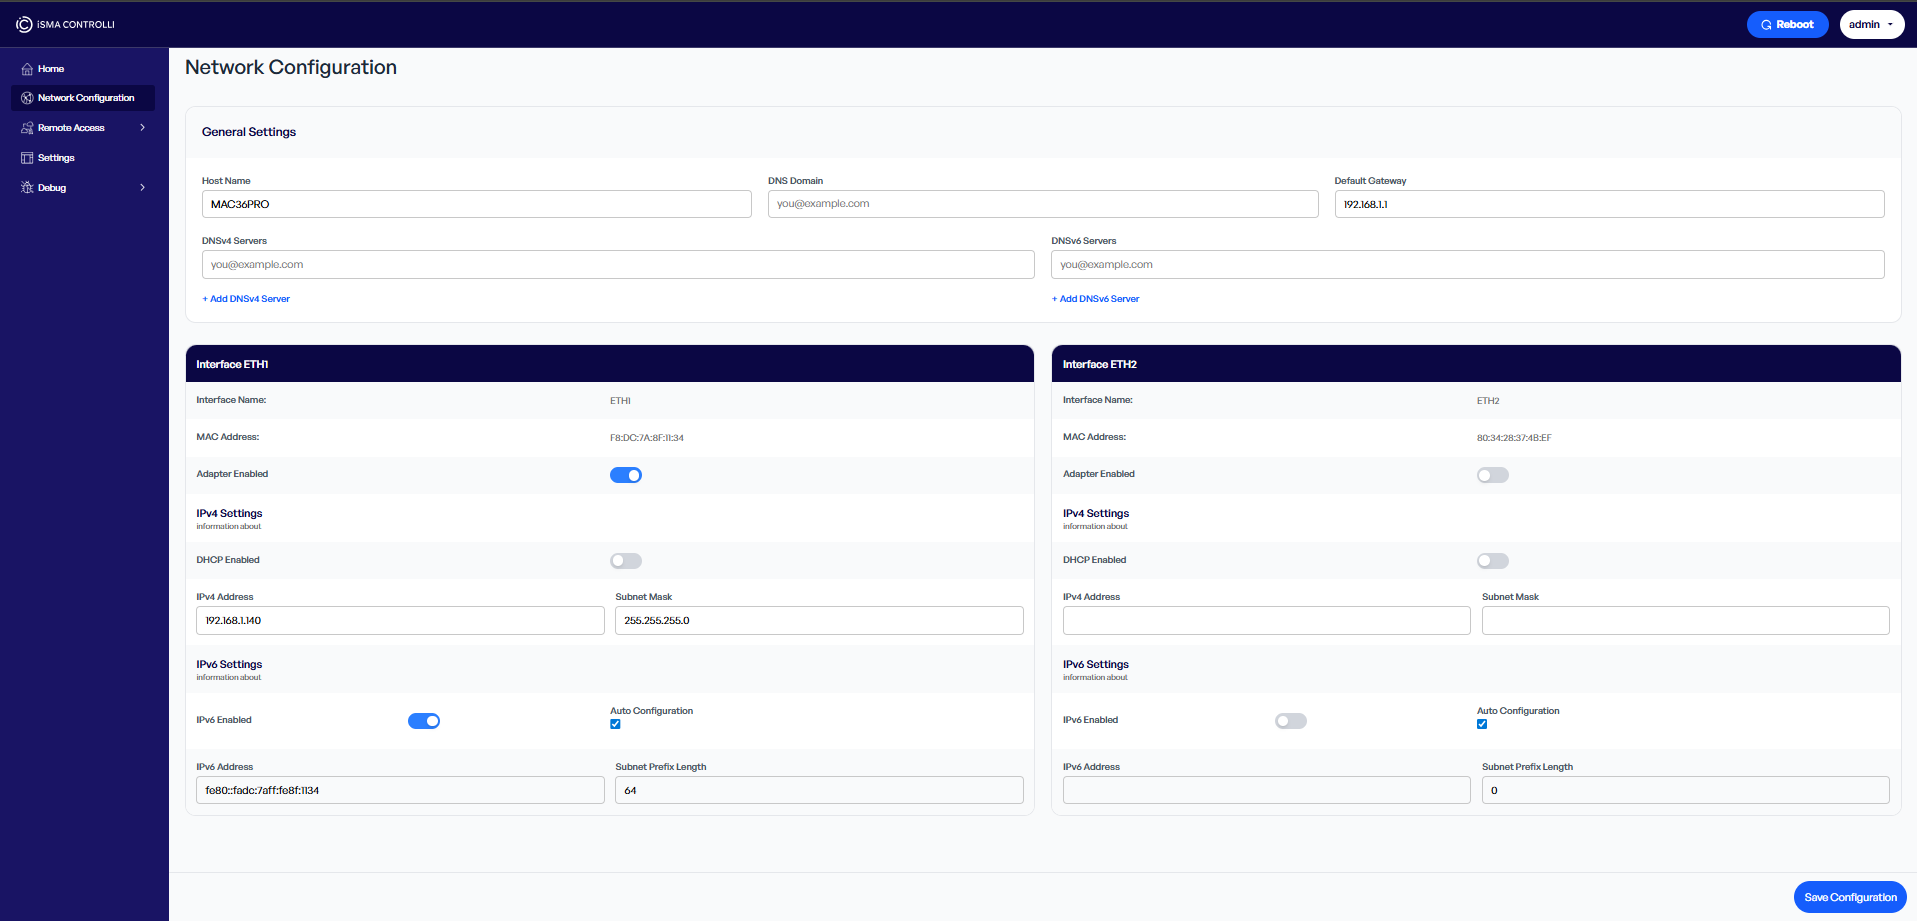
The Network Configuration tab has the following fields:
General Settings tab:
-
Host Name: allows to set a network hostname of the controller,
-
DNS Domain: allows to set a DNS domain,
-
Default Gateway: allows to set a default IP gateway,
-
DNSv4 Servers: allows to set a DNS server for IPv4,
-
+Add DNSv4 Server: allows to add an additional DNS server for IPv4,
-
-
DNSv6 Servers: allows to set a DNS server for IPv6,
-
+Add DNSv6 Server: allows to add an additional DNS server for IPv6;
-
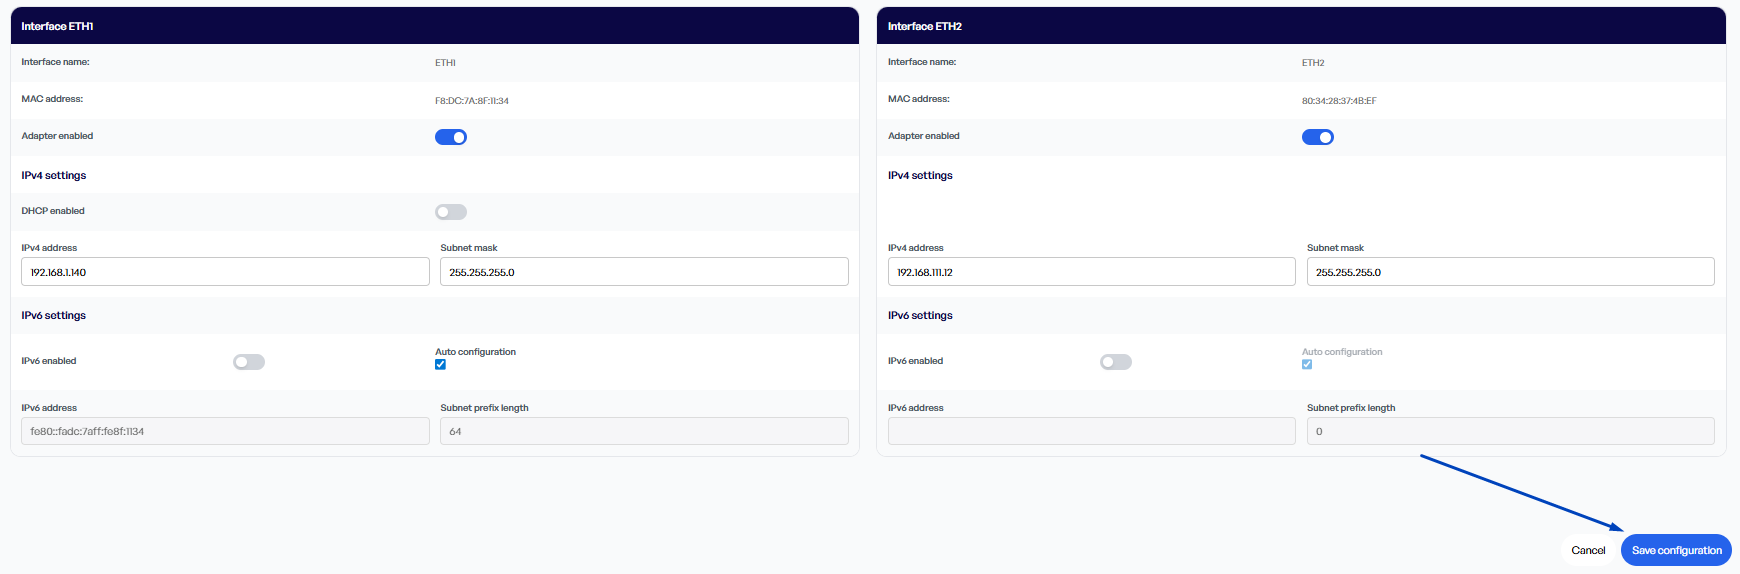
Interface ETH1/ETH2 tabs (dependent on controller’s interfaces):
-
Interface Name: shows the interface’s name,
-
MAC Address: shows the MAC address of the controller’s eth1/2 interface,
-
Adapter Enabled: allows to enable/disable the Ethernet adapter mode;
IPv4 Settings:
-
DHCP Enabled: allows to switch on/off a DHCP mode,
-
IPv4 Address: allows to set an IP address of the controller,
-
Subnet Mask: allows to set a subnet mask of the controller;
IPv6 Settings:
-
IPv6 Enabled: allows to enable the IPv6 addressing for the controller,
-
Auto Configuration: allows to set the controller’s IPv6 address and subnet prefix length automatically,
-
IPv6 Address: allows to set the controller’s IPv6 address if the auto configuration is checked off,
-
Subnet Prefix Length: allows to set the controller’s subnet prefix length if the auto configuration is checked off.
After making any change in the Network Configuration tab, it is required to confirm changes with the Save Configuration button.
Any change made to the network settings is validated. A green pop-up upon saving a new configuration informs that entered data are correct and a reboot is required:

A red pop-up informs that entered data are incorrect. Saving will not be possible until corrected data are filled in.
Remote Access
In the Device Management web server’s tree, under Remote Access, the VPN, LTE, and SSH tabs are available.
WireGuard VPN
The WireGuard VPN tab allows to manage the VPN connection supported by the MAC36PRO controller.
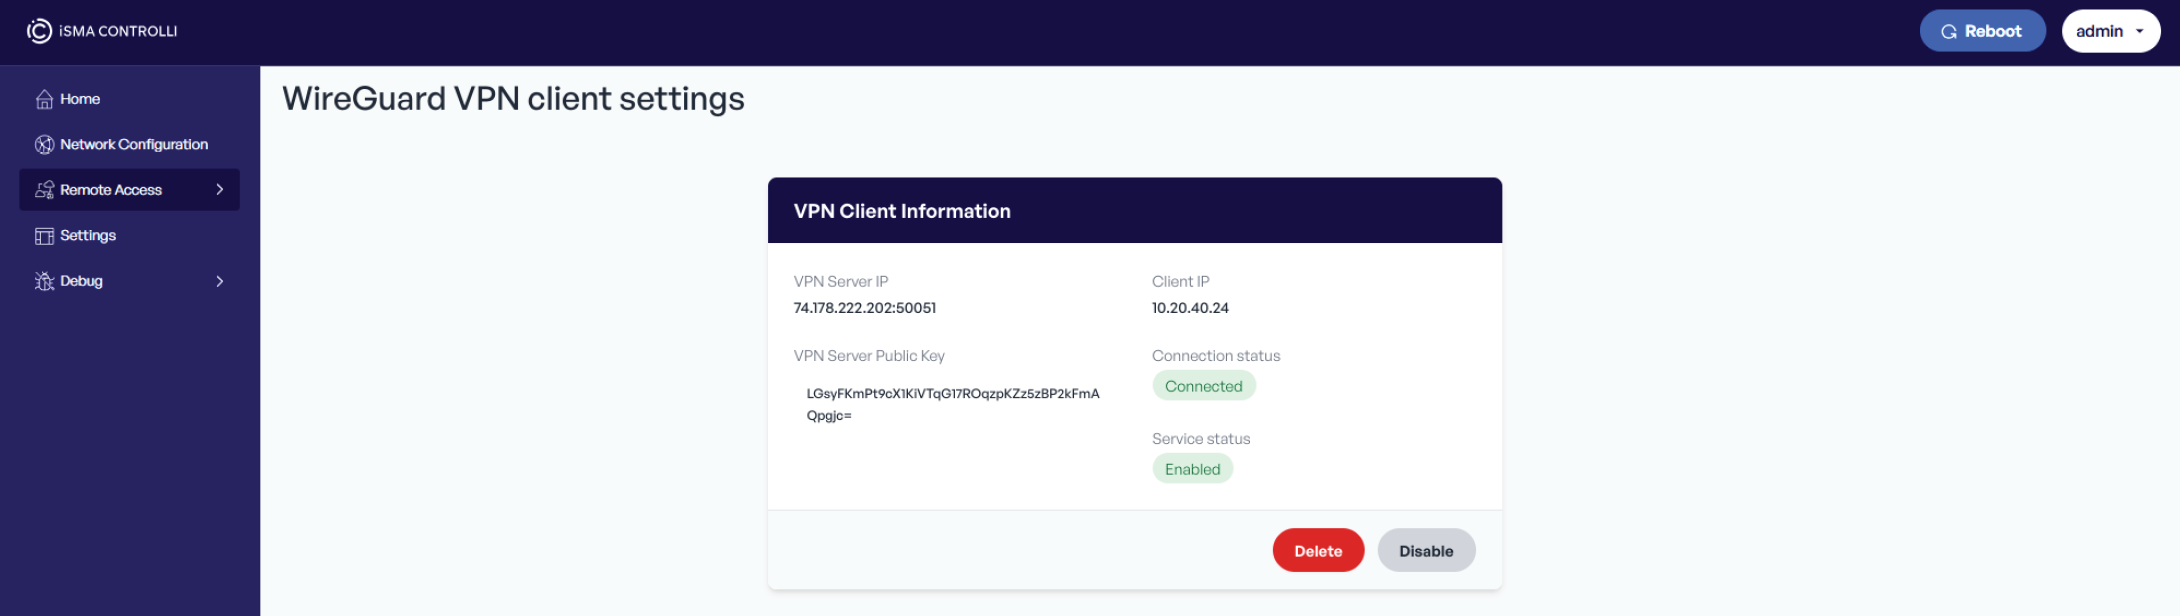
The MAC36PRO supports a connection to a WireGuard VPN network in a client mode. It enables to secure remote access to the controller through an encrypted tunnel. Once the VPN connection is established, the controller's web server, platform, and station can be accessed using the VPN IP address, providing complete remote control of the MAC36PRO controller.
Note
The MAC36PRO acts as a VPN client only. A separate WireGuard infrastructure is required to establish the WireGuard VPN connection with the controller.
To establish a VPN connection, a valid WireGuard configuration file (.conf) must be provided by the VPN server administrator. This is a standard file, which defines all necessary parameters including:
-
interface private key,
-
VPN server (peer) public key,
-
client IP,
-
VPN server IP (endpoint address),
-
allowed IP ranges.
To set up the WireGuard VPN Client, follow the three step process:
Step 1: Upload configuration
Add the .conf file provided by the VPN server administrator. Use the Choose File button to select the file and Upload button to send it.
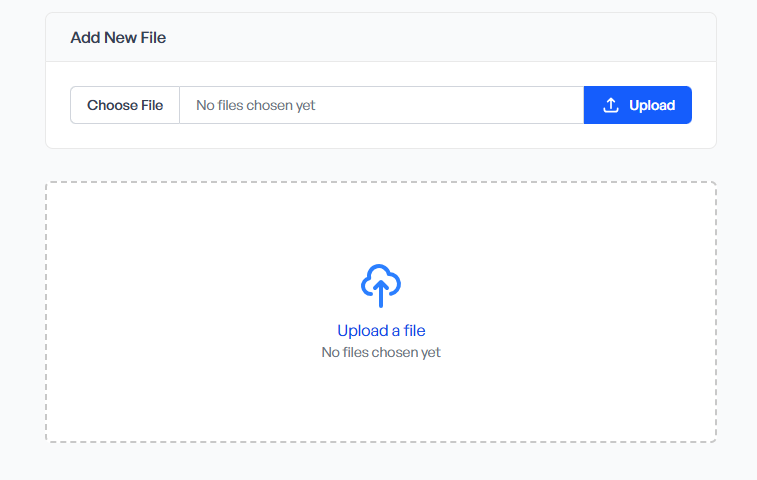
Note
The upload window becomes available only if there is no previously uploaded VPN configuration currently on the device. If the configuration file has been uploaded, it must be removed first using the Delete button before uploading a new one.
Step 2: Activate the configuration
After uploading a configuration file, it is required to activate it in order to initiate the VPN connection.
Step 3: Controller reboot
A device restart is required to apply the changes and establish the connection with the WireGuard VPN server. Reboot can be initiated using the button in the top right corner of the web server.
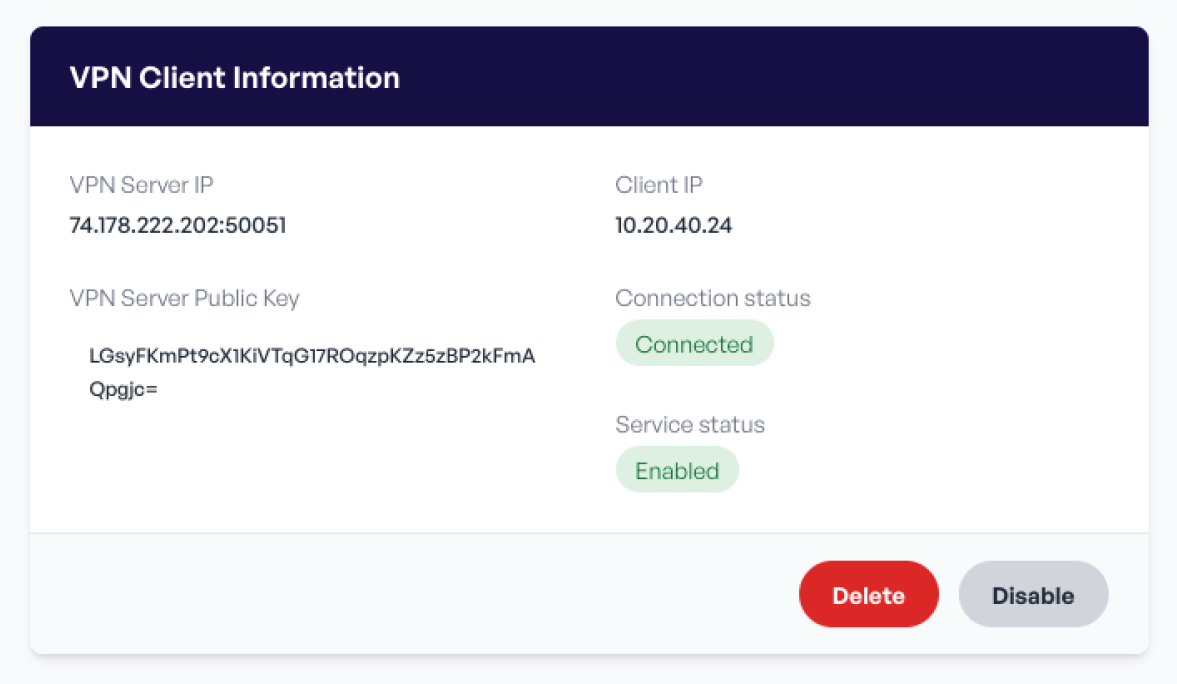
A correctly configured VPN service will display information about the established connection to the WireGuard VPN server.
LTE
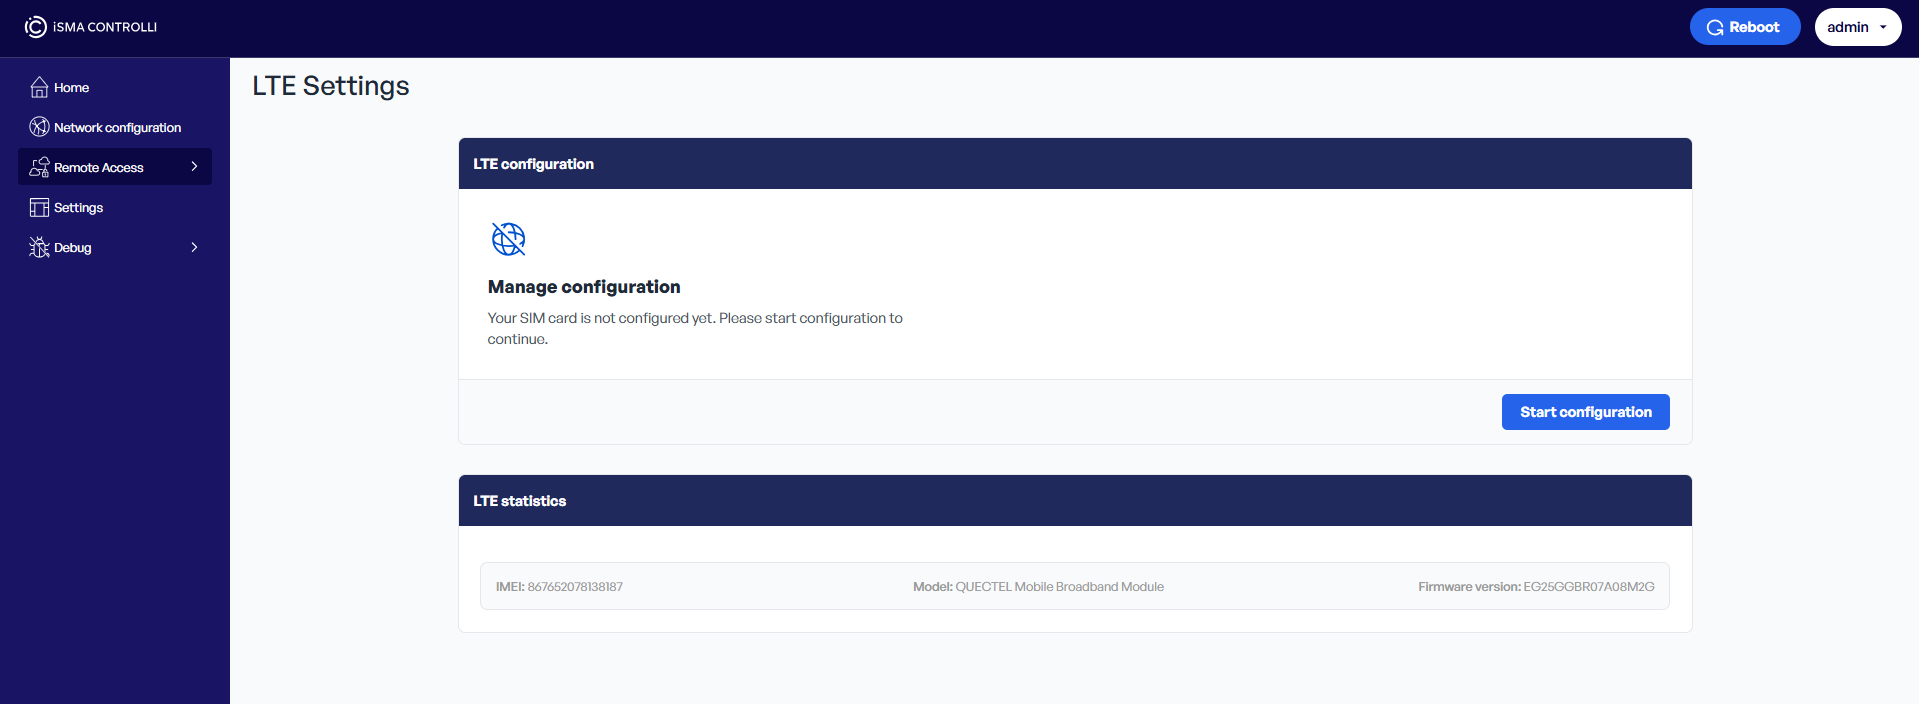
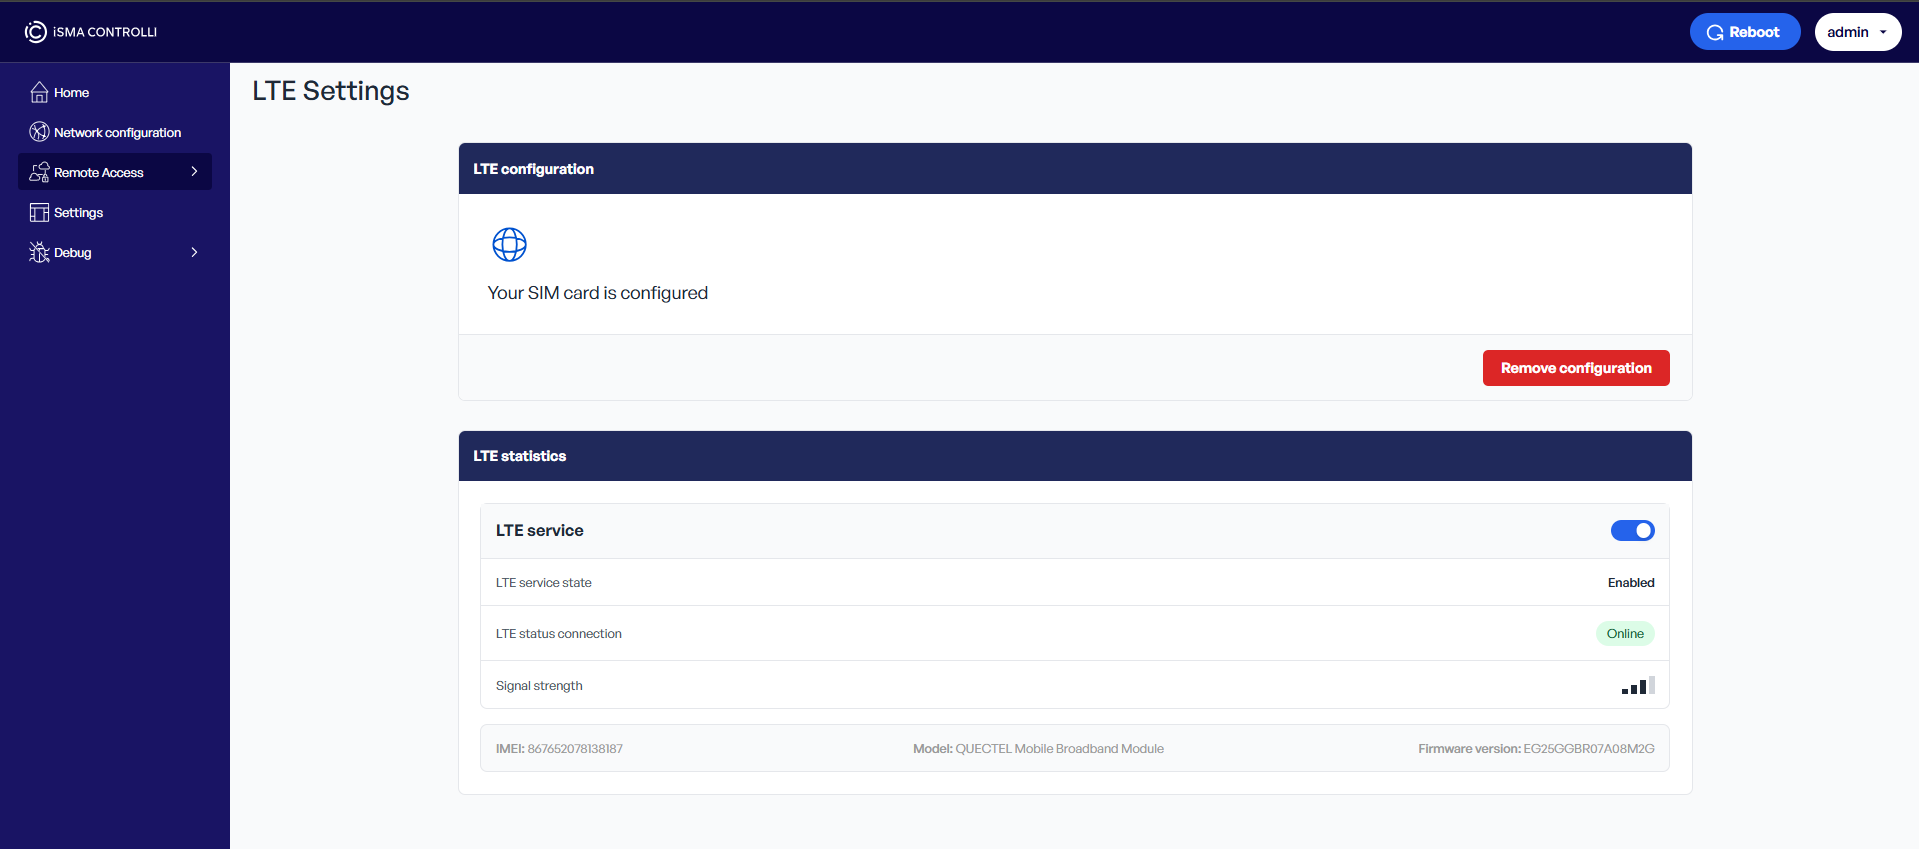
The LTE Settings tab is dedicated to the configuration of an LTE 4G connection with the MAC36PRO controller.
-
LTE Configuration:
The LTE Configuration section allows to set up a SIM card configuration for the LTE connection. To start, press the Start configuration button and follow the instructions, which prompt to fill in a PIN number (if required), APN, and public access protection requirements.
Note
A reboot is required after setting up a SIM card configuration.
-
LTE Statistics:
The LTE Statistics section allows to enable/disable the LTE service, it indicates the LTE service and connection status and shows the LTE signal strength.
To learn more about the LTE connection, please see: LTE Configuration.
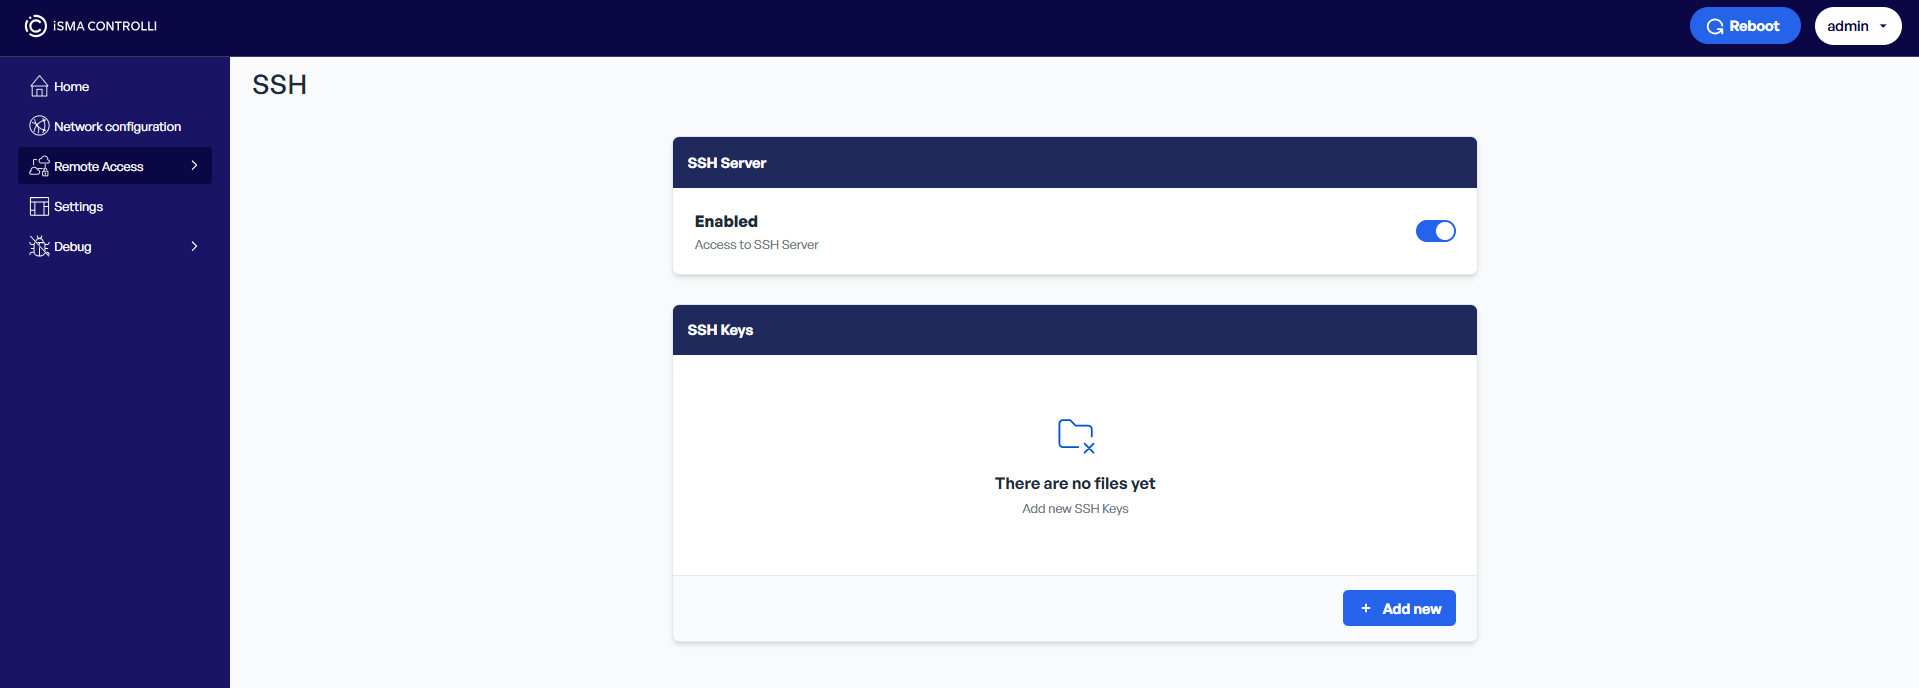
SSH
The SSH tab allows to set up an SSH connection on the MAC36PRO controller.
-
SSH Server:
The SSH Server section allows to enable/disable access to the SSH server.
-
SSH Keys:
The SSH Keys section allows to add a public SSH key(s) to the MAC36PRO controller. To add a new key, use the Add new button. Select the public key file and upload it to the controller. Each new key is associated with a currently logged user in the web server. Each user can be affiliated to a few keys with different names.
To learn more about the SSH connection, please see: SSH Management.
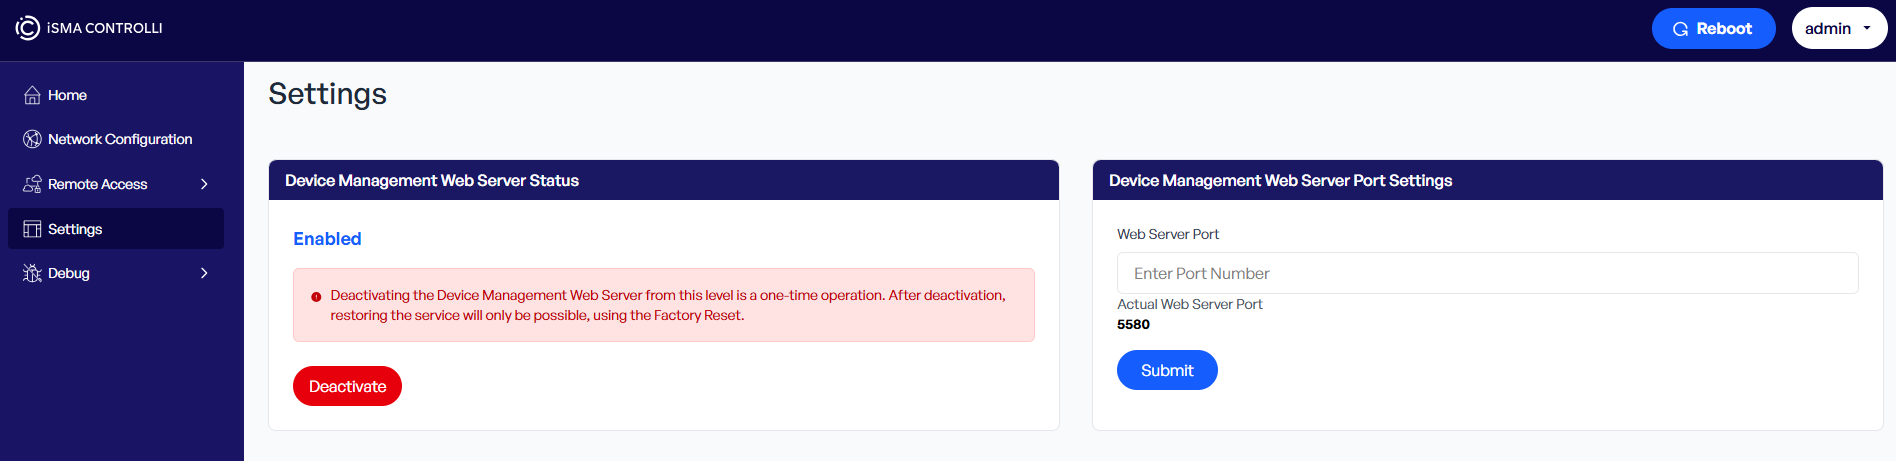
Settings
The Settings tab refers to the basic configuration options related to the web server’s operation and security.
-
Device Management Web Server Status:
For projects with increased security requirements, the Device Management web server can be permanently disabled after the commissioning process.
Note
Once disabled, the Device Management web server becomes inaccessible. The only way to re-enable the web server is a device factory reset.
-
Device Management Web Server Port Settings:
The Device Management web server is configured to use TCP port 5580 by default for incoming HTTPS connections. This port can be changed in the Settings tab to comply with the site-specific security policies or avoid conflicts with other services.
Note
Once the port is changed, access to the web server must be done using the new port number in the URL format: https://[MAC36PRO_IP_ADDRESS]:[new_port]
To confirm changes, it is required to use the Submit button and reboot the controller.
Debug
Logs
The Logs tab allows to manage logs available for diagnostic and troubleshooting purposes.
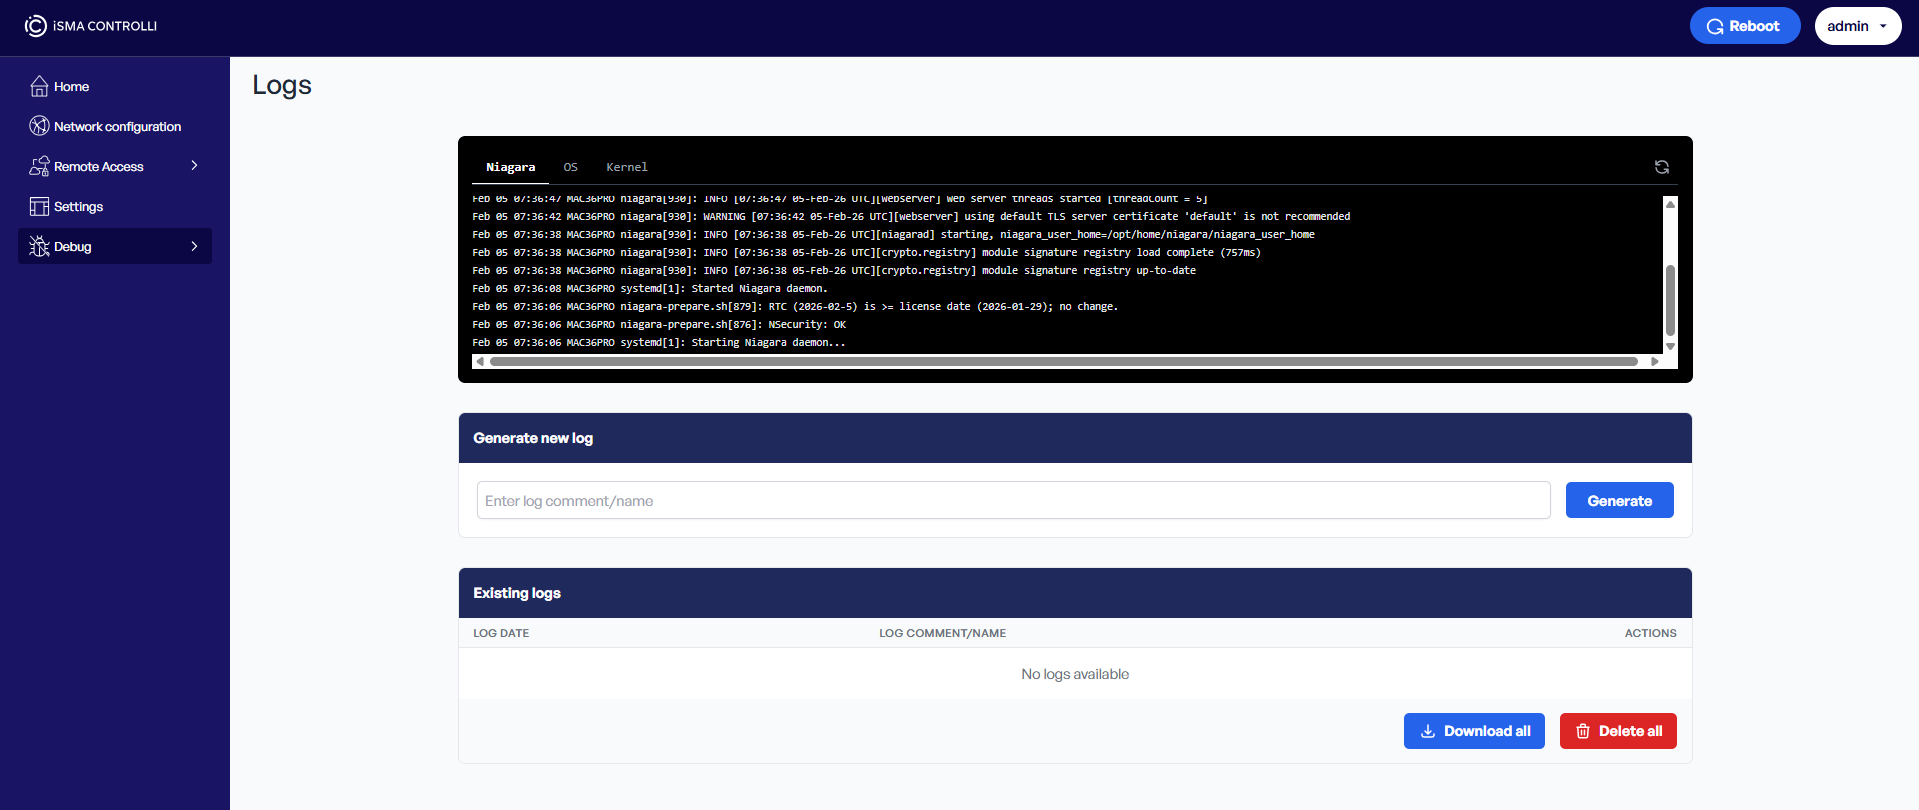
The Logs section offers to download logs categorized in three groups:
-
Niagara: logs from platform,
-
OS: logs from any other applications/scripts executed on the MAC device,
-
Kernel: more HW/FW related logs directly from the kernel of Linux OS.
These logs are downloaded only once, when the web server page is opened. To update logs, use the Refresh icon in the top right corner of the black logs section or refresh the whole page.
-
Generate new log:
The Generate new log section allows to generate a new logs package. To this end, enter a name for the new logs file and use the Generate button.
Tip
For diagnostic purposes, the name of the logs package should be informative and include, for example, a reference to the targeted problem or status of the issue if it is possible to reproduce it.
-
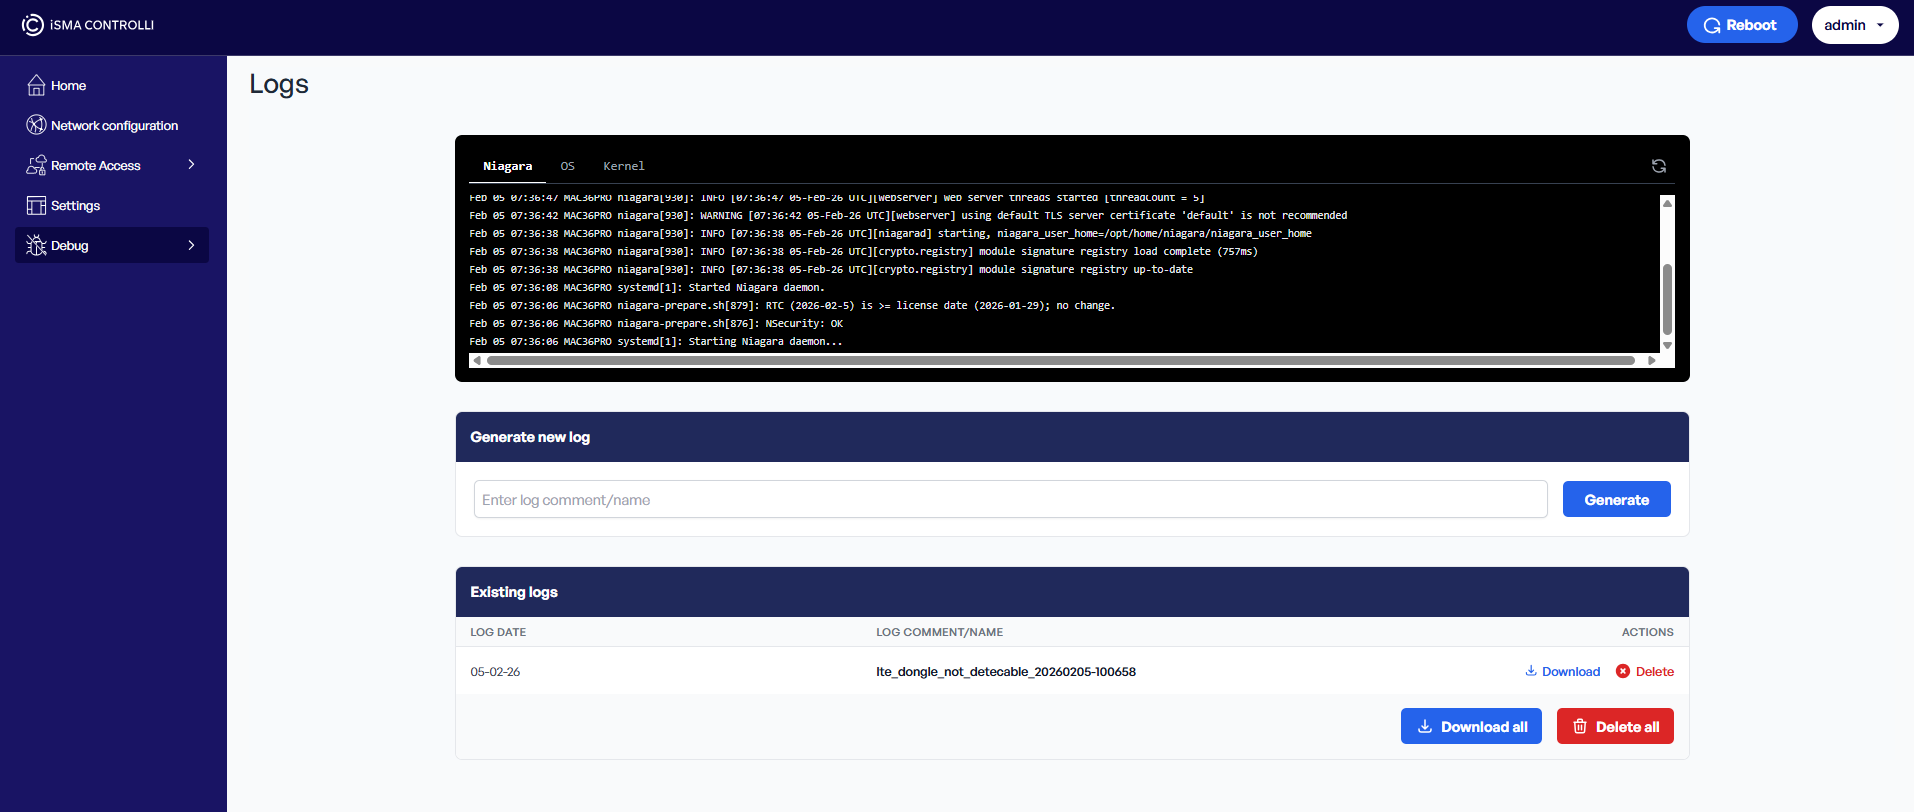
Existing logs:
Once the logs package has been generated, it becomes available to download in the Existing logs section. Use the Download option to download it to a specified location, or Delete to removed it.
Note
Please note that there is a limit of generated logs packages of 10 files. Once the 11th package is generated, the oldest package (1st) is removed.
To learn more about the logs functionality, please see: Logs Manager.
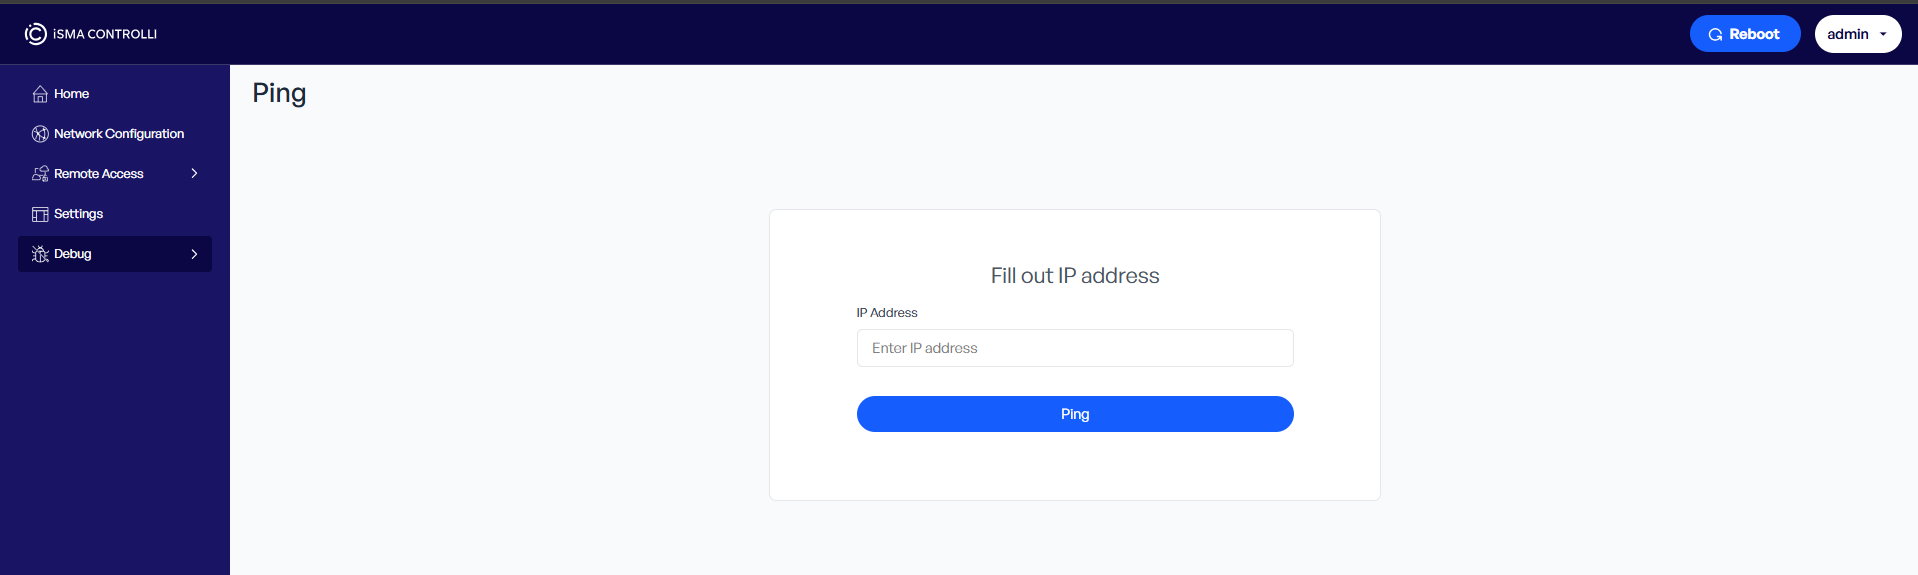
Ping
In the Device Management web server’s tree, under Debug, the Ping tab is available. The Ping tab provides a basic utility for network troubleshooting by allowing users to send ICMP echo requests (ping) directly from the MAC36PRO network stack. It is especially useful for verifying the connection to devices on the OT network, such as IP Multiprotocol I/O modules, VAV14-IP, or RAC18-IP.
To ping the controller, a raw IP address must be entered in IPv4 address format. Domain names are not accepted.
SSH Super User
The SSH Super User tab allows to activate the SSH Super User access to the MAC36PRO controller.
Warning
Please note that the SSH Super User option is strictly reserved for access by the iSMA CONTROLLI Support Department and must not be enabled without a direct request from the iSMA CONTROLLI technical personnel.
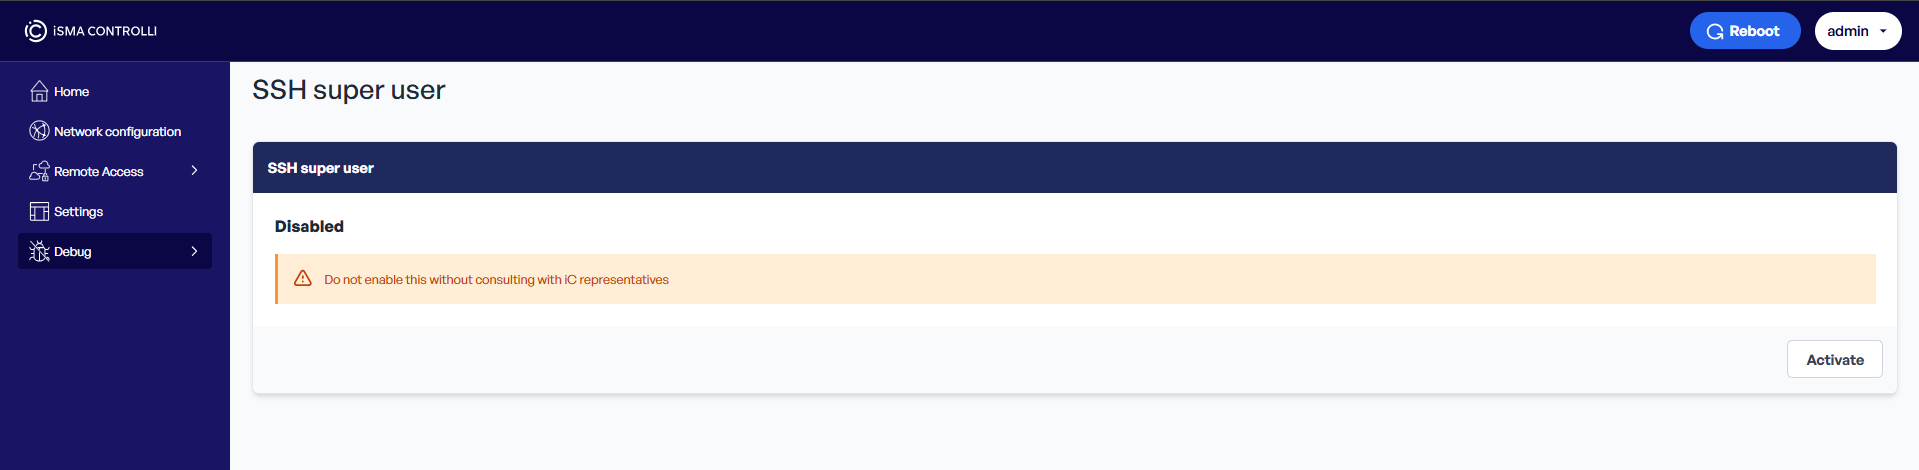
To activate the root key for the SSH Super User access to the MAC36PRO controller. use the Activate button.
To learn more about the SSH Super User access, please see: SSH Management.