The Configuration Tool USB EBV allows to read and write only the configuration information of the valve.
In this Configuration Tool the "Info" tab is missing and it is therefore not possible, for example, to set a command signal to move the actuator or view the graphs of the of the real time valve position, but allows the firmware upgrade (in fact there is the "FW Update" tab in addition to the Modbus version) and to open the Configuration Tool in "Offline" mode (simulator) that allows to interact with the user interface even if the actuator and USB cable are not connected.
When the USB cable is connected between the PC and the actuator, the motor is disabled and therefore if the actuator was moving before the connection, it will stop immediately and then resume the movement towards the previously calculated position once the cable is disconnected.
It is recommended to start the application with the USB cable disconnected on the PC side.
At the first start, you will be asked for authorization to install the USB driver software of the actuator, press the "Install this driver software anyway" option.
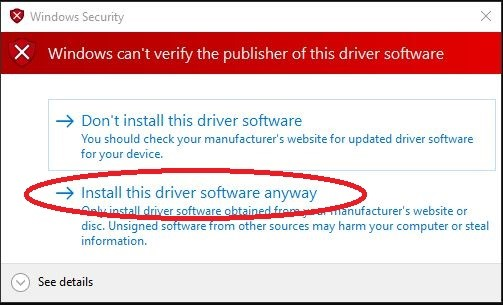
Confirm message of the driver installation
At the start-up the Configuration Tool EBV USB is opened in offline mode. The offline mode allows to interact with the user interface even if the actuator and serial converter are not connected. In this mode it's possible to simulate all Configuration Tool operations except the "Update Page" and "Load File" because these operations need to have the actuator and the serial converter connected.
To switch to the Configuration Tool mode is enough to click on the "OFFLINE" check box to remove the mark.
When the application is started, if the cable is already connected or is connected after opening the configurator, the COM port to which the actuator is connected will be automatically recognized. If the COM port does not appear automatically in the list, the procedure for detecting the COM port is indicated in paragraph 4.2.
In the "Device Manager" window of the Windows OS under "Ports (COM and LPT)" the device will be identified by the description "Controlli USB" with the assigned COM port number next to it in brackets.
For the functions and meanings of the various EBV USB Configurator tabs, see the previous paragraphs.
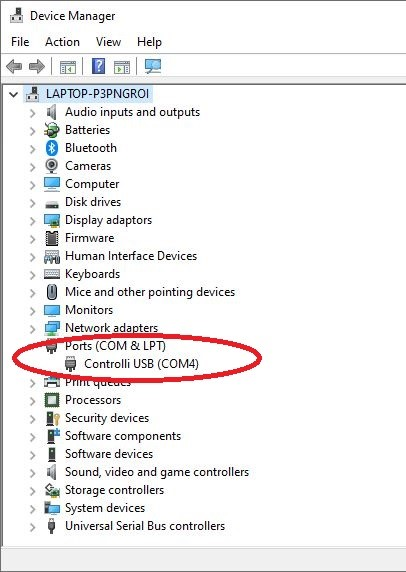
Windows device manager to identify the COM port of the actuator
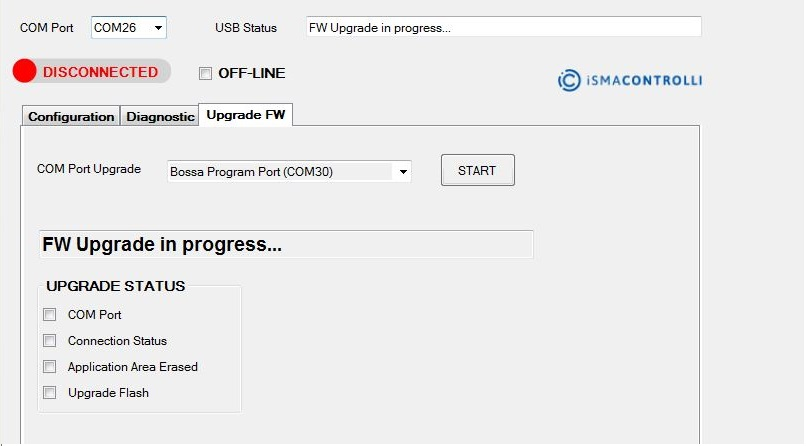
FW Upgrade Tab
In this window it is possible to upgrade the actuator firmware.
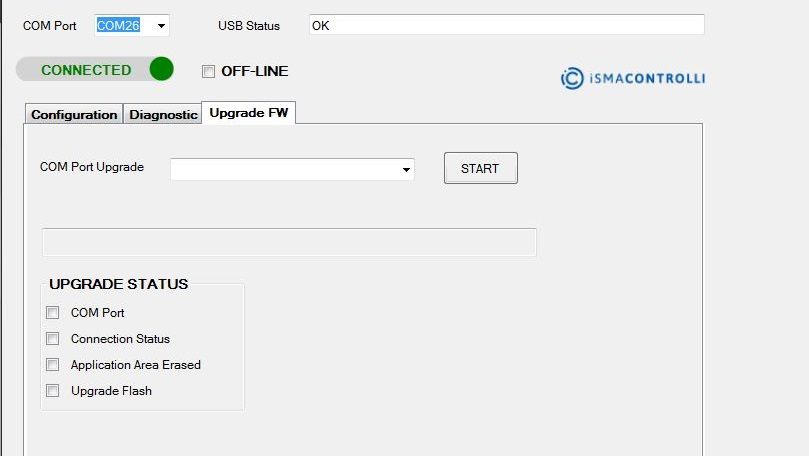
Visualization of the FW Upgrade tab
-
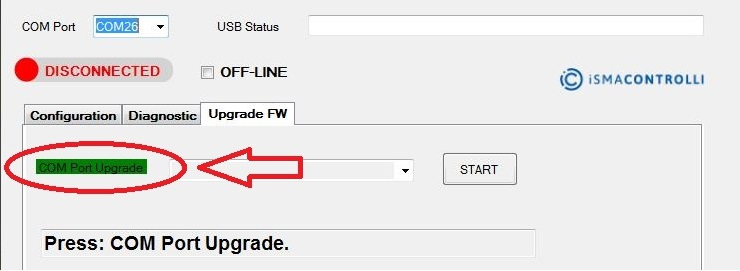
COM Port Upgrade: this drop-down menu displays the COM port used by the bootloader for the firmware update. The corrected COM port is detected automatically ONLY if DIP3 is in the ON position (if the dip3 is initially in the OFF position, after having moved it to ON it is necessary to reset the actuator, this operation is done automatically by the configurator).
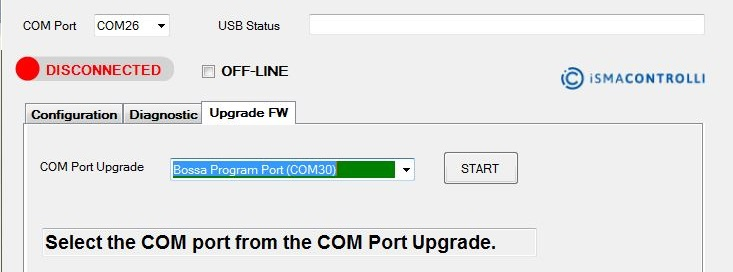
If the automatic search for the COM port is not completed successfully (maximum search time is 90 seconds), pressing the "Upgrade COM Port" label displays all the available COM ports of the computer with their description (the one relating to the bootloader is Bossa Program Port (mainly on Windows 7) or AT91 USB To Serial Converter (mainly on Windows 10)), by selecting the correct COM port and pressing the "Enter" key on the keyboard, the update procedure continues.
-
START: the button allows to continue or repeat an operation in case of errors in the automatic procedure, it must be PRESSED ONLY when a pop-up window warns that it must be used.
-
UPGRADE STATUS: this section includes the status of the firmware upgrade. At the end of the download procedure, the operations marked with a tick in the box and the relative description with a green background were successful, while those without a tick and with the description on a red background failed.
There is also a text box that shows the operation to be performed or the operation in progress and notification messages for the user during the firmware upgrade procedure.
The first operation to perform is to copy the new firmware file (MVEIoT.bin) in the installation folder of the Configuration Tool EBV USB (Program Files (x86) \ Configuration Tool EBV USB) at the same level as where the executable file of the configurator is located (Configuration Tool EBV USB.exe).
The file name must NOT be changed (MVEIoT.bin).
By pressing on the tab, a message asks for confirmation of the desire to update the firmware and suggests leaving only the connection cable between the PC and EBV actuator connected to the USB ports. Pressing the "Yes" button automatically starts the upgrade procedure, pressing the "No" button cancels the start of the procedure (to start it later, change the tab and select the "FW upgrade" tab again or press the drop-down menu item "Update Page").
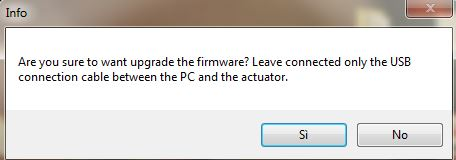
Confirm message of starting firmware upgrade procedure
The upgrade procedure, which starts automatically, is divided into the following steps (various messages will be displayed to guide the user in the upgrade, read very carefully what is requested for each message):
Step 1: Saving the configuration file with the data currently present in the actuator (because the firmware upgrade will erase completely the EBV memory). In this way it will be possible to reload all the necessary information once the new firmware has been updated, as the configuration parameters, the anomaly event counters and the energy data. For saving, a window will be open where to specify the file name to save.
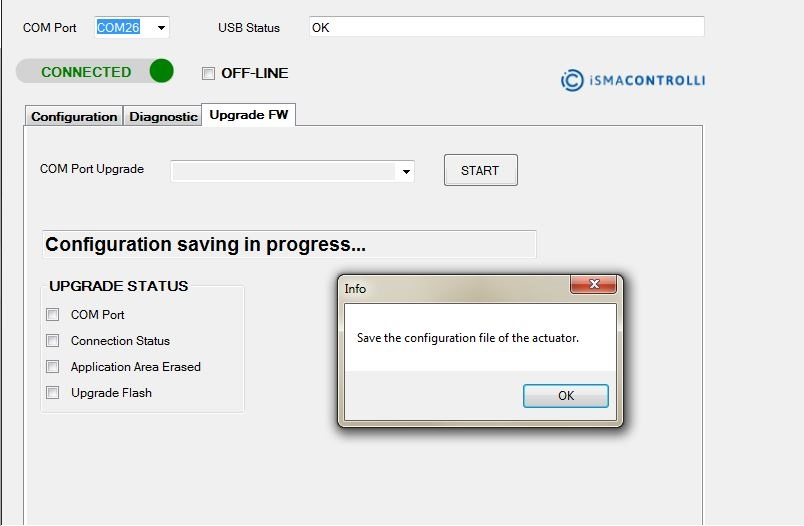
Saving actuator configuration in progress
Step 2: Move the DIP switch 3 to the ON position (essential!) and only after press the "OK" button of the message. To facilitate the movement of the DIP 3 it is suggested to get a small screwdriver or an object with a small tip.
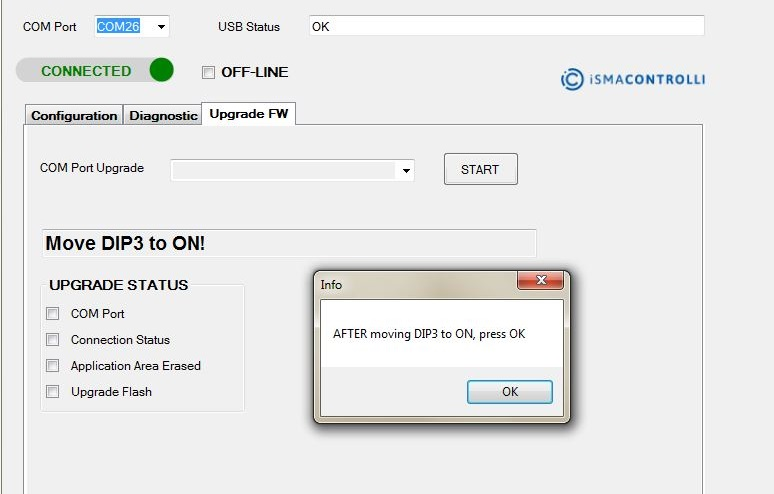
Info message: move DIP 3 in ON
Step 3: The actuator will automatically perform a Reset to enter in the bootloader mode.
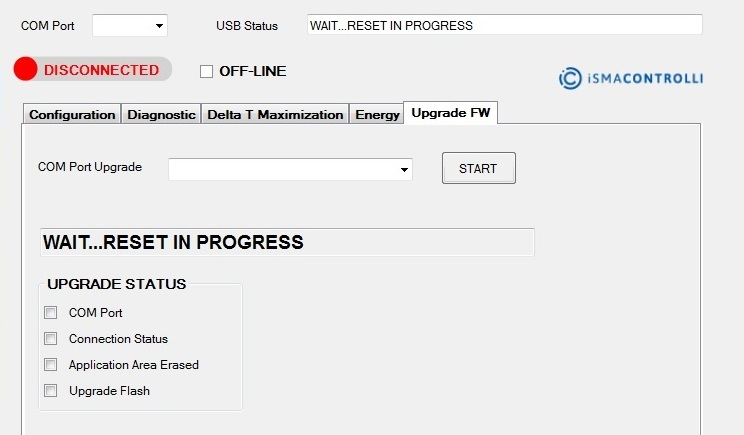
Reset actuator to set the actuator in bootloader mode
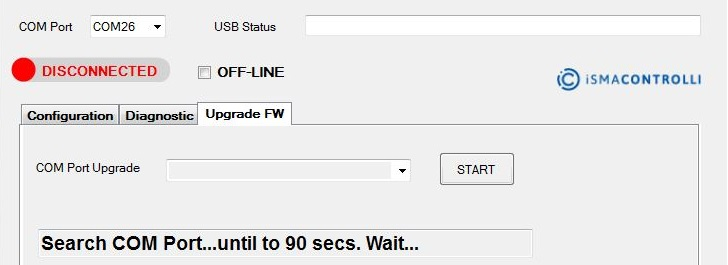
Step 4: An automatic search is perform to find the COM port used by the bootloader (the search has a maximum duration of 90 seconds (marked by a continuously rotating wheel) so that, if it is the very first time that the system enters in bootloader mode, the Windows operating system has time to install the corresponding driver and recognize the specific COM port).
On Windows 10 it may occur that the correct driver is not automatically recognized, and the bootloader COM port driver must be updated, otherwise it is not recognized with the specific name, but with a generic USB Serial Port. To update the driver, from the Windows "Device Manager" panel, open the "Ports (COM and LPT)" item and right-click on the COM detected for the bootloader and press the "Update Driver" item and search for the driver in the "drv" folder of the configurator folder.
If the COM port driver update was carried out within 90 seconds, the port will be automatically detected and will be displayed in the appropriate drop-down menu next to the "Update COM Port" label.
Automatic search of the COM port for bootloader
Step 5: If the COM port was not automatically detected (because for example the driver update took longer than 90 seconds), you can manually search for the available COM ports by clicking on the "COM Port Upgrade" label.
Manual search of the COM port if automatic search has not been successful
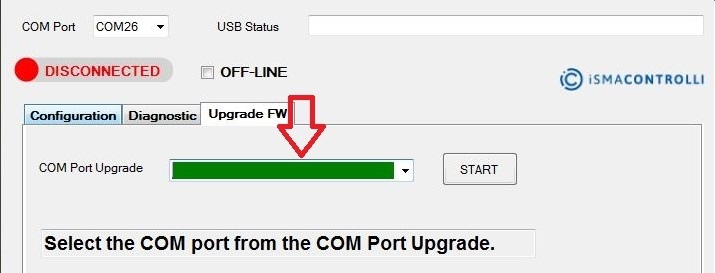
If COM ports have been found, they will be visible in the relative drop-down control and the availability of active COM ports on the PC will be indicated by the green background and therefore it will be possible to check which are by pressing the small arrow pointing down at the end of the drop-down control (beyond the COM also indicates the complete name of the connected device, as showed in the "Windows Device Manager).
COM port detected through manual search
Once the COM has been selected it is necessary to press the Enter key on the keyboard.
Visualization of the COM port for the bootloader
If the desired COM port has not been found, it's possible to press the "COM Port Upgrade" label up to a maximum of 3 times to perform the manual search.
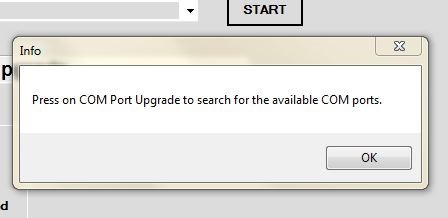
Message of the operation to perform to search COM port manually
Step 6: If the COM port has been detected (regardless of whether with the method in point 4 or point 5), a DOS command prompt window will open automatically, which first checks if the "sam-ba_2.18" has been installed (as indicated in chapter 3.2). In case of forgetfulness, it will carry out the setup and the user will have to follow the instructions on the screen as already indicated in chapter 3.2 without changing any items.
It is important that "sam-ba_2.18" is installed before starting the configuration tool for the first time.
If the "sam-ba_2.18" program is already installed, the update progress operations will be displayed (the erase of the application memory area, the download of the new application into memory and finally a comparison is made between the application just downloaded in memory and the uploaded file to verify that what has been downloaded in memory is correct).
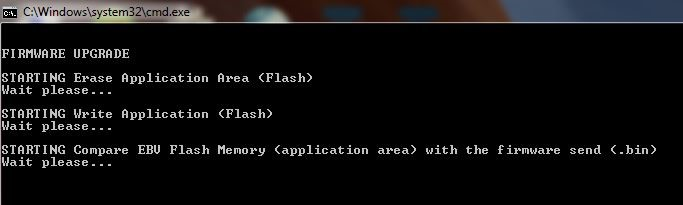
Command Prompt with the operation in progress to upgrade the firmware
Firmware downloading in progress
Step 7: The result of the various operations is indicated at the end of the procedure in the "UPGRADE STATUS" section, if the operation was successful in addition to having the box checked, the description of the operation is on a green background, while in the event of an error there will be no check mark and the error description will be on a red background.
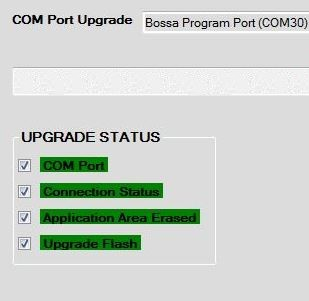
Firmware upgrading successful
In case of errors, the firmware upgrade procedure can be repeated only once by pressing the "START" button when the following information message appears:
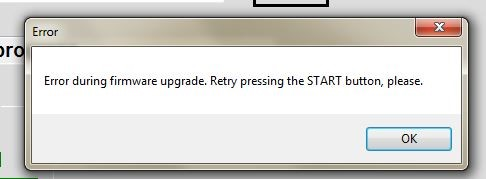
Error message during firmware downloading
Step 8: If the upgrade operation was successful (or if the second upgrade attempt failed), messages will be displayed to the user asking to:
-
Set the DIP 3 to OFF and ONLY then press the "OK" button.
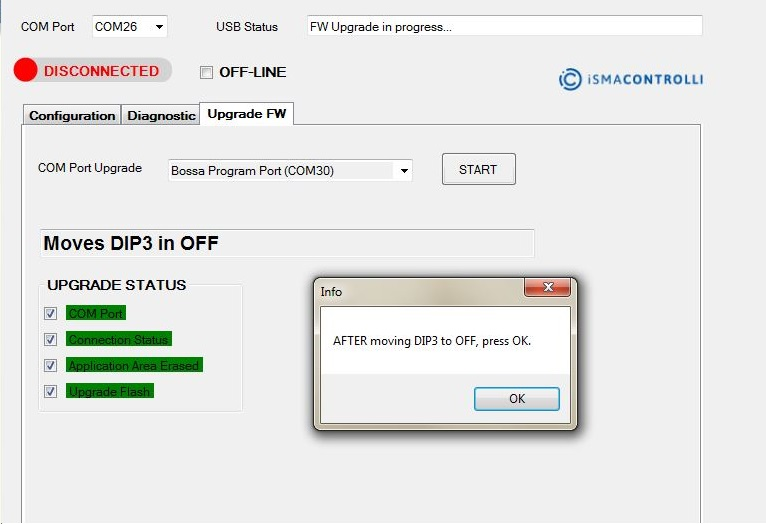
Message to move DIP3 in OFF position
-
Turn off the actuator, wait 5 seconds and turn it on again and then press the "OK" button:
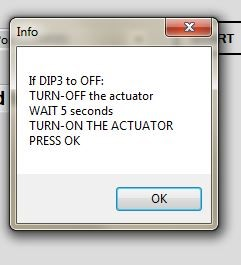
Operations to perform after to have moved DIP3 in OFF position
-
Finally, press the "DISCONNECTED" button to connect again the configurator to the actuator:
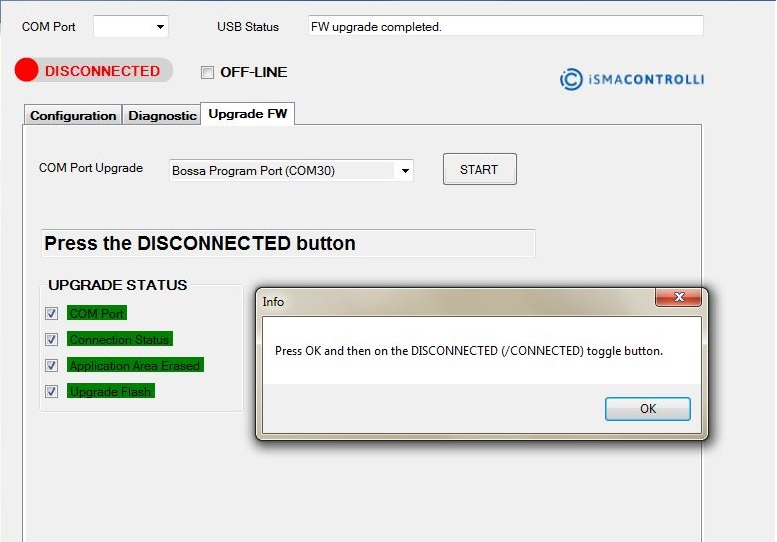
Connect the actuator at the ending of the procedure
-
If the connection is successful, a pop-up message asks to select the configuration file (previously saved in step 1) to be loaded on the actuator (therefore the connection procedure to the actuator must be successful).
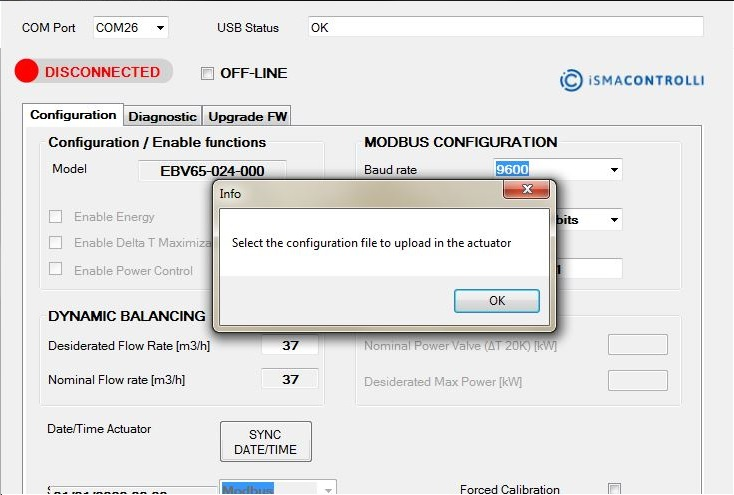
Select the configuration file to reload the data, saved into configuration file before upgrade, inside the database
-
Once the file is selected, loading of the data starts and the progress is indicated by a status bar.
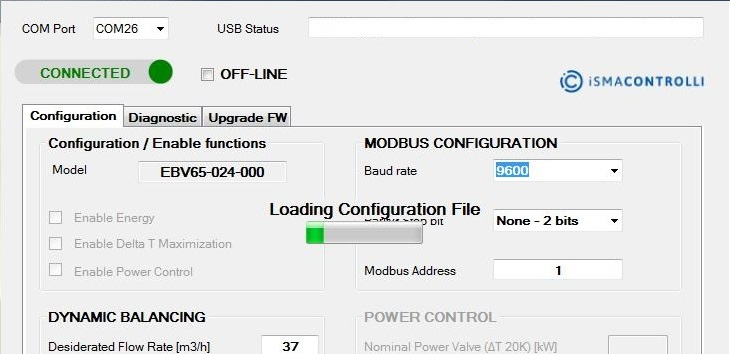
Progress bar to show the configuration file data loading into the actuator
In case of errors during the data download, the same file can be loaded again by selecting from the drop-down menu, located in the upper side of the configurator window, the item "Configuration File" and then the subitem "Load File".
When the connection is made successfully, check in the "FW version" text box that the version has been updated (if the version does not correspond to the desired one, proceed from the beginning).