The Visualization demo application folder contains files required for a demo configuration of the web server:
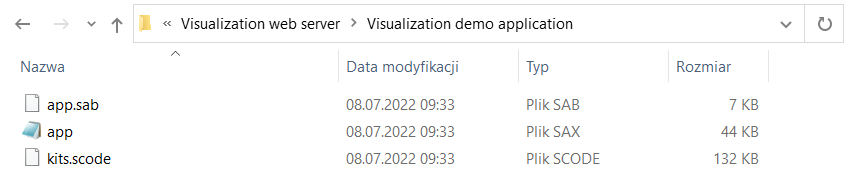
Visualization demo application folder
In order to use the visualization web server, it is required to install a default application, app.sax, which includes predefined folders and components responsible for displaying values on the main page:
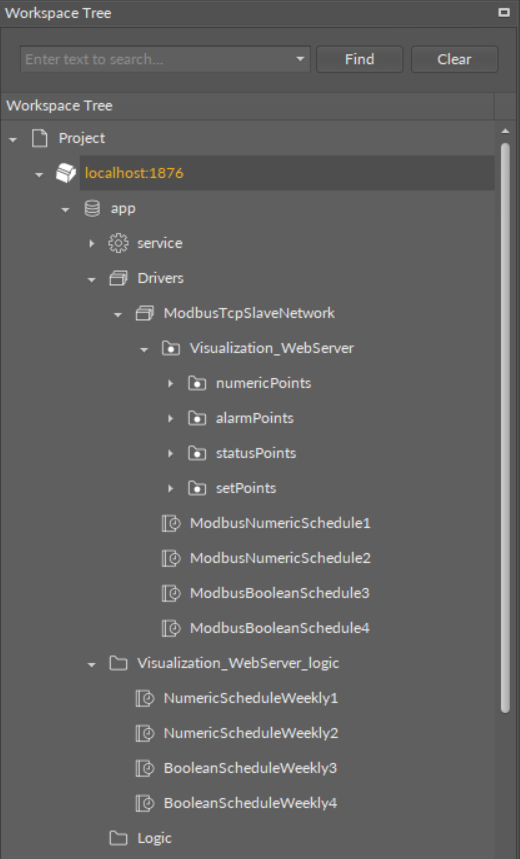
Demo application structure
The visualization demo application contains the following components and folders:
-
ModbusTcpSlaveNetwork in the Drivers folder:
-
Visualization_WebServer Modbus folder:
-
numericPoints folder containing 30 NumericValue components for sensor values;
-
alarmPoints folder containing 16 BooleanValue components for alarm states;
-
statusPoints folder containing 16 BooleanValue components for status states;
-
setPoints folder containing 15 NumericValue and 15 BooleanValue components for setpoints;
-
-
2 ModbusNumericSchedule components linked with numeric schedules from the Visualization_WebServer_logic folder;
-
2 ModbusBooleanSchedule components linked with Boolean schedules from the Visualization_WebServer_logic folder;
-
-
Visualization_WebServer_logic folder in the app component containing:
-
2 NumericScheduleWeekly components linked with Modbus numeric schedules in the ModbusTcpSlaveNetwork;
-
2 BooleanScheduleWeekly components linked with Modbus Boolean schedules in the ModbusTcpSlaveNetwork.
-
The visualization web server uses the demo application to display points values (sensors, alarms, status, and setpoints values) on the main view, and schedules on the schedules view.
Uploading the Visualization Demo Application
Warning!
Installing the visualization demo application on the device with a running user application erases the preexisting application!
If there is a user application installed on the controller, please go to the Using the Visualization Web Server with the User Application section.
Warning!
Before uploading the demo application, please make sure that the iSMA_ModbusTcpSlaveNetwork and iSMA_VisualizationWebServer kits are installed.
In order to install the visualization demo application, it is required to:
-
go to the AAC20 Software Bundle, then the Visualization web server folder and the Visualization demo application folder;
-
copy the app.sax file from this folder;
-
go to the latest iSMA Tool folder, then the home folder and Applications folder;
-
paste the copied app.sax file there;
-
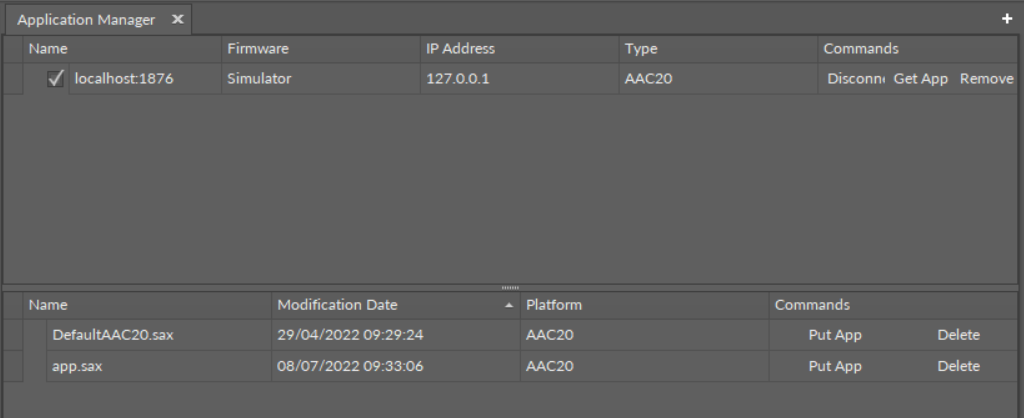
go back to the iSMA Tool program and open the Application Manager for the running device;
-
use the Get App function to refresh a list of available applications;
-
use the Put App function to upload the app.sax file with the visualization demo application.
Please make sure that the iSMA_ModbusTcpSlaveNetwork and iSMA_VisualizationWebServer kits are installed.
Using the Visualization Web Server with the User Application
There are two methods to start using the visualization web server with the user application preinstalled on the device. The first method is to manually add necessary components, and the second involves using the AAC20 simulator to install a demo application and copy necessary files.
Adding Components Manually
In order to use the visualization web server on the device that has the user application running, it is required to add and link the following folders and components (from kits in the Device Kits window):
-
in the Drivers folder:
-
add and configure the ModbusTcpSlaveNetwork component (if already added, use the existing network);
-
(to display sensors, alarms, status, and setpoints values)
-
-
add the Modbus folder (the Visualization_WebServer folder in the demo application), and name it as appropriate;
-
add and configure NumericValue or BooleanValues components that will represent sensors, alarms, status, and setpoints values (possibly, group the components in Modbus folders as in the demo application);
-
-
(to use schedules)
-
-
add and configure the ModbusNumericSchedule and/or ModbusBooleanSchedule components;
-
-
in the logic:
-
add and configure NumericScheduleWeekly and/or BooleanScheduleWeekly components (possibly, group the components into folders as appropriate).
-
Linking
In order for the visualization web server to display schedules properly, it is required to link the NumericScheduleWeekly and/or BooleanScheduleWeekly components with the relevant ModbusNumericSchedule and/or ModbusBooleanSchedule components.
Please note that the visualization web server has priority over the iSMA Tool, so if components are linked, the web server will overwrite any change to the schedule made in the iSMA Tool. In order to make changes to schedule from the iSMA Tool, it is required to unlink schedules components, and reinstate links when the change is completed.
Using the Visualization Demo Application on the AAC20 Simulator
The other method to use the visualization web server on an existing application is to install the demo application (app.sax file) on the simulator (127.0.0.1:1876) and copy the necessary files from the simulator to the controller.
Worth to notice:
Please note that in order to install the demo application to the AAC20 simulator, it is required to copy the app.sax file from the Visualization demo application folder in the Software Bundle to the iSMA Tool's home/Applications folder. Then, use the Get app and Put app functions in the Applications Manager for the AAC20 simulator. The detailed procedure is described in the Uploading the Visualization Demo Application section.
Installing Default the default application on simulator
Components to copy from the demo application are grouped in two folders:
-
the ModbusTcpSlaveNetwork folder contents (Visualization_WebServer folder and ModbusNumericSchedule/ModbusBooleanSchedule components) from Drivers, and
-
the Visualization_WebServer_logic folder to the used device.
After copying the required components, paste them into relevant folders on the destination AAC20 controller.
Warning!
Copying components between 2 different devices is allowed from the iSMA Tool 1.2.6. Please note that the same versions of kits are required on both devices.
If more components are still necessary, it is required to add them manually.
Please notice that, for the schedules to be displayed correctly, it is required to always add a corresponding pair of components for weekly schedule in the logic and Modbus schedule in the ModbusTcpSlaveNetwork (for example, the NumericScheduleWeekly and ModbusNumericSchedule pair).
Linking
In order for the visualization web server to display schedules properly, it is required to link the NumericScheduleWeekly and/or BooleanScheduleWeekly components with the relevant ModbusNumericSchedule and/or ModbusBooleanSchedule components.
Worth to notice:
Please note that the visualization web server has priority over the iSMA Tool, so if components are linked, the web server will overwrite any change to the schedule made in the iSMA Tool. In order to make changes to schedule from the iSMA Tool, it is required to unlink schedules components, and reinstate links when the change is completed.