TCP/IP Settings
A TCP/IP Configuration is one of several platform views. Typically, it is used to initially configure a remote controller’s TCP/IP settings.
Configuring TCP/IP communication settings is a task for the systems integrator, while initially setting up a controller.
Perform the following steps:
-
Open a connection to the platform.
-
Expand the Platform container in the Navigation tree, and double-click the TCP/IP Configuration container.

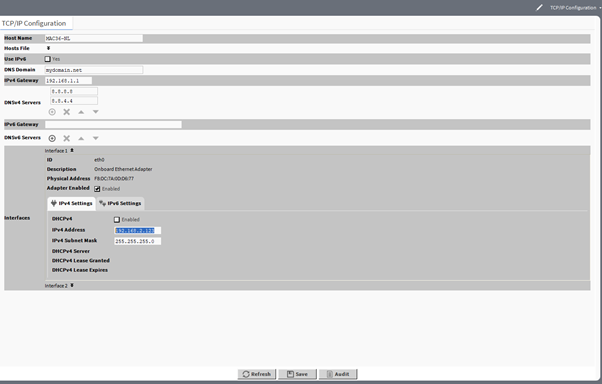
TCP/IP configuration
-
Click the drop-down arrows to expand a group of properties.
For each Ethernet port on the connected platform, the TCP/IP Configuration platform view provides an expandable interface in the Image section.
All compatible MAC36 controllers have two Ethernet ports: ETH1 and ETH2. In the TCP/IP Configuration view, they are listed as Interface 1 (eth0) and Interface 2 (eth1).

Ethernet port configuration
As shown above, each Interface has the following properties at the top:
-
ID: a read-only OS identifier for the hardware interface, such as “eth0” for the MAC36 controller, or, for a Windows platform, either a 128-bit GUID (globally unique identifier) or a Windows network connection name, such as “Local Area Connection 2”.
-
Description: a read-only text string such as “Onboard Ethernet Adapter eth0” for the MAC36 controller, or, i.e., “Intel(R) PRO/100 VE Network Connection” for a Win32-based host, describing a NIC model.
-
Physical Address: the unique 48-bit MAC address of the Ethernet adapter, in six two-hexadecimal digits. For example, for the “eth0” Interface 1 port of the MAC36 controller: F8:DC:7A:0D:D6:77.
-
Adapter Enabled: a checkbox to specify whether the Ethernet port is usable.
The top of the TCP/IP Configuration view provides the platform’s TCP/IP host settings.

TCP/IP host setting
These available host fields are as follows:
-
Host Name: synonymous with “computer name,” this is a string that can be processed by a DNS server to resolve to an IP address. On Windows-based systems, this hostname is the computer’s identification in its workgroup or domain. If using host names, each Niagara platform should have a unique host name.
-
Hosts File: the hosts file is a standard TCP/IP hosts file, where each line associates a specific IP address with a known host name. To review, click the expand control to see all entries.
For the MAC36 controllers, its hosts file can be edited.
To add an entry, click at the end of the last line and press Enter.
Then type the IP address, at least one space, then enter a known host name.
To delete an entry, drag to highlight the entire line, then press Backspace.
Click the expand control again to collapse the Hosts File editor.
-
Use IPv6: the default setting is No (unchecked). If set to Yes (checked), Niagara (platform daemon and station) responds to IPv6 requests, that is, creates IPv6 server sockets (daemon) and IPv6 fox multicast sockets.
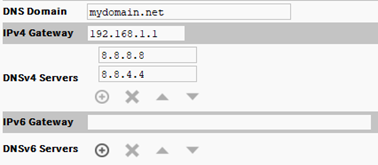
If connected to the MAC36 controller, the DNS and gateway settings are also “host-level” parameters in the TCP/IP Configuration view, as shown below.
Note: For a Windows-based host, DNS and gateway settings are available under each Interface section.

DNS gateway
The available fields for MAC36 controllers are as follows:
-
DNS Domain: the TCP/IP Domain Name System (DNS) domain this host belongs to, if used.
-
IPv4 Gateway: the IP address of the router that forwards packets to other IPv4 networks or subnets. A valid gateway address is required in multi-station (MAC36) jobs to allow point discoveries under Niagara Networks.
-
DNSv4 Servers: the IP address of one or more DNS servers (if available), where each can automate associations between host names and IPv4 addresses. Included are icon-buttons to Add (enter the IP address of the server), Delete, and move Up/Down (set the DNS search order).
-
IPv6 Gateway: the IPv6 address for the router that forwards packets to other IPv6 networks or subnets.
-
DNSv6 Servers: the IPv6 address for one or more IPv6 DNS servers (if available), where each can automate associations between host names and IPv6 addresses. Included are icon-buttons to Add (enter the IP address of the server), Delete, and move Up/Down (set the DNS search order).
To save time, when making multiple changes, enter all changes before continuing.
When the configuration is finished, click Save.
The system displays:

Reboot
Reboot the controller for the changes to take effect.
