The iC Tool allows to manage users of the controller with a dedicated User Manager view. It allows to define a range of changes in controller application for each user. The User Manager is opened by double-clicking the user service in the Workspace Tree window.
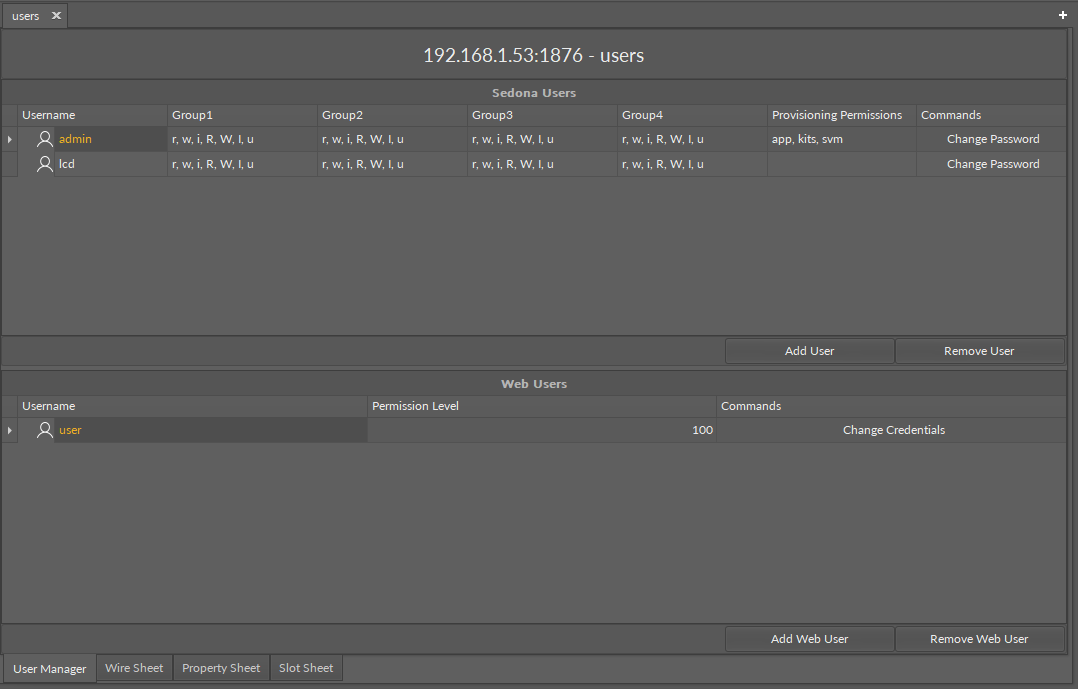
The User Manager view shows the defined users, allows to edit their permissions and passwords, and makes it possible to add a new user and remove an already existing one.
The view is divided into two windows: Sedona Users and Web Users.
Sedona Users
The upper window of the User Manager view is dedicated for Sedona users, who can log in to the controller. By default, two users are set up, admin and lcd, with different access permissions defined in table columns. The admin user has no restrictions (empty columns) and has full access to the controller. The lcd user, which allows to log in to the controller directly from the lcd display in the AAC20-LCD controllers, has defined restrictions in accordance with rules set by Sedona environment.
The view has 7 columns:
-
Username: displays a username of the controller's user;
-
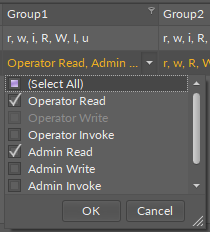
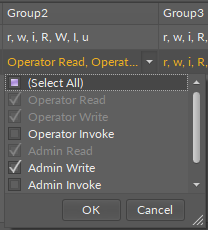
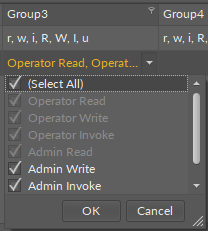
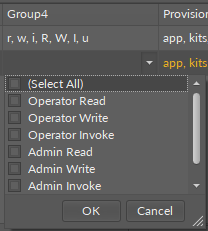
Group1-Group4: shows user permissions given to components assigned to these groups;
-
Provisioning Permissions: defines what services a particular user is able to use;
-
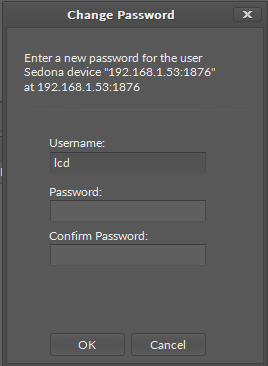
Commands: allows to set a new password for a user.
Clicking each column opens a pop-up window with check boxes to edit users options and permissions.

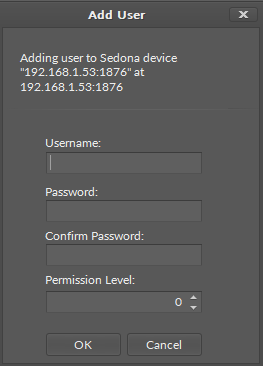
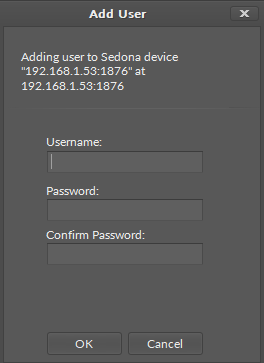
At the bottom of the Sedona Users tab are two buttons to add and remove users. In order to add a user, enter a username and a password. Adding a new user in the iC Tool will automatically create a component named the same as the username and expand the user list in the User Manager view.
Note: It is not recommended to change the username (component’s name) after setting a password. If it is necessary to change the username, a new password should be set for it.
Note: In case a component representing a user is duplicated to create a new user with the same permissions, new user should also have a new password set.
Removing of a particular user may be done using two methods: either by removing the row in User Manager view, selecting it and pressing the Remove user button, or by removing the component representing that user.
Web Users
The bottom window of the User Manager view is the Web Users view. Web users are designed to log in to the AAC20 visualization web server.
The view has 3 columns:
-
Username: displays a username of the web user;
-
Permission Level: allows to set a permission level for the user;
Note: The permission level of the user is correlated with the permission level of schedules determined in the Visualization_configurator.xlsm file. If the user's permission level is lower than the schedule's required level of permissions, the schedule will not be displayed for this user after logging in to the visualization web server.
-
Commends: allows to set new credentials for a user.
Note: In order to change a username, it is required to change password at the same time too.
At the bottom of the Web Users tab are two buttons to add and remove users. In order to add a user, enter a username, password, and permission level. Adding a new user in the iC Tool will automatically create a component named the same as the username and expand the user list in the User Manager view.