Sockets Available in the iSMA-B-AAC20 Controller
The iSMA-B-AAC20 controller has 16 sockets for Modbus network. 3 out of 16 sockets are permanently occupied for:
-
Modbus Server;
-
SOX;
-
web server.
Consequently, there are 13 sockets left to use in the device, for example, the Modbus TCP network can communicate with 13 devices with different IP addresses and connect them to application (adding more devices automatically forces them into the fault status). Also, adding any of the iSMA Weather or iSMA MailService kits occupies 1 socket per each kit (which becomes apparent after adding the kit and its components, saving the application, and rebooting the controller). The iSMA MailService kit can occupy more sockets if the mail service is configured for one account on one host–each next host occupies next sockets.
Installing Kit
To install the iSMA MailService kit, import the kit to the iSMA Tool software (possibly as part of the package of various kits in a zip file). In order to do this, use an application from the Sedona -> Import Sedona Files.
After a successful import of files, upload them to the device using the Kit Manager from Sedona Tools package.
WARNING! Before programming the iSMA MailService, please check if the latest kit version is used. The latest kit is available at iSMA CONTROLLI support web site: ismacontrolli.com.

Sedona installer
After a successful import of all packages, upload the files to your device using the Kit Manager tab, available from the Object Properties window or at the right-click on the device name in the iSMA Tool Tree window.
To install a selected kit:
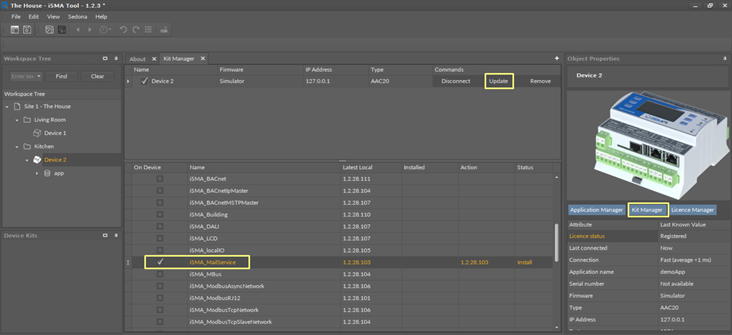
Step 1: Open the iSMA Tool, connect to the device, and go to the Kit Manager tab, available from the Object Properties window or at the right-click on the device name in the Workspace Tree window;
Step 2: Select the iSMA MailService kit, then click the Update command as per the figure below;
Step 3: The component is installed successfully.
Installing the kit
Removing Kit
To remove the selected kit:
Step 1: Open the iSMA Tool, connect to the device, and remove all iSMA MailService kit’s components from the application;
Step 2: Go to the Kit Manager tab, available from the Object Properties window or at the right-click on the device name in the Workspace Tree window;
Step 3: Uncheck the iSMA MailService kit, then click the Update command;
Step 4: Components uninstallation was successful.